12+ Dorm Living Room Ideas You’ll Actually Love
Your dorm living room doesn’t have to feel cramped or sterile—it’s your chance to create a cozy, personalized retreat that makes studying more enjoyable and hanging out with friends even better.
Whether you’re working with a tiny common area or a surprisingly spacious lounge, these ideas will help you maximize every inch while expressing your unique style without breaking the bank or violating housing rules.
The links in this post may be affiliate links. If you purchase through them, I may earn a small commission at no extra cost to you.
1. Multi-Functional Storage Ottoman Seating
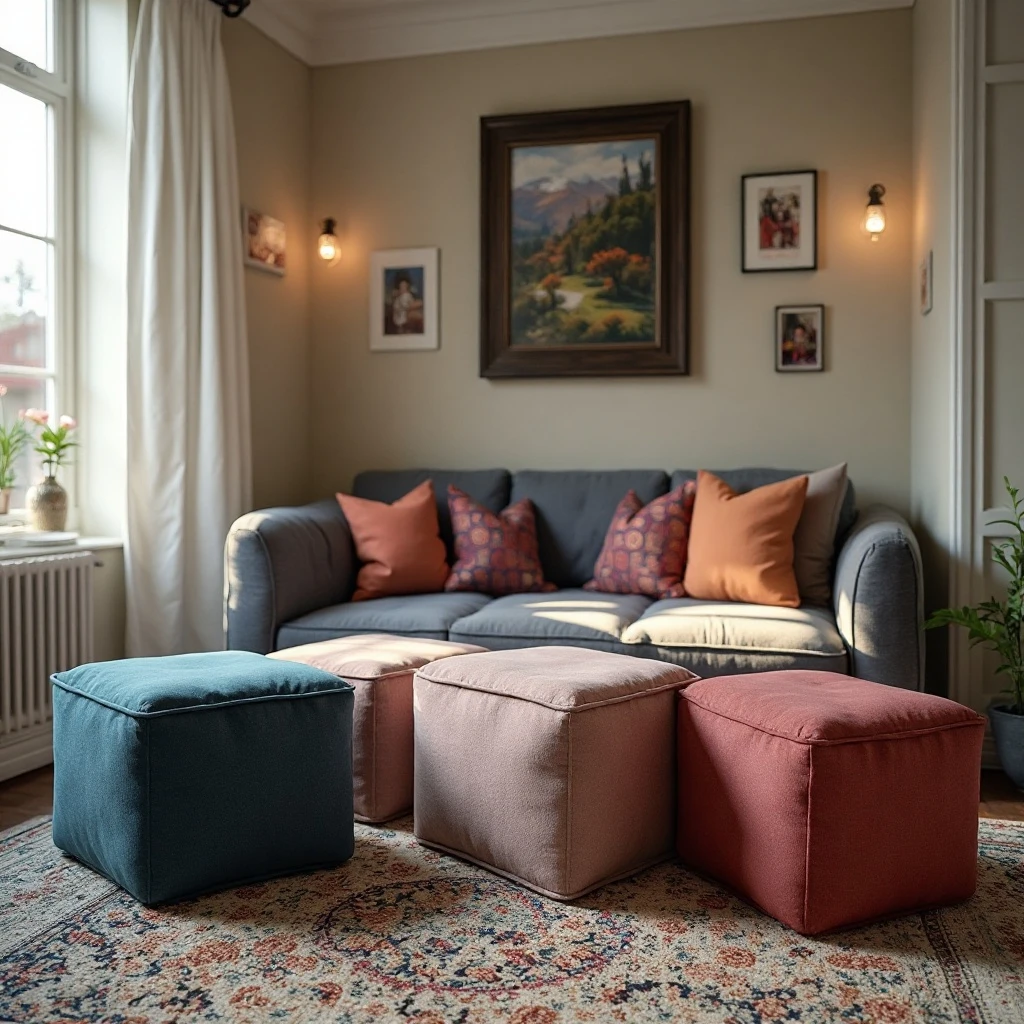
Create flexible seating that doubles as hidden storage using fabric storage ottomans or cube organizers topped with cushions. Arrange 3-4 ottomans in a cluster that can be rearranged for movie nights, study groups, or solo relaxation time. Shop on Amazon
Why It Works: Ottomans solve the dorm dilemma of needing extra seating for guests while providing crucial storage for blankets, textbooks, or snacks. They’re lightweight enough to move around easily, can serve as coffee tables or footrests, and most importantly, they don’t take up permanent floor space like traditional furniture.
How to Style It:
- Choose ottomans that are 16-18 inches tall for comfortable seating and standard table height compatibility
- Select cube ottomans with removable lids in durable fabrics like polyester or canvas that can handle daily use
- Layer colorful floor cushions nearby for additional flexible seating that stacks away when not needed
- Coordinate colors with your overall room palette—neutrals with one accent color work best for versatility
Where to Use It: Small dorm lounges, suite common areas, studio-style dorm rooms, apartment-style dorm living spaces
Pro Tip: Place a large wooden tray on top of an ottoman to instantly transform it into a stable coffee table surface for drinks and snacks, then remove the tray when you need the seating.
2. Pegboard Wall Organization System
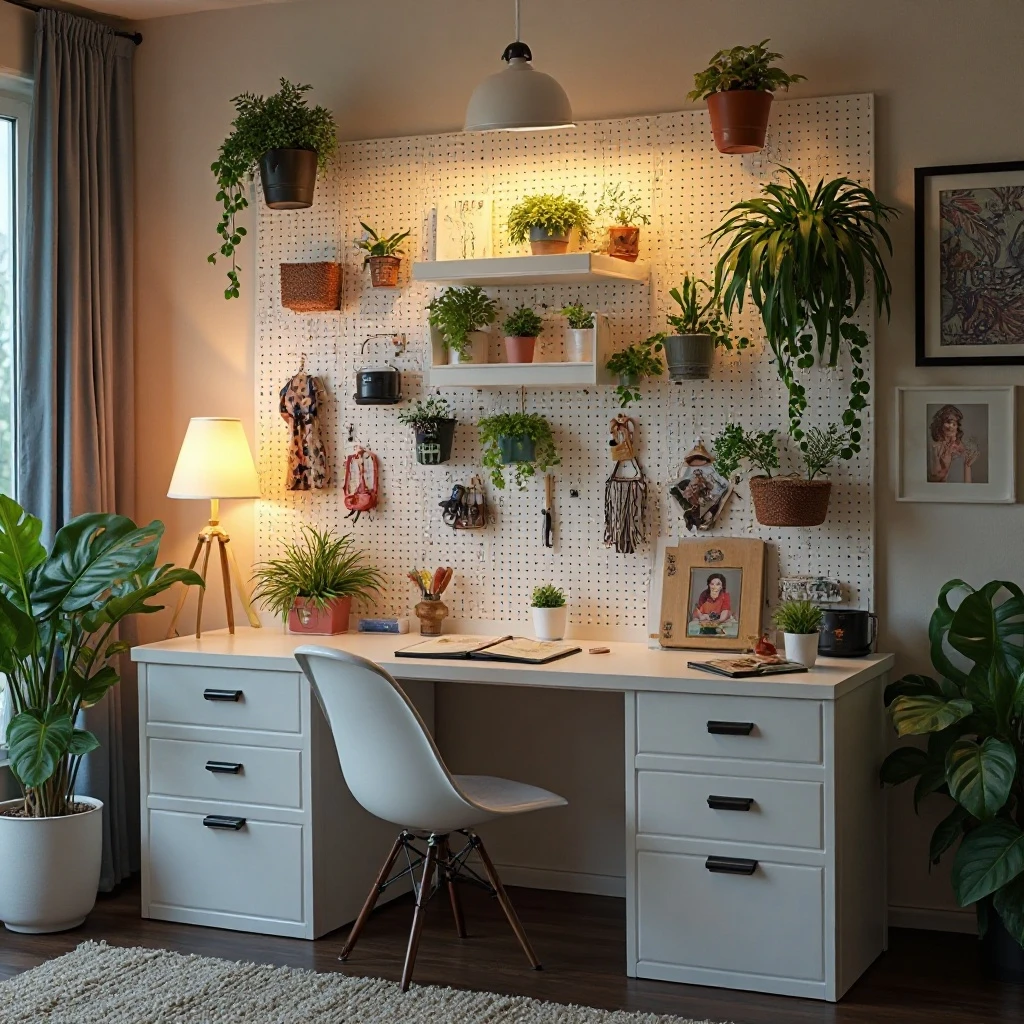
Install a large pegboard (24×36 inches minimum) on the wall as both functional storage and decorative art. Use hooks, small shelves, and baskets to hold everything from keys and headphones to plants and string lights. Shop on Amazon
Why It Works: Pegboards are completely customizable and damage-free when mounted with Command strips, making them perfect for rental restrictions. They turn vertical wall space into valuable storage while creating an Instagram-worthy focal point that showcases your personality through the items you display.
How to Style It:
- Paint the pegboard in a bold color like navy, sage green, or millennial pink to make it a statement piece
- Mix practical items (charging cables, water bottle) with decorative ones (small plants, photos, art prints)
- Create zones on the board: top section for frequently used items, middle for decorative elements, bottom for heavier items
- Use matching accessories (all brass hooks or white baskets) to maintain visual cohesion despite variety
Where to Use It: Above a desk area, entrance wall near the door, behind a seating area, narrow wall spaces
Pro Tip: Attach small metal clips to the pegboard hooks to create an ever-changing photo gallery that’s easier to update than traditional frames and adds personal warmth to your space.
3. Floor Pillow Lounge Area
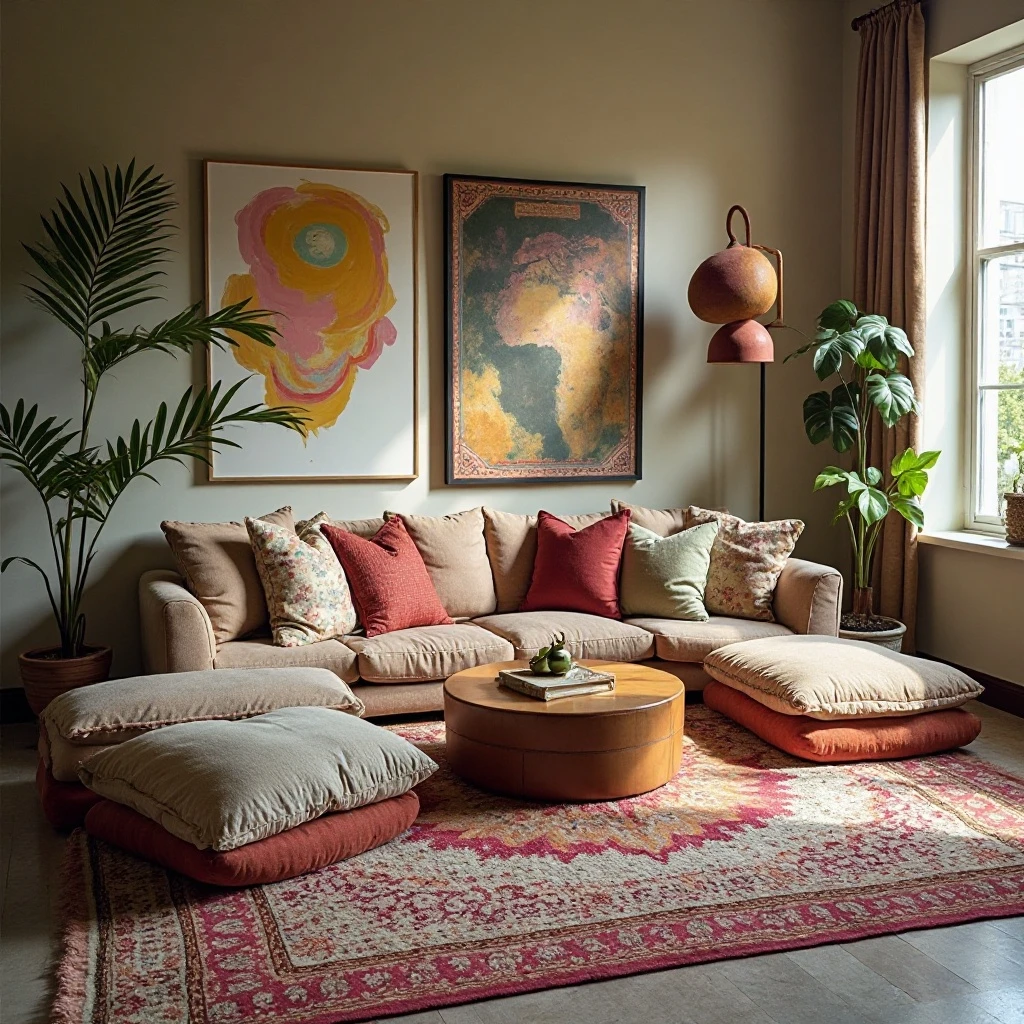
Design a bohemian-inspired seating zone using oversized floor pillows (24-26 inches square), layered rugs, and a low coffee table or large tray. This creates an intimate gathering space that feels intentionally cozy rather than furniture-deprived. Shop on Amazon
Why It Works: Floor seating maximizes vertical space by keeping sightlines open, making small rooms feel larger. It’s also incredibly budget-friendly, highly movable for different activities, and creates the relaxed, casual vibe that encourages friends to stay and hang out.
How to Style It:
- Layer a large area rug (5×7 feet minimum) over dorm flooring, then add a smaller textured rug on top for depth
- Mix pillow sizes—combine 26-inch floor cushions with 18-inch poufs and standard throw pillows for back support
- Position pillows in a U-shape or circle to facilitate conversation and create an intentional gathering spot
- Add a low-profile coffee table (under 16 inches high) or use a large wooden tray elevated on stacked books
Where to Use It: Corner nooks, in front of windows with good natural light, center of open-plan dorm rooms, bonus rooms
Pro Tip: Choose floor pillows with removable, washable covers in durable outdoor fabric—they’re spill-resistant and will survive an entire semester of pizza nights and coffee spills.
4. Tension Rod Room Divider with Curtains
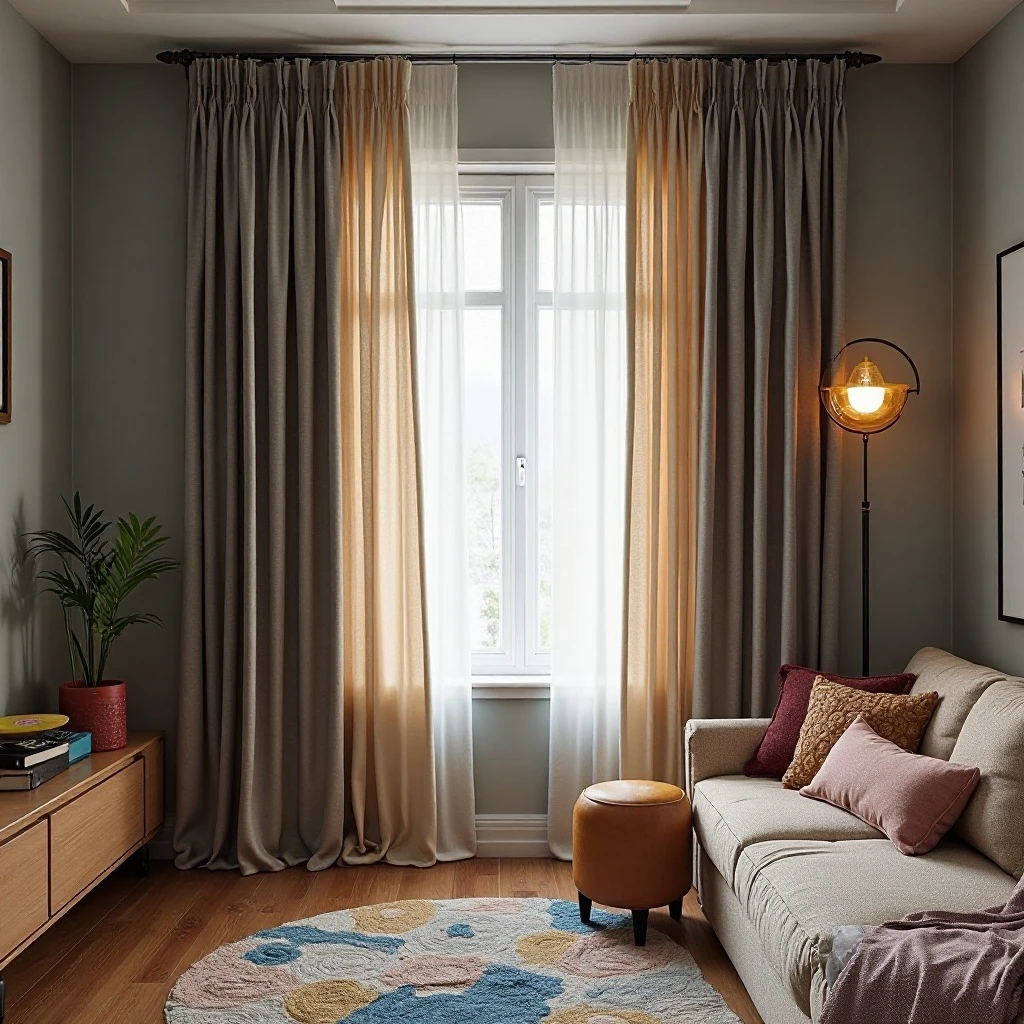
Use one or two tension rods with lightweight curtains to create flexible room zones—separating sleeping areas from living space, creating a dressing area, or adding a backdrop for video calls. Shop on Amazon
Why It Works: Tension rods require zero wall damage and can be removed in seconds, yet they dramatically improve functionality by creating privacy and visual separation in shared spaces. Curtains also add softness, color, and sound absorption to echo-prone dorm rooms with hard surfaces.
How to Style It:
- Install rods at ceiling height (or as high as possible) to make ceilings appear taller and maximize the sense of space
- Choose sheer curtains for light filtering and openness, or canvas/cotton for complete privacy when needed
- Select curtains 12-24 inches wider than the space to create fullness when drawn closed
- Coordinate curtain colors with your bedding or seating to tie the room together visually
Where to Use It: Shared bedrooms, studio-style dorms, between sleeping and study areas, creating closet space
Pro Tip: Hang string lights or garland along the top of the tension rod to make the divider feel like an intentional design feature rather than a makeshift solution.
5. Gallery Wall with Removable Adhesive

Create an impactful gallery wall using Command strips, washi tape, or adhesive poster strips to display a mix of prints, photos, postcards, and inspirational quotes in various frame sizes. Shop on Amazon
Why It Works: A well-curated gallery wall immediately personalizes sterile dorm walls and serves as a conversation starter. It reflects your interests, memories, and aesthetic preferences while filling blank wall space that would otherwise make the room feel unfinished and temporary.
How to Style It:
- Plan your layout on the floor first, leaving 2-3 inches between each frame for visual breathing room
- Mix frame sizes but stick to 2-3 coordinating colors (all black, all wood, or black and gold)
- Include a variety of art—photos, typography prints, illustrations, and pressed botanicals for visual interest
- Start with the largest piece at eye level (57-60 inches from floor to center) and build outward
Where to Use It: Above seating areas, long narrow walls, space above desks, entryway walls
Pro Tip: Use plates, clipboard frames, and floating shelves mixed with traditional frames to add depth and make swapping out images effortless when you want to refresh your space mid-semester.
6. Convertible Desk-to-Dining Setup
Transform your desk area into a casual dining and entertaining space by adding a table runner, keeping desk accessories in a portable caddy, and surrounding it with seating that serves dual purposes. Shop on Amazon
Why It Works: Most dorms lack dedicated dining space, forcing students to eat on beds or laps. A desk that converts for meals creates a proper gathering spot, makes eating together more enjoyable, and maintains boundaries between study time and social time.
How to Style It:
- Store desk supplies in a single portable caddy or drawer organizer that you can relocate in 30 seconds
- Keep a folded tablecloth or runner in a drawer to transform the surface instantly for meals
- Position the desk centrally in the room rather than against a wall so people can sit on multiple sides
- Add a small vase with fresh or faux flowers that stays in place to make the space feel intentional
Where to Use It: Studio apartments, dorm rooms with generous desk space, shared suites with communal desks
Pro Tip: Designate matching dinner plates, cloth napkins, and real glasses (not disposable) for group meals—this small ritual elevates dorm dining and makes your space feel more adult and intentional.
7. Vertical Garden with Hanging Planters
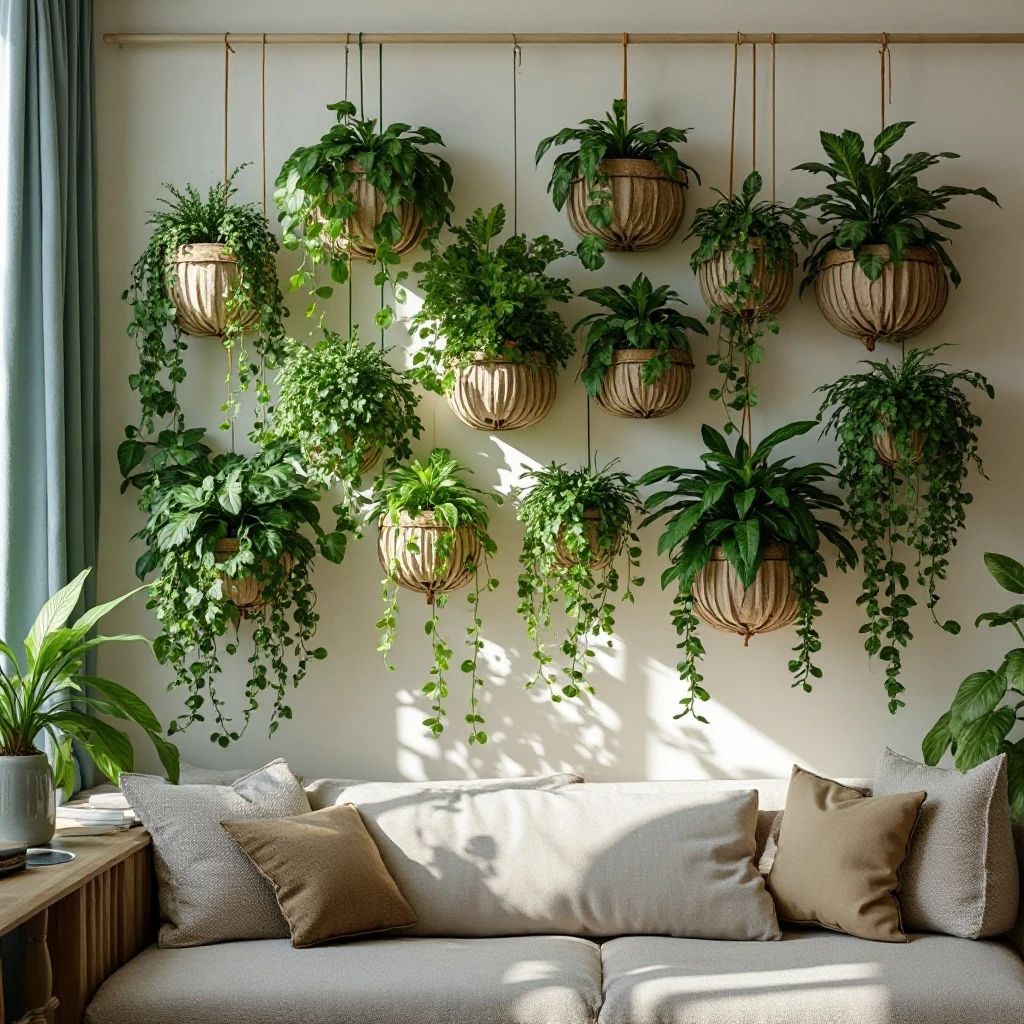
Install a vertical garden using macramé plant hangers, wall-mounted planters, or a tension rod with S-hooks to display pothos, philodendrons, or other low-maintenance trailing plants. Shop on Amazon
Why It Works: Plants improve air quality, reduce stress, and bring life to institutional spaces without taking up precious surface area. Vertical gardens draw the eye upward, making rooms feel taller, while trailing vines add movement and organic softness that contrasts with harsh dorm furniture.
How to Style It:
- Choose 3-5 planters at varying heights (stagger by 8-12 inches) to create visual rhythm
- Use pothos, spider plants, or philodendrons—they tolerate inconsistent watering and low light conditions
- Match planter styles (all macramé, all ceramic, or all modern geometric) for cohesive design
- Position plants near windows but not in direct harsh sunlight to prevent leaf burn
Where to Use It: Near windows, corner spaces, above seating areas, flanking doorways or windows
Pro Tip: Add battery-operated fairy lights woven through the plant hangers in the evening to create ambient lighting that makes your living room feel like a trendy coffee shop.
8. Rolling Bar Cart Station
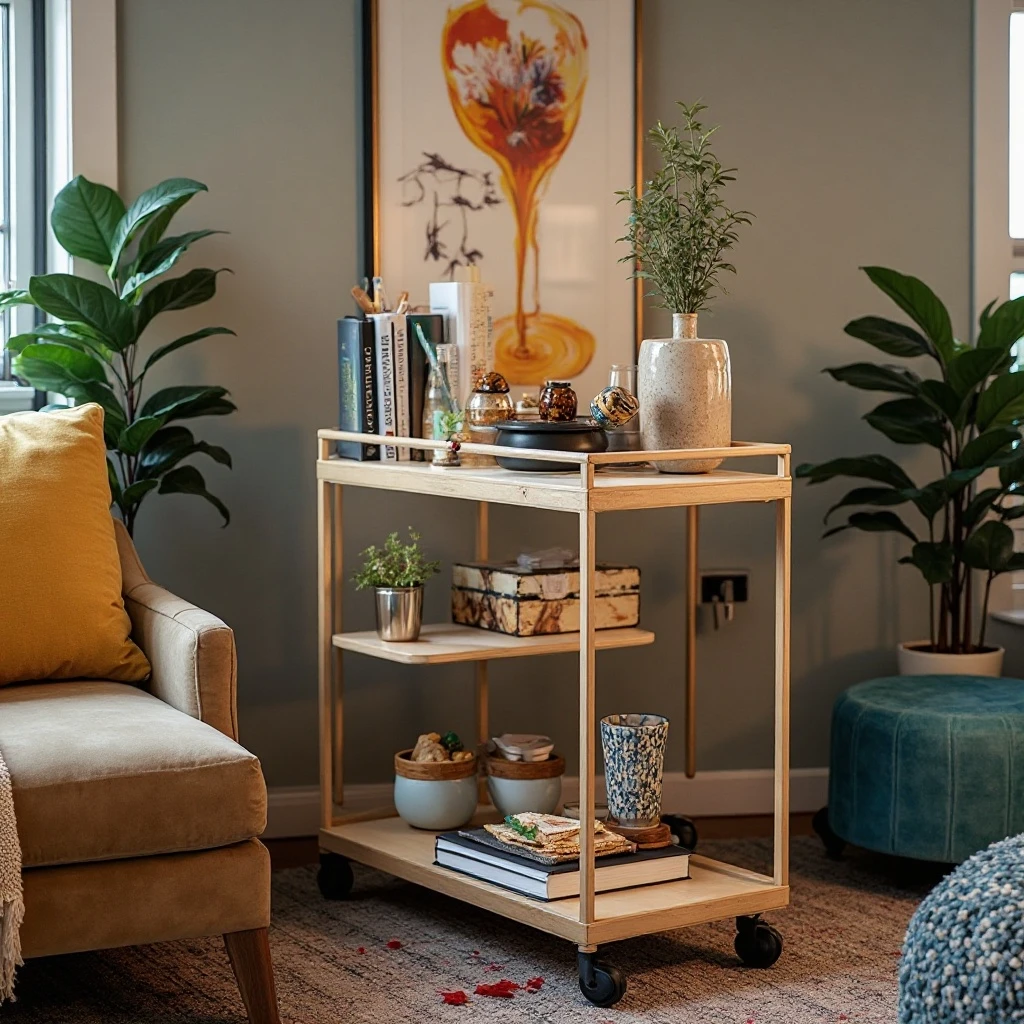
Repurpose a rolling bar cart as a multi-functional station for snacks, coffee supplies, study materials, or even as a mobile side table that can be positioned wherever needed. Shop on Amazon
Why It Works: Bar carts are compact, mobile, and incredibly versatile—they can serve as a coffee station in the morning, a snack center during study sessions, and extra surface space during gatherings. The wheels make it easy to tuck away or reposition as needs change throughout the day.
How to Style It:
- Stock the top shelf with attractive containers—glass jars for coffee, tea, or snacks create visual appeal
- Use the middle shelf for mugs, small plates, or frequently used textbooks you want within reach
- Store overflow items like extra napkins, tea bags, or charging cables in baskets on the bottom shelf
- Add a small plant, decorative tray, or string of lights on top to make it feel curated rather than purely functional
Where to Use It: Next to seating areas, in kitchenette corners, beside desks, in room entryways
Pro Tip: Choose a cart with a handle so you can easily pull it next to your desk during late-night study sessions or beside your bed when you’re sick and need everything within arm’s reach.
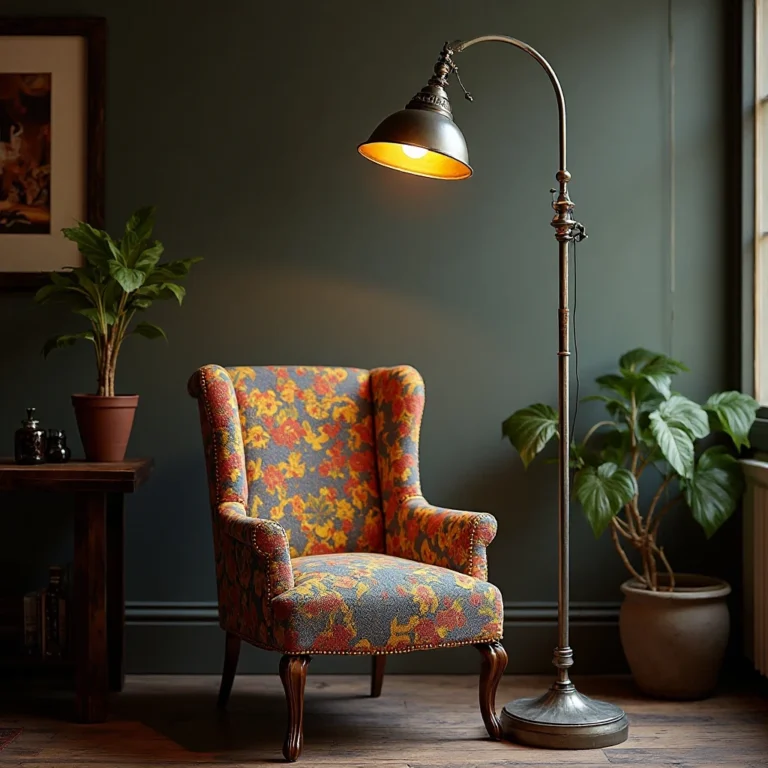
9. Cozy Reading Nook with Papasan or Saucer Chair
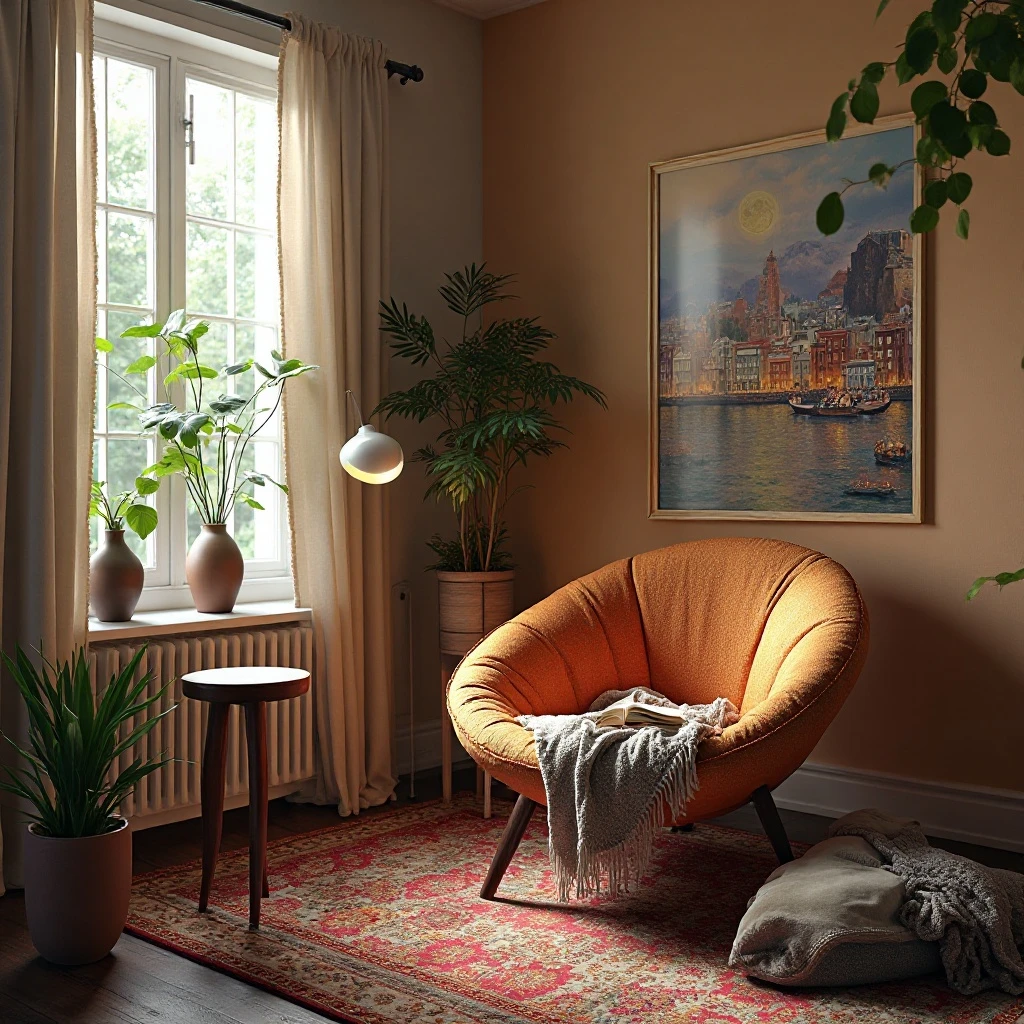
Create a dedicated relaxation corner using a papasan chair, hanging egg chair, or oversized saucer chair paired with a small side table, reading lamp, and throw blanket. Shop on Amazon
Why It Works: Having a designated spot that’s just for relaxation (not studying or sleeping) helps maintain work-life balance in a small space. These chairs are statement pieces that define a zone, provide exceptional comfort, and give your room personality that standard dorm furniture lacks.
How to Style It:
- Position the chair in a corner at a 45-degree angle to maximize floor space while creating an inviting nook
- Add a floor lamp or clip-on reading light positioned over the shoulder for task lighting
- Layer 2-3 throw pillows and a chunky knit or faux fur throw blanket for maximum coziness
- Place a small side table (nesting tables work great) within arm’s reach for drinks, books, or devices
Where to Use It: Corner spaces, next to windows, opposite the study desk, in bedroom sections of suites
Pro Tip: Hang a small floating shelf directly above the chair at arm’s height to hold your current read, phone, and water bottle—this keeps everything accessible without cluttering the floor.
10. LED Strip Lighting for Ambiance
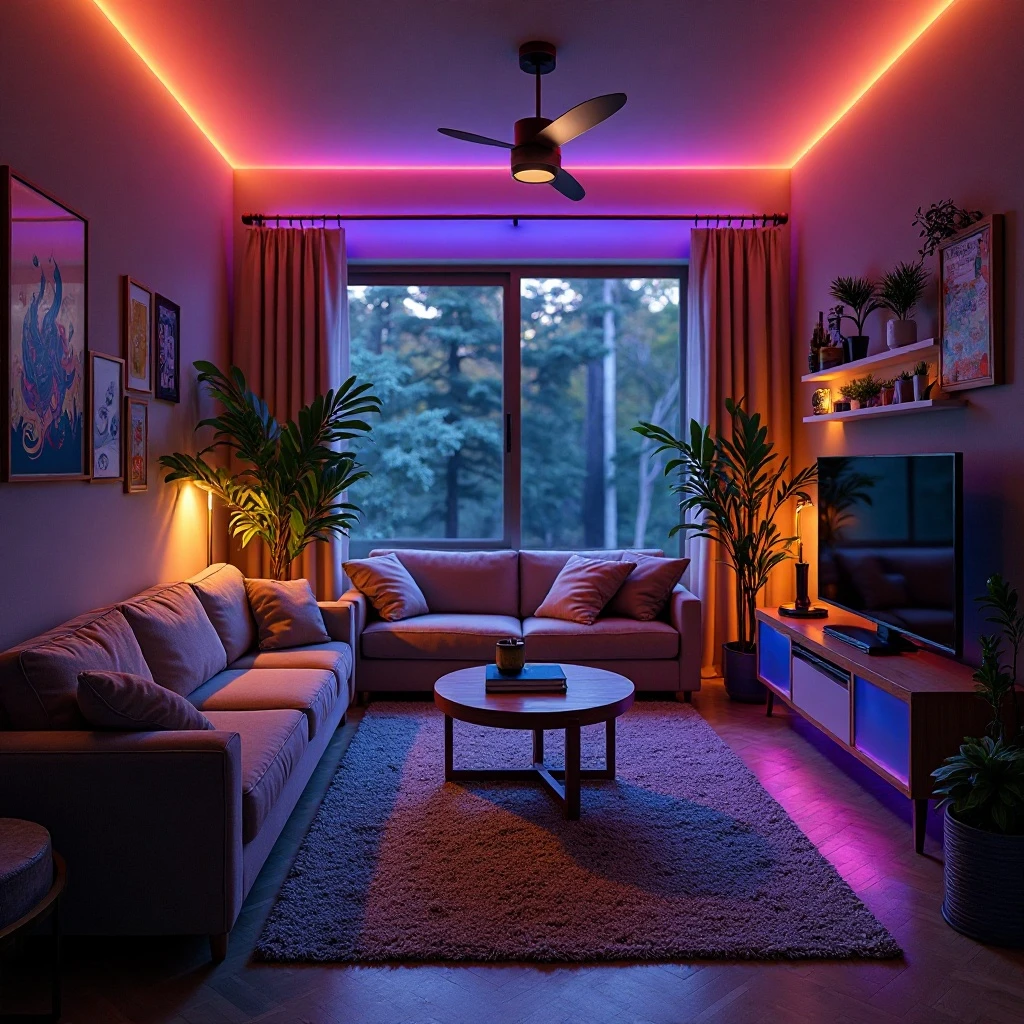
Install color-changing LED strip lights behind furniture, along ceiling edges, or under shelving to create customizable mood lighting that transforms the space from study mode to hangout mode. Shop on Amazon
Why It Works: Harsh overhead fluorescent lighting is the enemy of cozy living spaces. LED strips allow you to control brightness and color temperature, creating warm ambient lighting for relaxation or bright white light for studying. They’re also incredibly affordable, use minimal electricity, and install without any damage.
How to Style It:
- Run strips along the back edge of your desk, behind your TV or monitor, or along the top of curtain rods
- Choose warm white (2700K-3000K) for everyday use—it’s flattering and relaxing without feeling clinical
- Install strips along the wall-ceiling junction to create an indirect lighting effect that makes rooms feel larger
- Use the dimming feature during movie nights and the brightest setting during cleaning or getting ready
Where to Use It: Behind headboards, under floating shelves, along baseboards, behind mirrors or artwork
Pro Tip: Skip the color-changing gimmick for primary lighting—while fun occasionally, constant color changes feel juvenile. Instead, invest in warm white strips and add one color strip just for accent lighting on special occasions.
11. Modular Shelving Display System
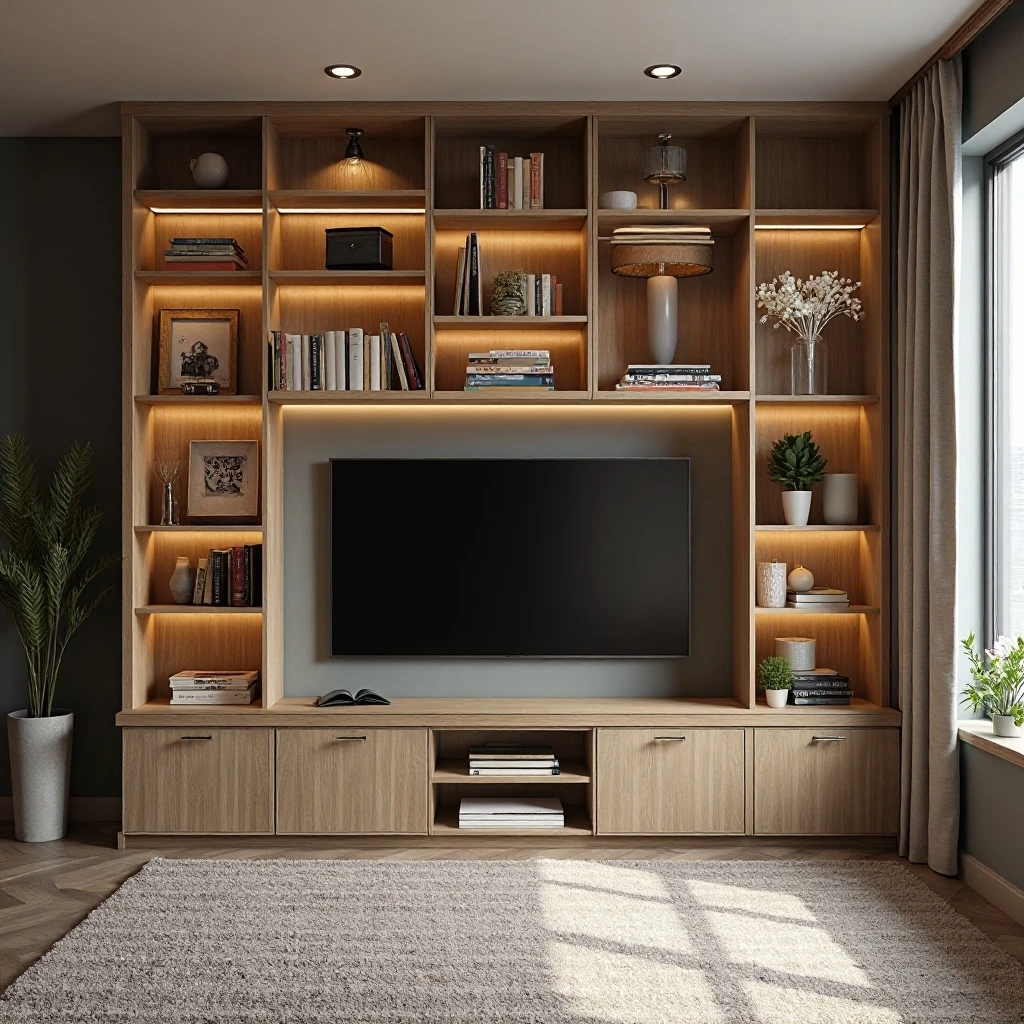
Create custom storage and display space using modular cube organizers (like Kallax units) that can be configured horizontally as a TV stand, vertically as a bookshelf, or stacked to create room dividers. Shop on Amazon
Why It Works: Modular systems adapt as your needs change—add cubes as you acquire more stuff, reconfigure them when you move to a different dorm, or separate them for multiple uses. They also provide the perfect combination of open display space and concealed storage when paired with fabric bins.
How to Style It:
- Alternate between open cubes (displaying books, plants, photos) and closed cubes (with fabric bins for clutter)
- Follow the “rule of thirds” for visual interest—roughly one-third closed storage, two-thirds open display
- Keep spines of books color-coordinated or use bookends to create neat sections rather than haphazard stacking
- Add small LED puck lights inside top cubes to highlight favorite items and add ambient lighting
Where to Use It: Against walls as TV stands, perpendicular to walls as room dividers, flanking doorways, under windows
Pro Tip: Use the top surface of horizontal cube organizers as a narrow sofa table behind seating—add a table lamp, small plant, and decorative objects to make your seating area feel finished and intentional like a real living room.
12. Tapestry or Large Fabric Wall Hanging
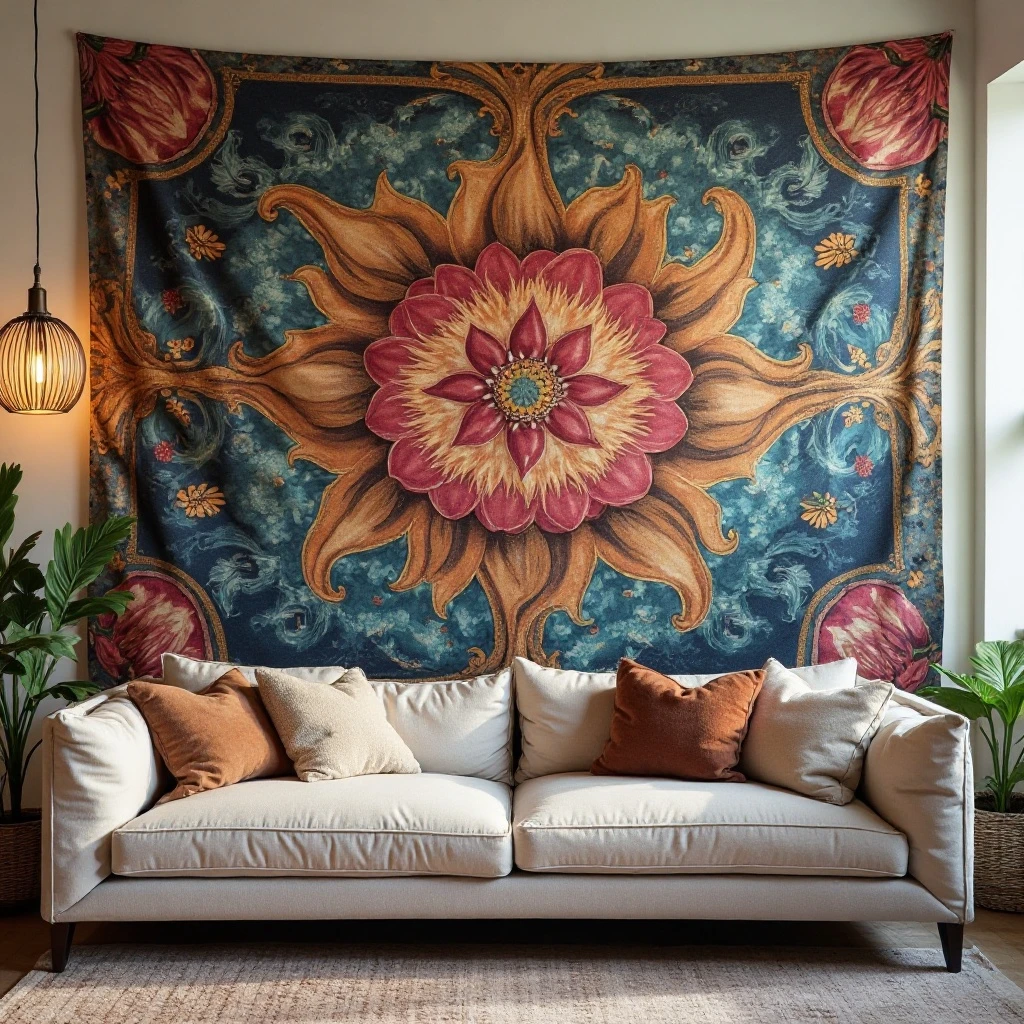
Cover an entire wall with a large tapestry, woven wall hanging, or fabric panel to add color, texture, and visual warmth while hiding damaged or institutional wall surfaces. Shop on Amazon
Why It Works: Tapestries instantly transform cold, blank walls into focal points full of personality. They’re affordable, cause zero damage when hung with Command hooks or tacks, and provide soft surfaces that absorb sound in echo-prone dorm rooms. Plus, they’re much easier to transport than multiple pieces of framed art.
How to Style It:
- Choose a tapestry that’s at least 60×80 inches to make a proper statement—small ones look unfinished
- Hang it taut using Command hooks in all four corners plus 2-3 points along the top edge for a polished look
- Position behind your seating area, headboard, or across the largest uninterrupted wall in your space
- Coordinate the dominant colors in the tapestry with your other textiles (pillows, rugs, throws)
Where to Use It: Behind beds, above sofas or seating areas, on the longest wall in the room, covering damaged walls
Pro Tip: Choose tapestries made from natural fibers like cotton rather than thin polyester—they hang better, photograph without sheen, and look significantly more expensive and intentional.
Common Mistakes to Avoid
1. Pushing All Furniture Against the Walls
This instinct to maximize floor space actually makes rooms feel smaller and less inviting. Instead, float your seating slightly away from walls to create intimacy and visual interest. Even pulling a desk or chair 12-18 inches from the wall creates a more intentional, designed look and allows for layered lighting and decor behind furniture. In small dorm spaces, this creates purposeful zones rather than a bowling alley effect.
2. Choosing All Matching Furniture Sets
Coordinated dorm furniture sets look generic and temporary—like you just moved in and haven’t personalized yet. Mix different styles, materials, and eras to create visual interest. Pair a modern desk with a vintage rug, or combine metal storage with wood accents. The key is choosing a cohesive color palette (stick to 3 main colors) while varying textures and styles for a collected, curated appearance.
3. Ignoring Vertical Space Completely
Most dorm dwellers focus only on floor space and leave walls bare above desk height. This wastes valuable real estate and makes ceilings feel lower. Install floating shelves at varying heights, use tall bookcases, hang plants, and mount items up to the ceiling line. Vertical storage and decor draw the eye upward, making rooms feel more spacious while providing essential storage for small spaces.
4. Using Only Overhead Lighting
Relying solely on harsh overhead fluorescent lights creates an institutional, uninviting atmosphere that makes it impossible to relax. Layer lighting instead: add a floor lamp for reading, desk lamp for tasks, string lights for ambiance, and LED strips for mood lighting. Having 3-4 light sources on different circuits lets you control brightness and warmth throughout the day and for different activities.
5. Buying Everything New and Matching
This approach is expensive, wasteful, and creates a space that looks like a catalog page rather than a home. Shop secondhand stores, borrow from family, and mix new pieces with vintage finds. The most interesting, comfortable spaces have history and personality—a grandmother’s throw blanket, a poster from your favorite concert, thrifted frames. These meaningful items make your dorm feel authentically yours.
6. Forgetting About Scale and Proportion
Oversized furniture overwhelms small dorm rooms, while too-tiny pieces look like dollhouse accessories. Choose furniture that’s approximately one-third the width of the wall it’s against. In a 10×12 room, a 3-4 foot sofa is perfect, but a 7-foot sectional will dominate. Similarly, avoid tiny 12-inch throw pillows on large seating—use 18-20 inch pillows instead for proper visual weight and actual comfort.
Frequently Asked Questions
How can I make my dorm living room feel bigger without removing furniture?
Use mirrors strategically to reflect light and create the illusion of depth—position a large mirror (at least 24×36 inches) opposite a window or across from your seating area. Choose furniture with exposed legs rather than pieces that sit directly on the floor, as visible floor space makes rooms feel larger. Stick to a light, cohesive color palette with no more than three main colors, and keep one wall relatively clear to serve as visual breathing room. Finally, push furniture slightly away from walls rather than against them to create intentional zones and flow.
What’s the best way to arrange furniture in a small dorm living area?
Start by identifying your room’s focal point—usually a window, TV area, or the longest wall—and arrange seating to face it. Float your main seating piece away from the wall if possible, even just 12 inches, to create depth. Position your desk perpendicular to a wall rather than against it to define separate zones for studying and relaxing. Create conversation areas where seating faces each other rather than all facing the same direction, using an area rug to anchor the grouping. Leave at least 18-24 inches of walkway space between furniture pieces for comfortable movement.
How do I decorate a dorm living room without damaging walls?
Rely on Command strips and hooks rated for your items’ weight—they hold surprisingly well and remove cleanly when you move out. Use tension rods for curtains, room dividers, and even to hang lightweight frames or string lights. Lean large artwork and mirrors against walls on dressers or shelves rather than hanging them. Washi tape or painter’s tape can create wall designs, frame posters, or outline photo collages without paint damage. For heavier items, use freestanding furniture like bookcases and room dividers to add vertical interest without touching walls at all.
What are the essential pieces of furniture for a dorm living room?
Start with flexible seating—a futon, loveseat, or papasan chair that accommodates multiple people but doesn’t dominate the space. Add a coffee table or ottoman that provides surface space and ideally storage underneath. Include one storage piece like a bookshelf or cube organizer to keep clutter contained. A floor or table lamp is essential since overhead dorm lighting is typically harsh and unflattering. Finally, invest in a quality area rug to define your living space, add warmth underfoot, and absorb sound in rooms with hard floors. Everything else is optional and should be added based on your specific needs and available space.
How can I create privacy in a shared dorm living room?
Install curtains on tension rods to create flexible dividers between shared and private spaces—they can be opened during social time and closed when you need focus or privacy. Use furniture as architectural elements by positioning bookcases, tall plants, or folding screens to create sight-line barriers without permanent walls. Designate “private hours” with roommates when certain areas are off-limits, and use headphones plus a “do not disturb” sign during these times. Create personal zones by giving each roommate their own clearly defined corner or area with their own seating, storage, and decor to minimize territorial conflicts.
What’s the best color scheme for a dorm living room that multiple people share?
Choose a neutral base (whites, grays, beiges, or soft earth tones) that everyone can agree on for large pieces and walls, then let each roommate add their personality through accent colors in pillows, throws, and personal decor. Stick to a three-color palette: one neutral, one primary accent color, and one metallic or secondary accent. Warm neutrals (cream, tan, warm gray) feel cozier than cool ones and work with most accent colors. If roommates have conflicting color preferences, create a cohesive look by choosing different shades of the same color family—one person uses navy while another uses sky blue—so the space feels coordinated despite individual expression.
Final Thoughts: Your Dorm Can Feel Like Home
The most important thing to remember is that your dorm living room should reflect who you are, not what you think a dorm “should” look like. Start with one or two ideas from this list that genuinely excite you rather than trying to implement everything at once—spaces evolve naturally as you live in them and discover what truly makes you comfortable.
Your dorm living room is more than just a place to kill time between classes. It’s where you’ll have late-night conversations that forge lifelong friendships, where you’ll decompress after difficult exams, and where you’ll create memories that define your college experience. Making this space comfortable and personal isn’t superficial—it directly impacts your well-being, academic success, and ability to build community during these formative years.
Give yourself permission to experiment, rearrange furniture on a whim, and change your mind about what works. The beauty of dorm living is its temporary nature—you can try bold design choices you might not risk in a permanent home, learn what you actually like versus what you thought you liked, and develop your personal style without long-term commitment.
Your Next Step: Walk around your dorm living room right now and identify the one thing that bothers you most—maybe it’s harsh lighting, lack of seating, or blank walls. Choose just one solution from this article to address that specific problem this week, and build from there.
Remember: The coziest, most welcoming dorm rooms aren’t the ones with the most expensive furniture or perfect Instagram aesthetics—they’re the ones that feel like the people who live there, filled with items that spark joy, serve a purpose, and tell your story.