20 Mud Kitchen Ideas – The Ultimate Guide for Outdoor Play
There’s something magical about watching a child hunched over a muddy pot, completely absorbed in their imaginary world — stirring “stew,” baking “mud cakes,” and declaring themselves the best chef in the garden. Mud kitchens aren’t just fun; they are powerhouses for child development.
A mud kitchen is one of the single greatest investments you can make in your child’s outdoor play environment. It grows with them, costs relatively little, and delivers endless hours of creative, sensory, and social learning.
Whether you have a sprawling garden or a tiny patio, an unlimited budget or just a few spare pallets, this guide covers 20 incredible mud kitchen ideas — complete with styling tips, placement advice.
Let’s dig in.
The 20 Ideas
1. Classic Pallet Mud Kitchen
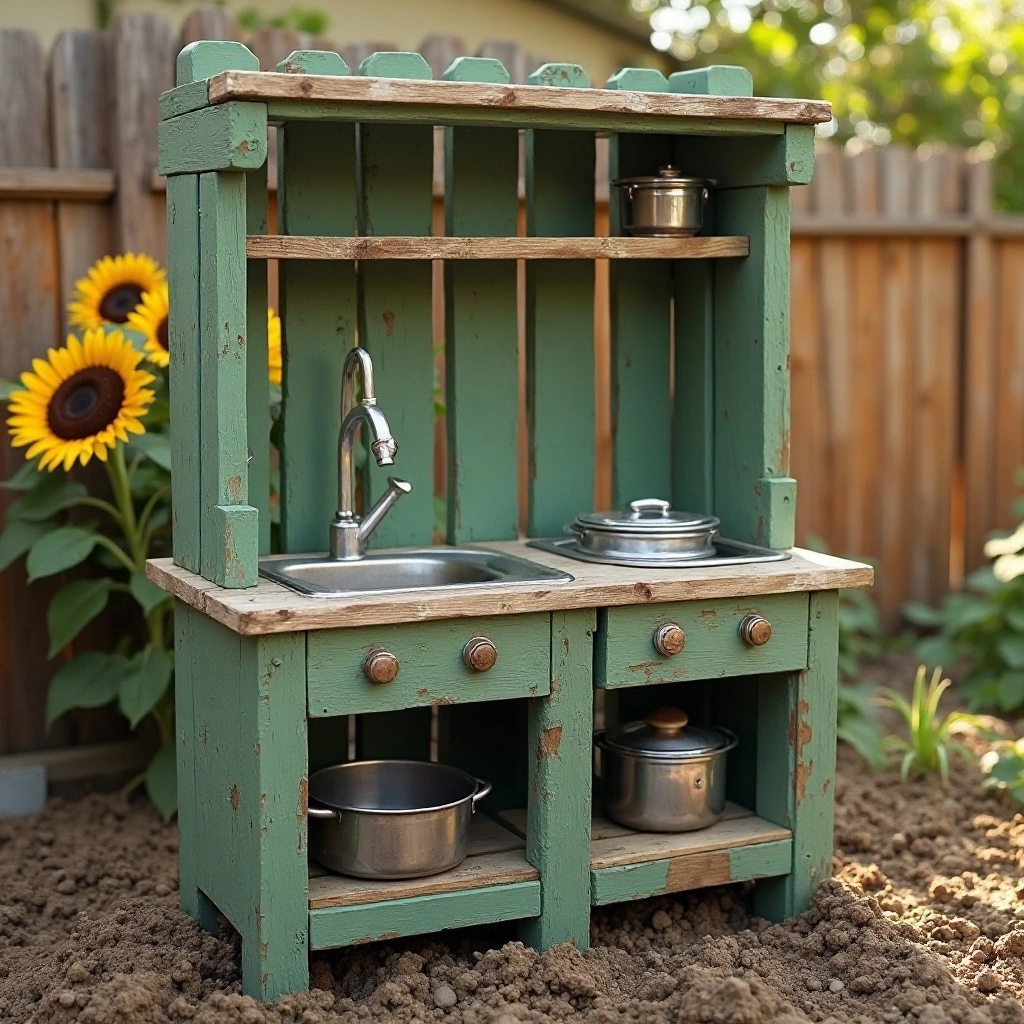
The classic pallet mud kitchen is where most outdoor play adventures begin. Built from one or two reclaimed wooden pallets stood upright and secured to a fence or freestanding frame, this budget-friendly design delivers everything a little chef needs: a work surface, open shelves, and an embedded bowl for water play.
Sand it down, seal it with weather-resistant paint, and you have a setup that lasts for years. It is the backbone of the mud kitchen world — simple, sturdy, and endlessly customisable. Shop on Amazon
How to Style It
- Sage green or white exterior chalk paint
- Vintage tin pots & pans from charity shops
- Hook rail for utensils along the top shelf
- Labeled spice jars filled with sand, soil, and gravel
- Wooden crate for loose parts storage below
- Mini chalkboard menu sign above the hob
Where to Use It
Best against a fence or shed wall in a sheltered corner of the garden. Avoid placing directly under trees that drop sap or fruit. A paved or gravel base underneath makes cleanup far easier and protects lawn from long-term wear.
Pro Tip
Use exterior wood glue and metal L-brackets to reinforce pallet joints before painting. One coat of exterior primer followed by two coats of exterior chalk paint in sage green gives a gorgeous matte finish that hides daily dirt and lasts 3–4 outdoor seasons.
2. Fairy Tale Enchanted Kitchen
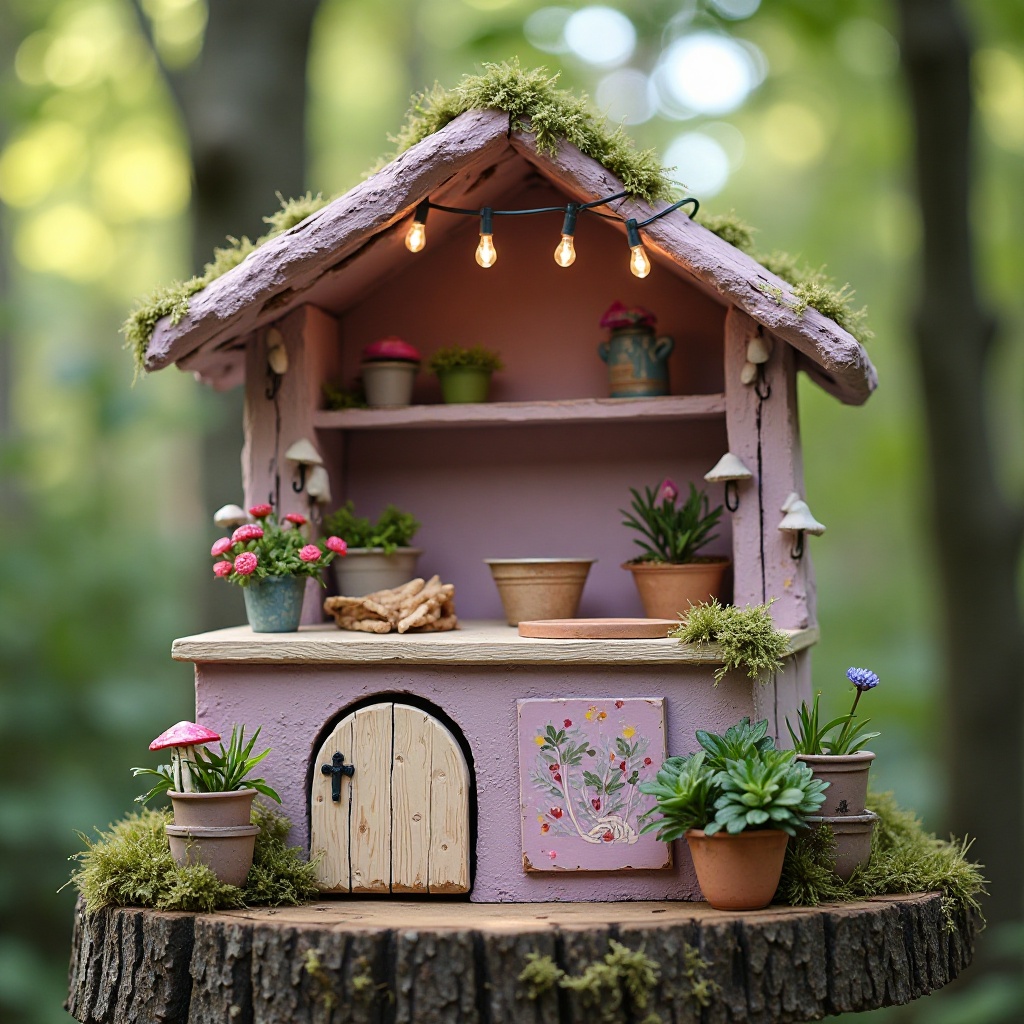
Transport your child into a storybook world with a fairy tale mud kitchen that doubles as an imaginative play prop. Built on a standard pallet or small wooden frame, the magic is entirely in the decoration: hand-painted toadstools, tiny fairy doors, trailing artificial vine, and whimsical signage like “Pixie’s Potions Corner.”
This style works especially well placed near garden foliage, making it feel like it was always part of a magical woodland. Children engage in richer, longer play sessions when the environment sparks their imagination from the moment they step outside. Shop on Amazon
How to Style It
- Lilac & forest green colour palette
- Solar fairy lights draped overhead
- Hand-painted mushroom and star details
- Artificial moss glued to wooden edges
- Tiny wooden fairy door fitted at the base
- Crystal or glass pebble decorations
Where to Use It
Tucked into a garden corner surrounded by tall flowering plants or ornamental grasses. Partial shade is ideal — it protects painted details from sun fade and keeps the space cool for extended play on warm days.
Pro Tip
Add glow-in-the-dark paint to the star details. Children are absolutely delighted when they notice them glowing at dusk during long summer evening play sessions — it extends outdoor time naturally and creates genuinely memorable moments
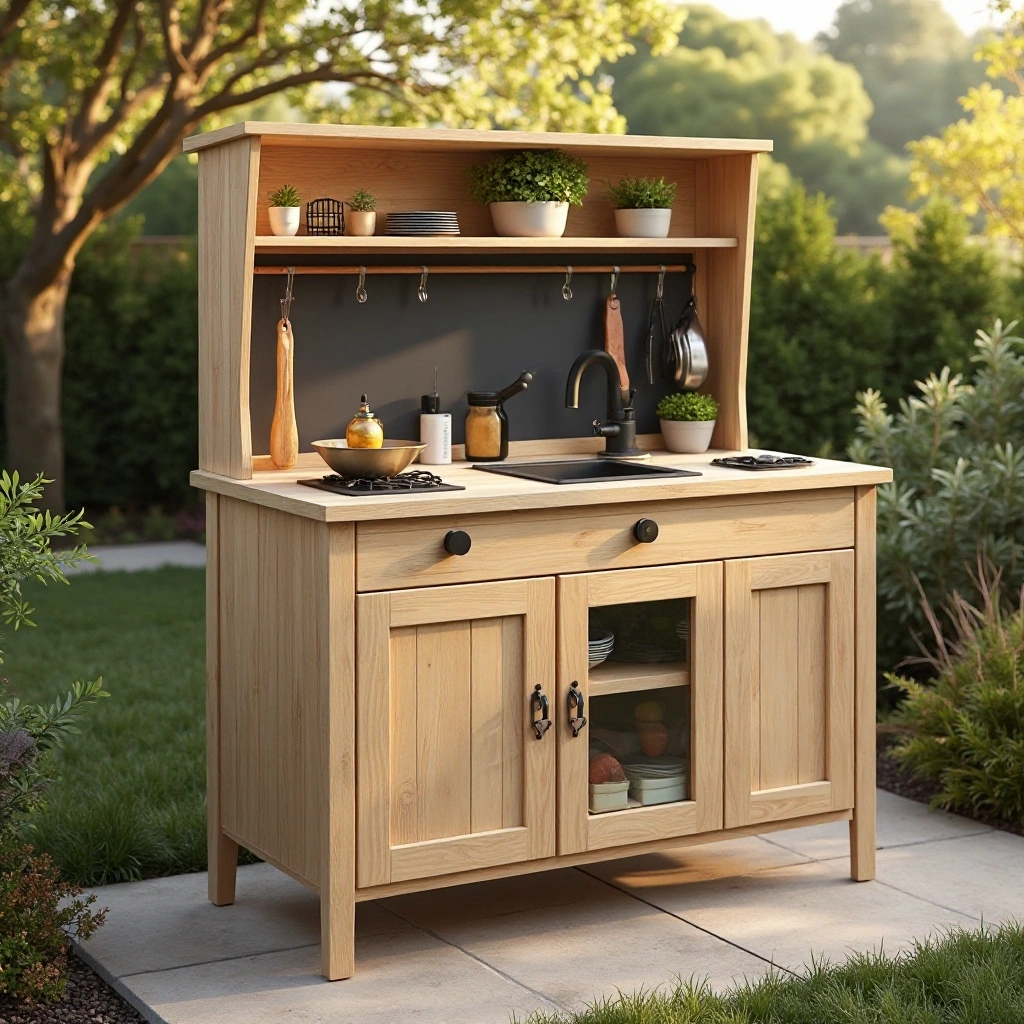
3. Upcycled Kitchen Cabinet Conversion
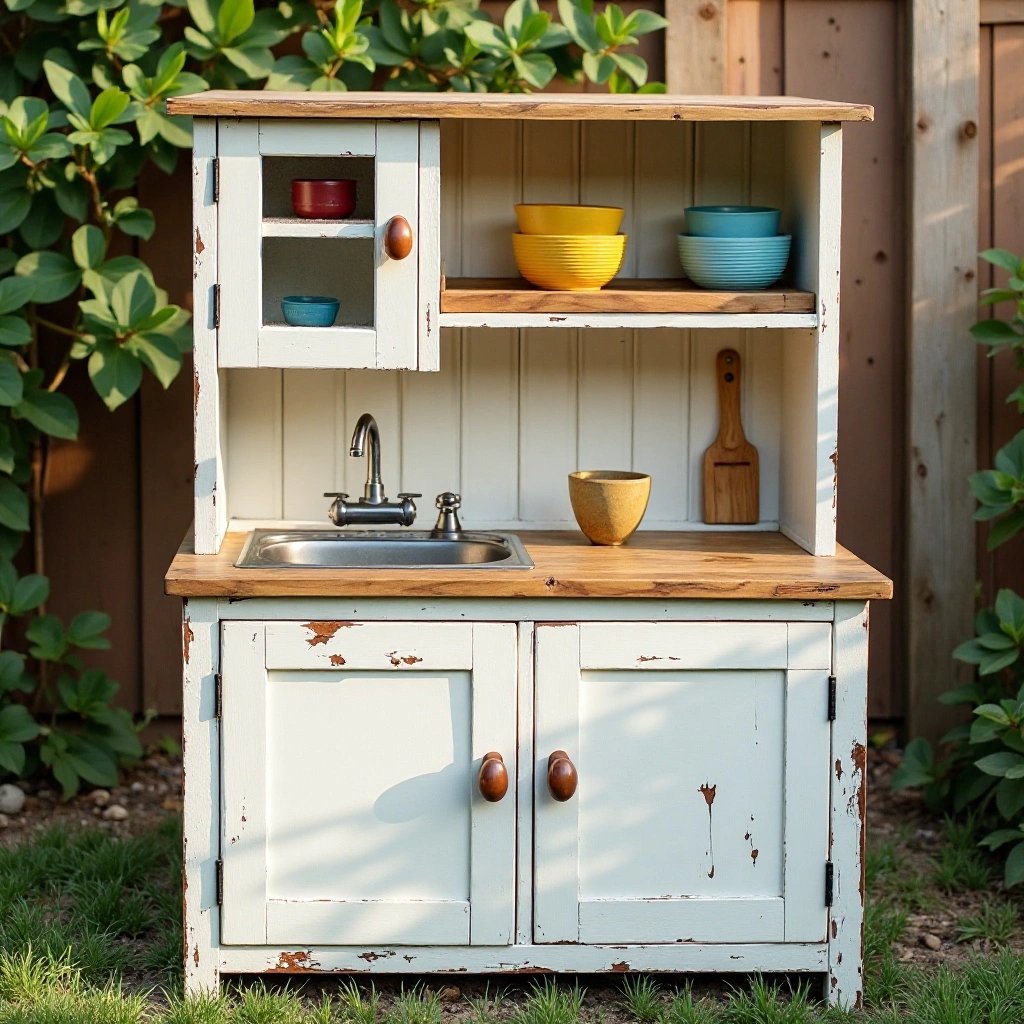
An old kitchen cabinet rescued from a skip, charity shop, or home renovation is the most realistic mud kitchen you can build. It already has the structure: doors, drawers, shelving, and a solid worktop. Sand the existing finish, apply weather-resistant paint, drill a hole for a salad bowl sink, and add outdoor sealant.
Children are drawn to this version because it looks exactly like a grown-up kitchen — complete with cupboards they can open and close to store “ingredients.” This is the gold standard of functional mud kitchens. Shop on Amazon
How to Style It
- Chalk white or duck egg blue exterior paint
- Replacement knobs and handles (copper or ceramic)
- Wooden chopping board as the main work surface
- Under-shelf hooks for hanging tools
- Labelled ingredient jars on the shelves
- Small real appliance props (old kettle, toaster)
Where to Use It
Works beautifully on a patio, decked area, or under a pergola. As a solid freestanding unit, it needs no fence backing. Position with the work surface facing away from prevailing wind and rain for maximum durability.
Pro Tip
Before outdoor use, remove all MDF components and replace with plywood — MDF swells and disintegrates when wet. Seal all cut edges with PVA glue before painting, then apply two coats of exterior varnish as a final layer. This prep work means your cabinet will last 5+ years outdoors.
4. Multi-Station Sensory Mud Hub
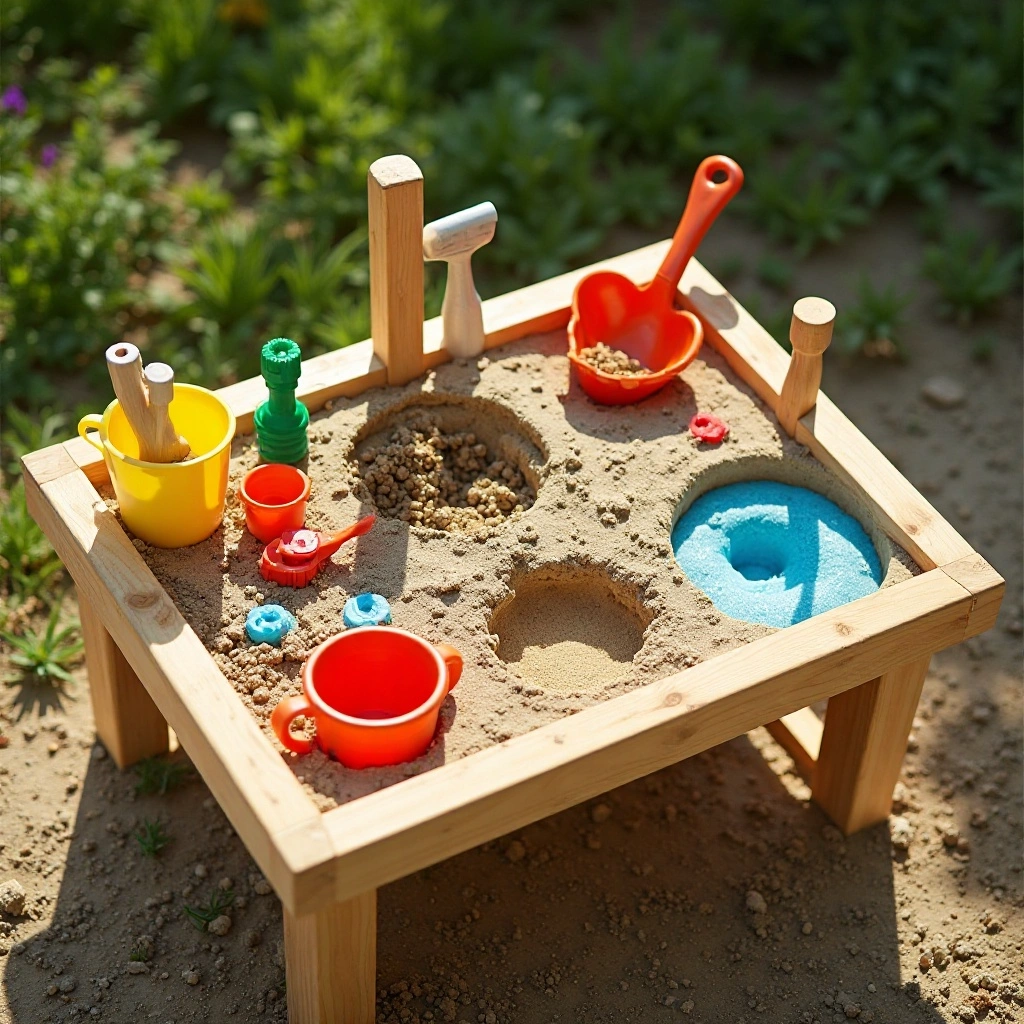
Rather than a single cooking area, the sensory mud station presents multiple trays side by side, each containing a different material: gooey mud, dry sand, water with natural soap foam, shredded leaves, or kinetic sand. This design is rooted in early childhood education — different sensory inputs simultaneously stimulate touch, smell, sight, and creative thinking.
Particularly popular in nurseries and forest school settings, it also works brilliantly wherever multiple children play together, giving each child their own station to explore independently. Shop on Amazon
How to Style It
- Colour-coded tray per texture type
- Numbered compartment labels
- Variety of scoops, brushes, and ladles
- Laminated activity prompt cards
- Funnel and tube attachments
- Loose parts basket nearby for extra materials
Where to Use It
Perfect for nurseries, schools, or homes with multiple children. A tarpaulin or splash mat underneath contains mess beautifully and protects lawn from long-term wear. Position on level ground with natural drainage nearby.
Pro Tip
Rotate the sensory materials weekly — swap mud for oobleck (cornstarch + water), replace sand with bird seed, or add essential oil drops to the water tray. This keeps the experience fresh and extends engagement for months with absolutely no extra cost.
5. Little Chef’s Professional Kitchen
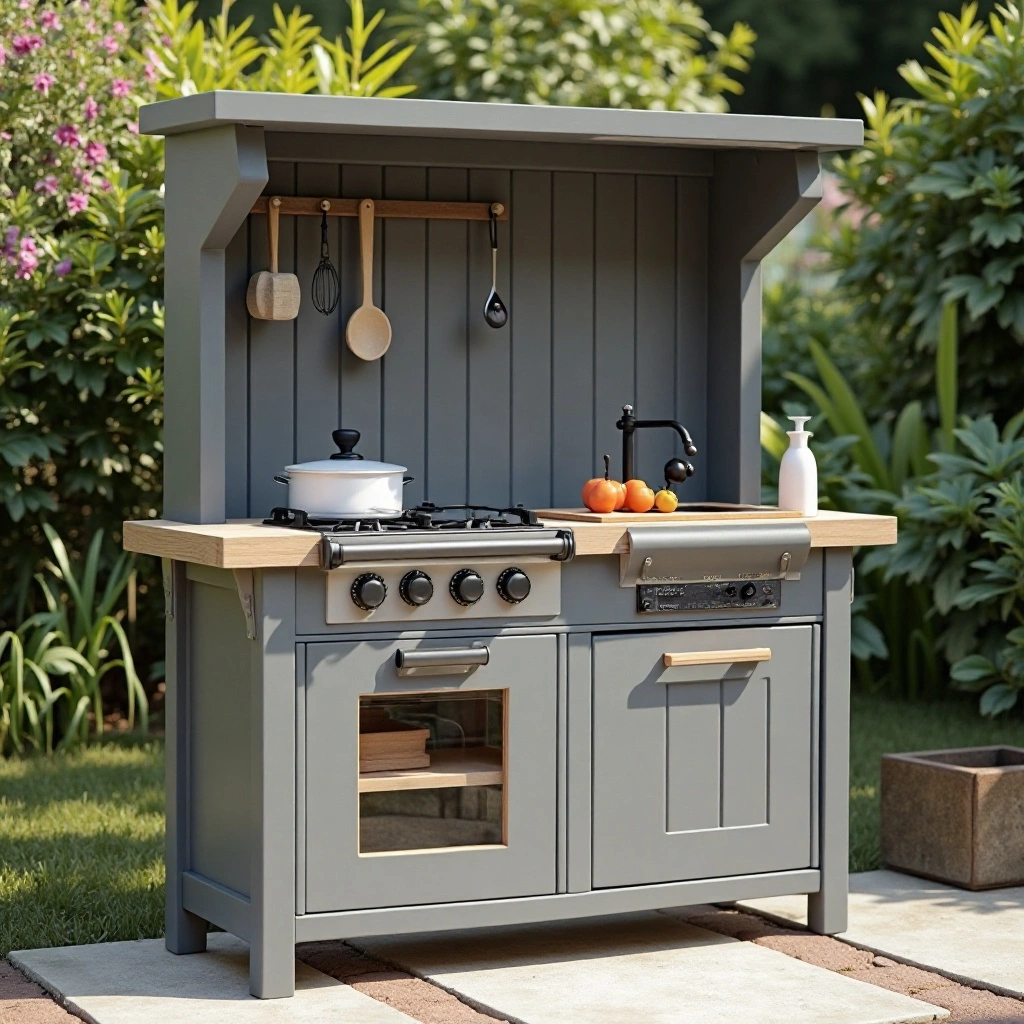
For the child who insists on running the fanciest restaurant in the garden, the Little Chef’s Professional Kitchen brings all the drama of a restaurant kitchen outdoors. Painted steel grey with metallic accents, a painted-on hob, a hanging pot rack, and a proper order window or serving hatch, this setup encourages elaborate dramatic play.
Children assign roles (chef, waiter, customer), practise social negotiation, develop language through menus and orders, and exercise early maths through pretend billing. Role play at its most sophisticated. Shop on Amazon
How to Style It
- Metallic grey or silver exterior paint
- Overhead hanging pot rack with hooks
- Chalkboard order window panel
- Laminated restaurant menu card
- Chef apron and hat hooks at child height
- Numbered paper order tickets
Where to Use It
Best installed alongside a play table serving as the “restaurant dining area.” A small wooden table and chairs nearby where customers can place orders and receive dishes completes the full restaurant experience.
Pro Tip
Create laminated “recipe cards” with simple pictorial instructions: 3 scoops of mud + 2 leaves + stir = Woodland Stew. These extend play dramatically and introduce early literacy and numeracy in a completely natural, child-led way.
6. Jungle Explorer Kitchen
The Jungle Explorer Kitchen is for the wild-hearted, adventurous child who sees every garden as a rainforest expedition. Built with dark olive green or khaki paintwork and decorated with trailing artificial tropical leaves, rope details, and bamboo accessories, this mud kitchen becomes base camp for culinary explorations.
Children “forage” natural loose parts from the garden to add to jungle potions and create elaborate nature-inspired stories. Particularly powerful for children who enjoy outdoor exploration, bug hunting, and nature-based play. Shop on Amazon
How to Style It
- Khaki and forest green colour palette
- Rope and twine woven through the frame
- Artificial tropical leaves trailing from shelves
- Bamboo utensils and bowls
- Animal print bunting strung above
- “Explorer HQ” hand-painted signage
Where to Use It
Ideal at the bottom of a garden near hedgerows or wild planting areas. Placing it near the “wilder” part of your space creates a natural sense of being away from home base, adding to the explorer narrative children build.
Pro Tip
Add a “Specimen Collection” tray beside the kitchen — a shallow wooden tray with labelled compartments for bark, pebbles, leaves, and berries. Children spend twice as long foraging when they have a dedicated collection station, deepening their connection with the natural world.
7. Beach-Themed Seaside Kitchen
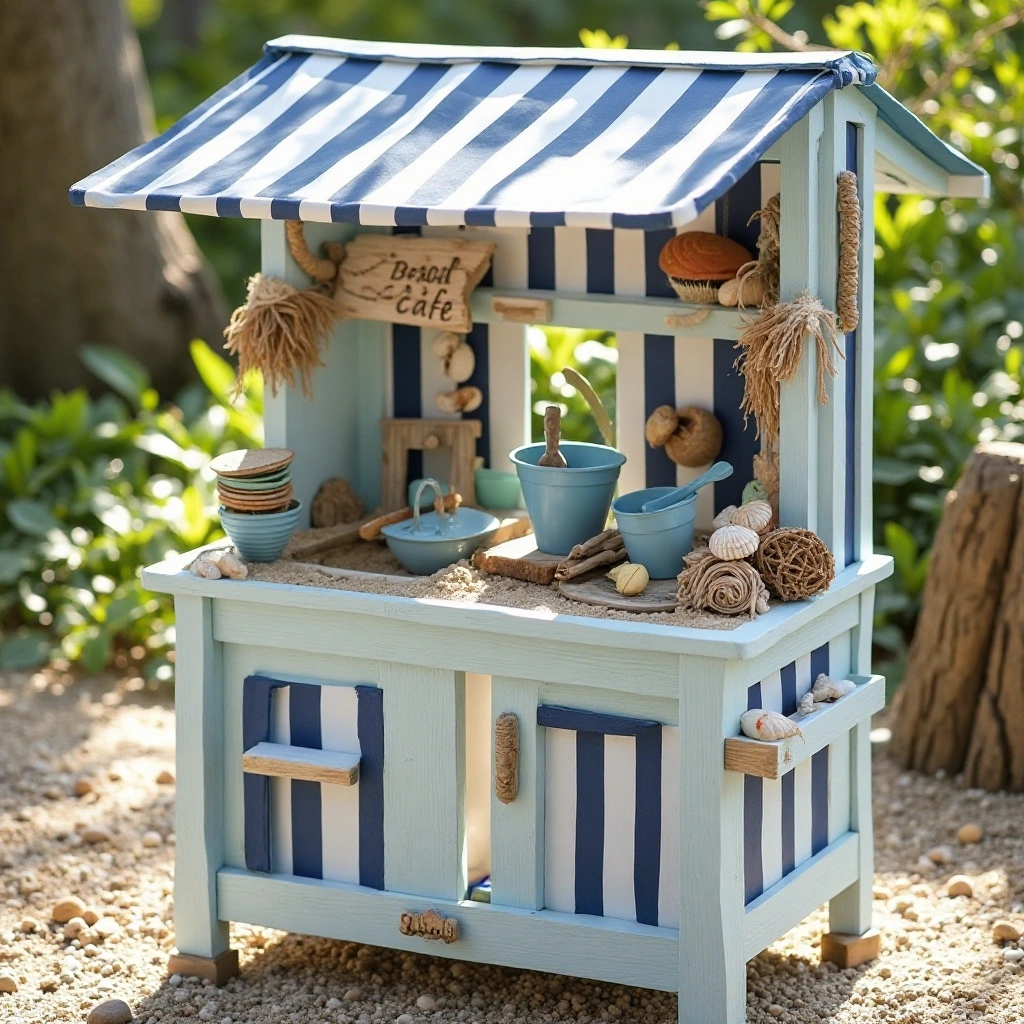
Bring the seaside to your garden with a beach-themed mud kitchen that swaps mud for sand and transforms the outdoor space into a coastal café. Painted in nautical navy and white, draped with rope accents, and decorated with real shells and driftwood signs, this kitchen is a summer staple.
Fill the basin with play sand alongside water, provide small buckets, spades, and sandcastle moulds, and set up a “Fish & Chips” or “Ice Cream Parlour” theme. Perfect for summer holidays at home. Shop on Amazon
How to Style It
- Navy and white nautical stripe panels
- Rope and driftwood accent pieces
- Shell collection display on the shelf
- Blue enamel buckets on hooks
- “Beach Café” driftwood sign above
- Sandcastle mould selection in a basket
Where to Use It
Works beautifully on a patio or near a paddling pool for a full “beach day at home.” Position on a base of play sand or pebbles to enhance the seaside atmosphere and provide natural drainage for water play.
Pro Tip
Mix a small amount of blue food colouring into the water tray to create a “rock pool” effect. Add kinetic sand alongside — it holds shapes like wet sand but never dries out, making it wonderfully sensory for extended beach-themed play sessions
8. Farmhouse Rustic Kitchen
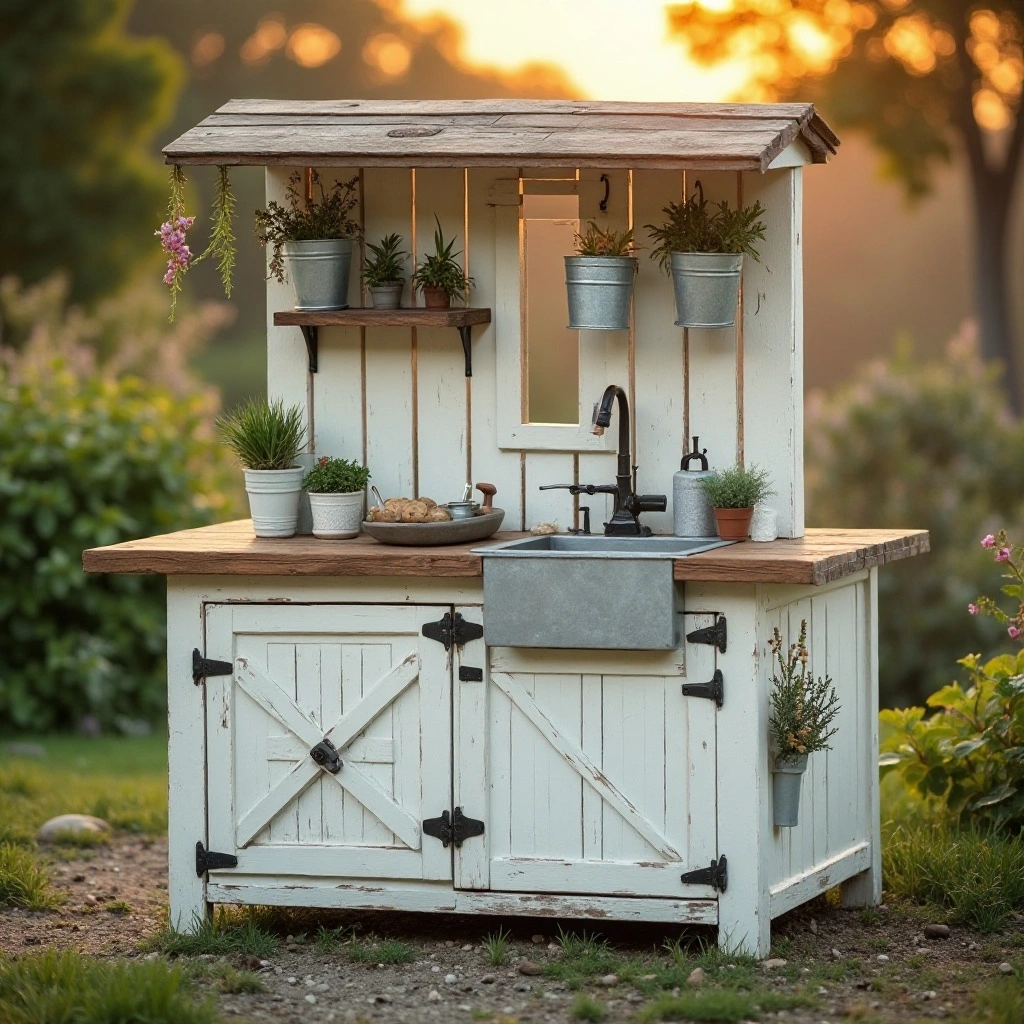
The farmhouse rustic mud kitchen evokes cosy country living with whitewashed timber, galvanised metal accents, and earthy charm. Children make “butter,” grind “flour,” and harvest “vegetables” in a setting that feels authentically rooted in the land.
Adding real potted herbs — rosemary, mint, thyme — nearby means children engage all their senses, especially smell, creating a richer and more immersive play experience. The farmhouse style photographs beautifully and remains a perennial favourite with outdoor play enthusiasts. Shop on Amazon
How to Style It
- Whitewash and wood stain finish
- Galvanised metal buckets and accessories
- Real herb pots on the shelf (mint, rosemary, thyme)
- Dried flower bundles hung from hooks
- Hessian apron on a wall hook
- Enamel mixing bowls in cream or grey
Where to Use It
Fits perfectly in cottage gardens and near raised vegetable beds, creating an authentic kitchen garden feel. Works equally well against a brick wall for a genuine farmyard backdrop, even in urban gardens.
Pro Tip
Plant child-safe herbs in terracotta pots on the shelf. Children picking and adding real herbs to their mud creations engages the sense of smell and introduces them to real garden plants — a beautiful first step toward growing their own food.
9. Pastel Dream Kitchen
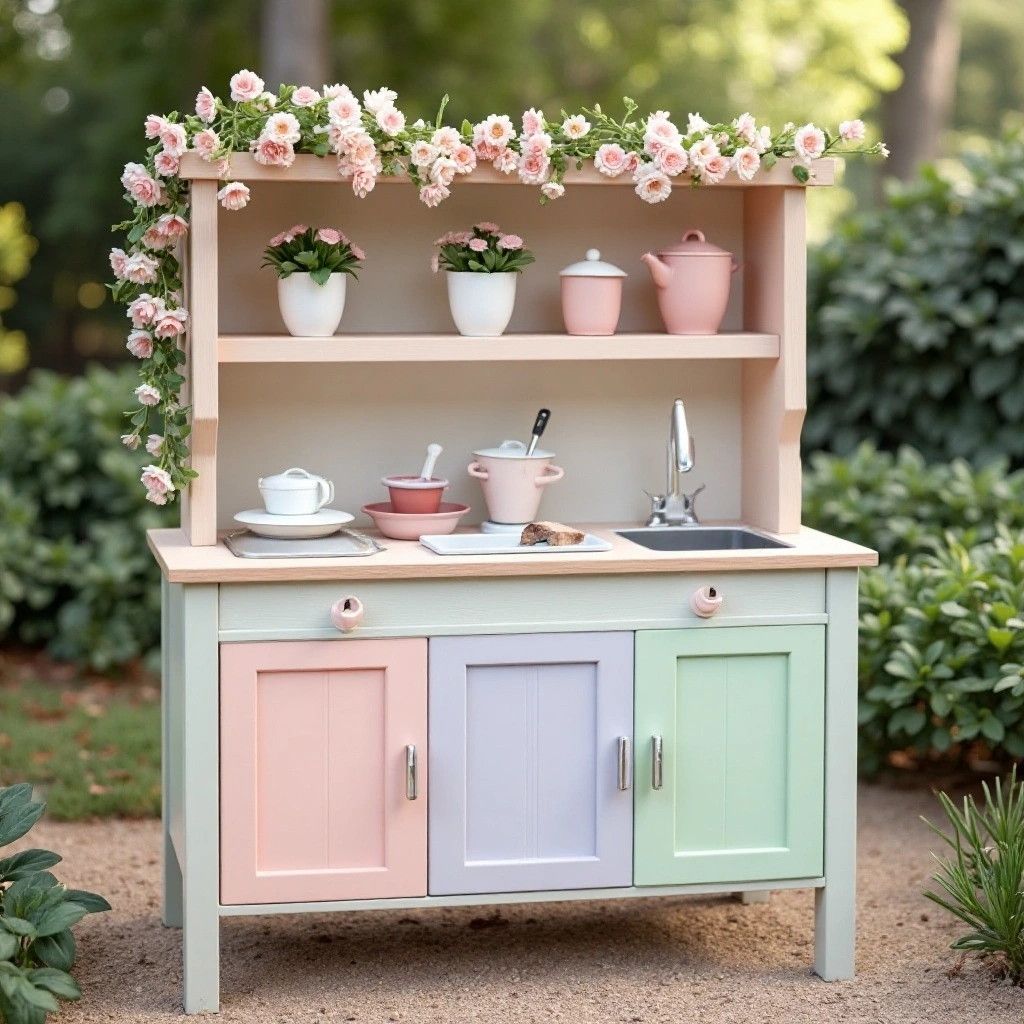
The pastel dream kitchen is proof that a mud kitchen can be both messy and beautiful. Each panel is painted a different soft pastel tone — blush, mint, lavender, buttercup — creating a colour-blocked effect that looks stunning in the garden.
Paired with pastel silicone utensils, floral garlands, and delicate bunting, this design appeals to children who love colour and beauty as part of their play. Completely gender-neutral despite its softness, it consistently ranks among the most shared mud kitchen designs online. Shop on Amazon
How to Style It
- Colour-block pastel panels throughout
- Pastel silicone cooking utensils
- Flower garland trim along the top
- White or cream metal accessories
- Pastel bunting strung above
- Matching pastel terracotta plant pots
Where to Use It
Best in a bright, open garden area where the colours can be fully appreciated. Avoid deep shade — pastel tones look washed out in low light. A white painted fence or wall behind creates a beautiful contrast backdrop for photographs.
Pro Tip
Use exterior chalk paint for pastel tones — it gives a beautiful matte, velvety finish that photographs exceptionally well. Seal with clear wax or matte exterior varnish to protect the colour from mud, water, and UV fading throughout the outdoor seasons.
10. Treehouse-Integrated Kitchen
When a mud kitchen is integrated beneath a treehouse or raised play platform, it transforms into a complete outdoor play universe. The upper level becomes the clubhouse or lookout post, while below hosts all the messy, creative kitchen action.
Children move fluidly between levels — running upstairs to plan their “menu,” coming down to cook. This integration also solves space challenges in smaller gardens by using vertical space cleverly. The structural timber of the play frame gives the mud kitchen a naturally robust, premium look with no additional framework costs. Shop on Amazon
How to Style It
- Match the treehouse timber stain exactly
- Built-in shelf unit under the platform
- Rope bucket for “food deliveries” between levels
- Pulley system connecting upper and lower levels
- Ground-level tool storage on side posts
- Hanging lantern for atmospheric evening play
Where to Use It
Integrates with an existing or new play structure. Ensure at least 180cm of headroom under the platform for comfortable standing play and adult supervision. Rubber bark chippings or artificial turf underneath provides both safety and drainage.
Pro Tip
Install a simple pulley rope system between the upper platform and the kitchen below. Children absolutely love hoisting “dishes” up to the customer above. It adds a mechanical play element that keeps older children deeply engaged long after the novelty of basic mud play has worn off.
11. Mud Pizza Oven Corner
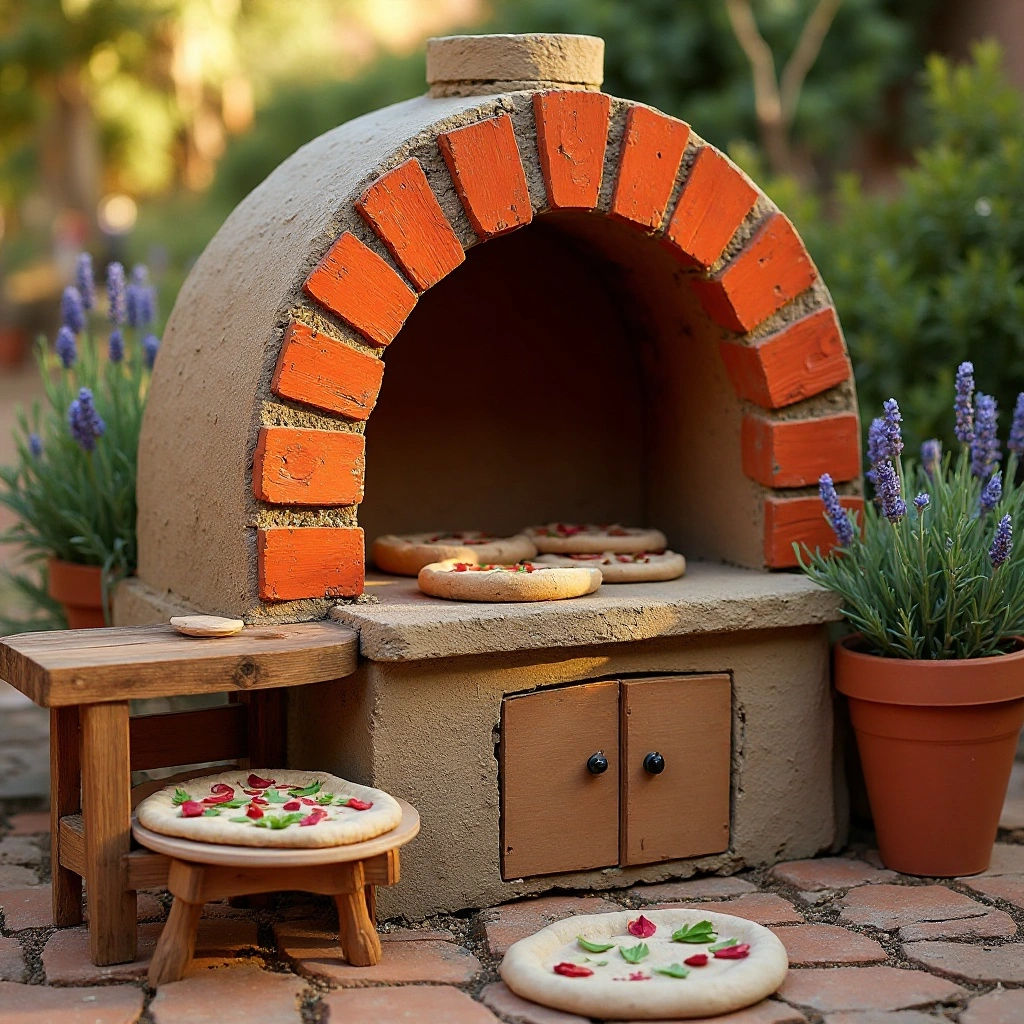
Move beyond the standard stove and introduce a child-sized mud pizza oven to completely transform outdoor play narratives. Built from a simple arched wooden frame painted in terracotta and brick red tones, paired with a prep counter, this setup invites children to flatten mud “dough,” add nature toppings (leaves for basil,
berries for olives, pebbles for pepperoni), slide their creations “into the oven,” and present them with enormous pride. One of the most engaging mud kitchen configurations because it introduces a recognisable real-world cooking process children find deeply satisfying to recreate. Shop on Amazon
How to Style It
- Terracotta and brick red colour palette
- Wooden pizza peel as a play prop
- Nature toppings display station with labelled sections
- Drying rack for completed “pizzas”
- Chalk menu board beside the oven
- Flour (play sand) in a labelled canister
Where to Use It
Works beautifully in a Mediterranean-style garden with terracotta pots and lavender planting. Position on a flat paved surface near a family gathering area so everyone can engage with the “pizza restaurant” and place orders from the young chefs-in-residence.
Pro Tip
Create a dedicated “toppings bar” — a wooden tray divided into sections filled with pebbles, leaves, petals, bark chips, and seed pods. Giving toppings their own display station dramatically extends play time and encourages children to be creative and deliberate in their pizza designs.
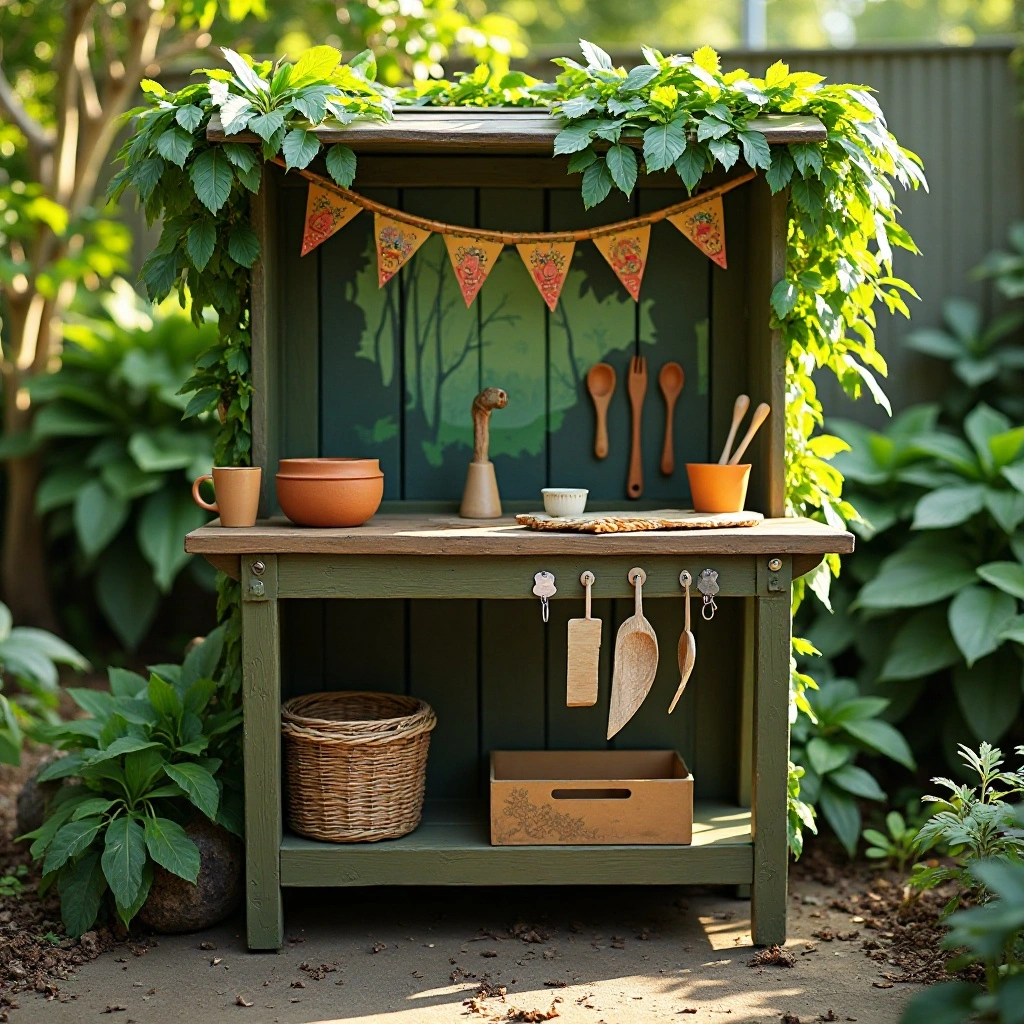
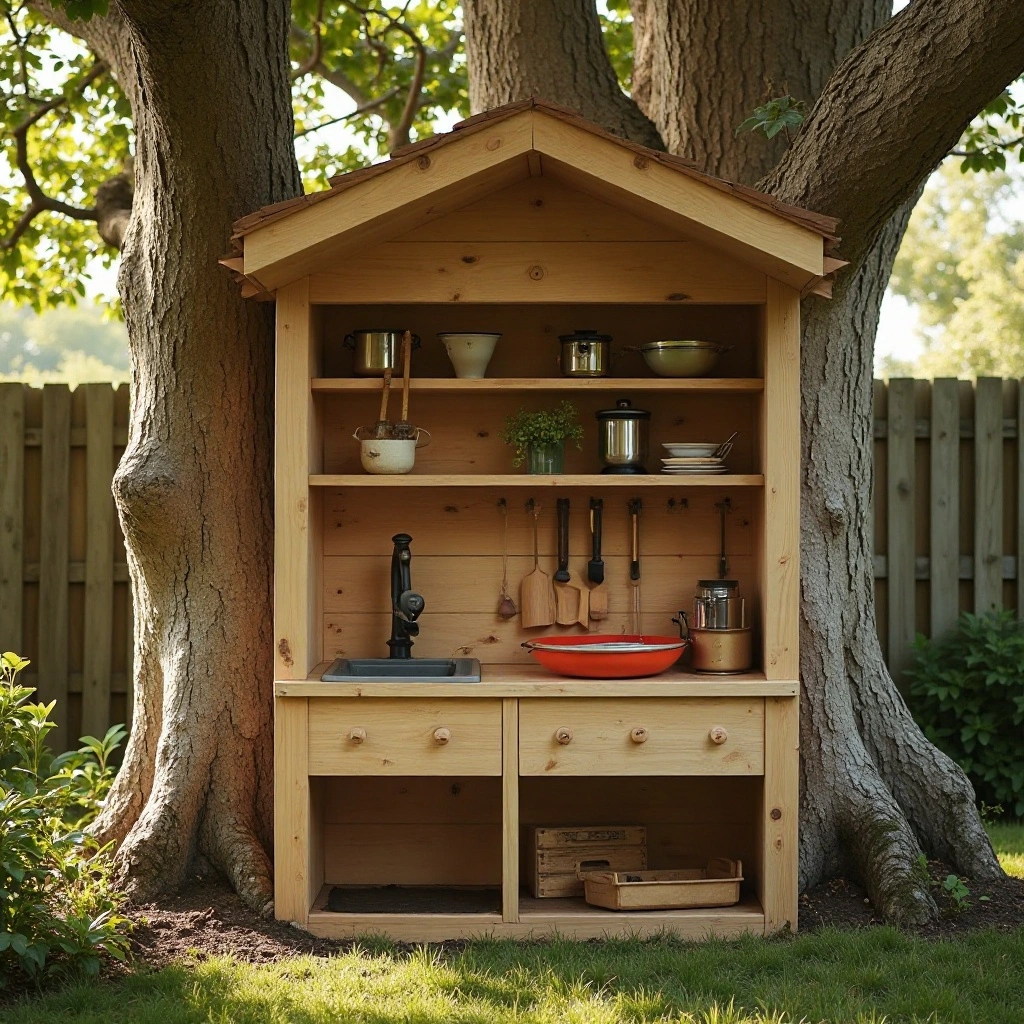
12. Natural Wood & Log Kitchen
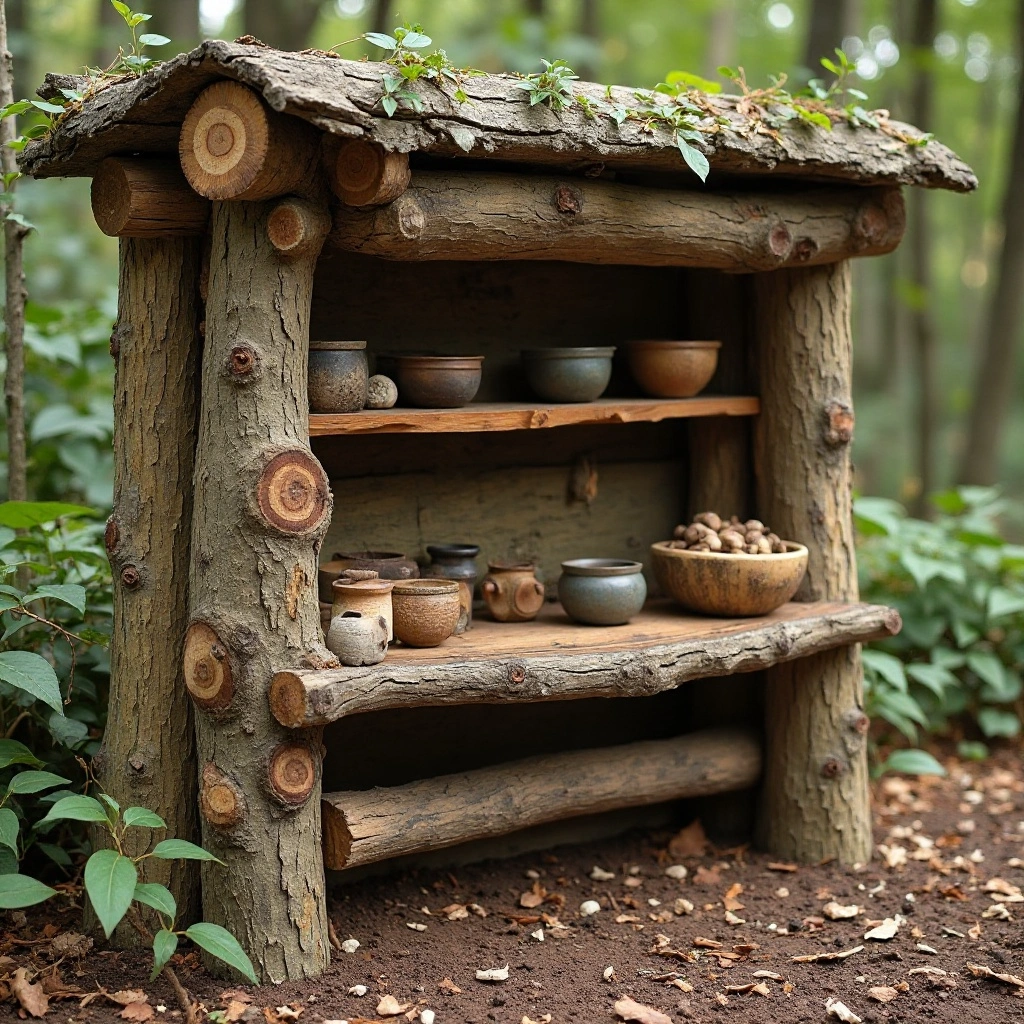
For families embracing forest school principles who want to minimise synthetic materials in their children’s play environment, the natural wood and log kitchen is the answer. Built entirely from untreated timber, thick log slice shelves, bark-on branches, and hollowed stone or log bowls — no paint, no plastic, no manufactured finishes.
It blends seamlessly into a naturalistic garden and teaches children to interact with genuine natural materials. Studies consistently show children who play with natural, unprocessed materials demonstrate greater creativity, longer engagement times, and deeper sensory processing. Shop on Amazon
How to Style It
- Only natural, unprocessed materials throughout
- Thick log slice rounds as shelving surfaces
- Stone pestle and mortar for grinding
- Bark chip ground cover underneath
- Foraged loose parts only — no bought accessories
- Woven wicker baskets for storage
Where to Use It
Designed for wild or naturalistic garden areas, woodland edges, or forest school settings. Positioning near actual woodland or dense planting makes the aesthetic cohesive and provides a rich foraging environment for children to source their own ingredients.
Pro Tip
Treat wooden elements with raw linseed oil rather than varnish or paint. It preserves the wood’s natural colour and grain while providing genuine weather resistance. Reapply once per season for maximum longevity without losing the beautiful, honest natural aesthetic.
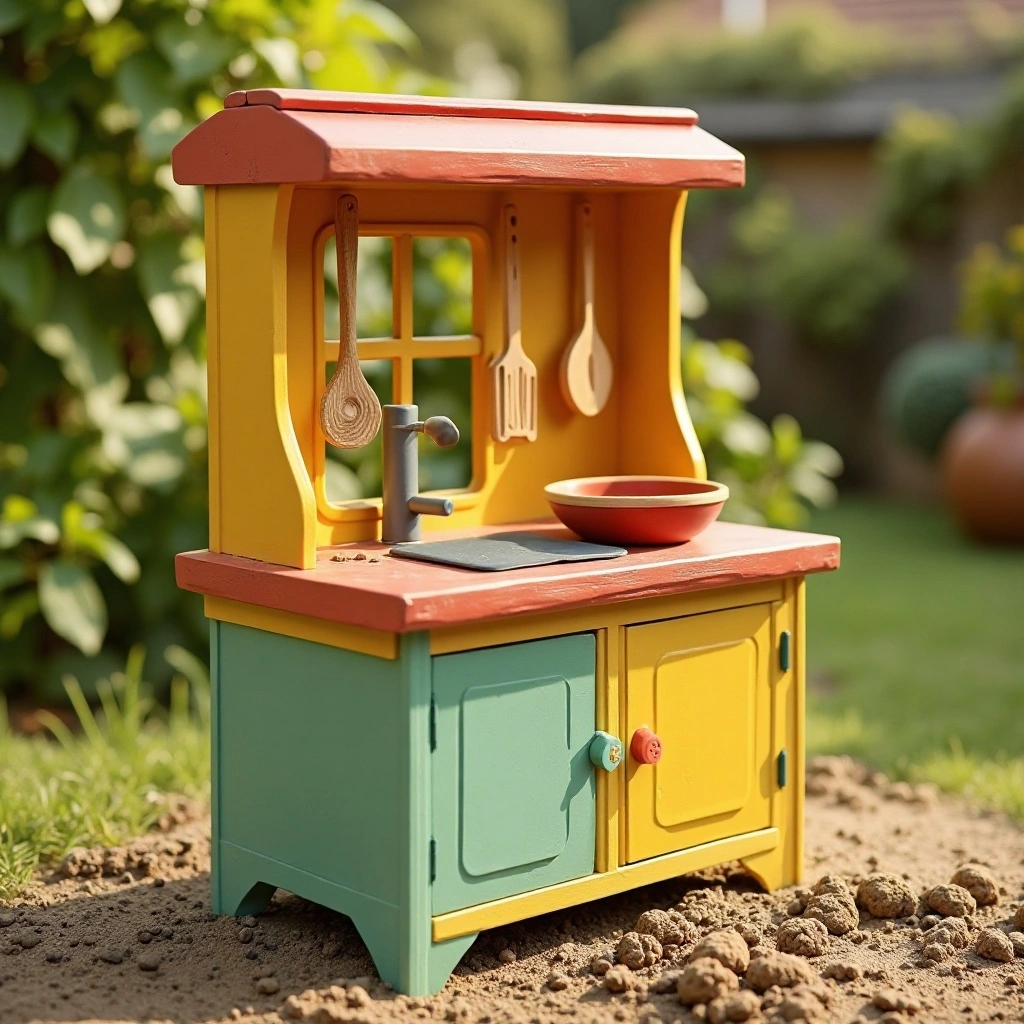
13. Rainbow Colour-Block Kitchen

Few mud kitchen designs bring as much immediate joy as a full rainbow colour-block kitchen. Each structural panel or shelf is painted a different saturated primary or secondary colour — bold red, sunshine yellow, electric blue, vivid green — creating a visual celebration that children are drawn to like magnets.
Beyond pure aesthetics, this design actively supports colour recognition in toddlers while injecting enormous energy into the outdoor space. It’s the mud kitchen equivalent of a permanent festival and practically guarantees outdoor time every single day. Shop on Amazon
How to Style It
- One bold saturated colour per panel
- Matching colour-coordinated accessories
- Rainbow bunting strung overhead
- Colour-sorted utensil cups on the shelf
- Bright primary colour mixing bowls
- Coloured water play station alongside
Where to Use It
Best as a focal point in the garden where the colours can be appreciated from the house. Works wonderfully in nurseries and family gardens as an immediate mood-booster. Pair with bright artificial grass for a full sensory colour experience.
Pro Tip
Use exterior gloss paint rather than chalk for rainbow panels — gloss colours are more saturated and vibrant, and the finish wipes clean of mud far more easily. Add a UV-protective topcoat to prevent sun-fading of the saturated tones across the first full outdoor season.
14. Montessori-Inspired Mud Kitchen
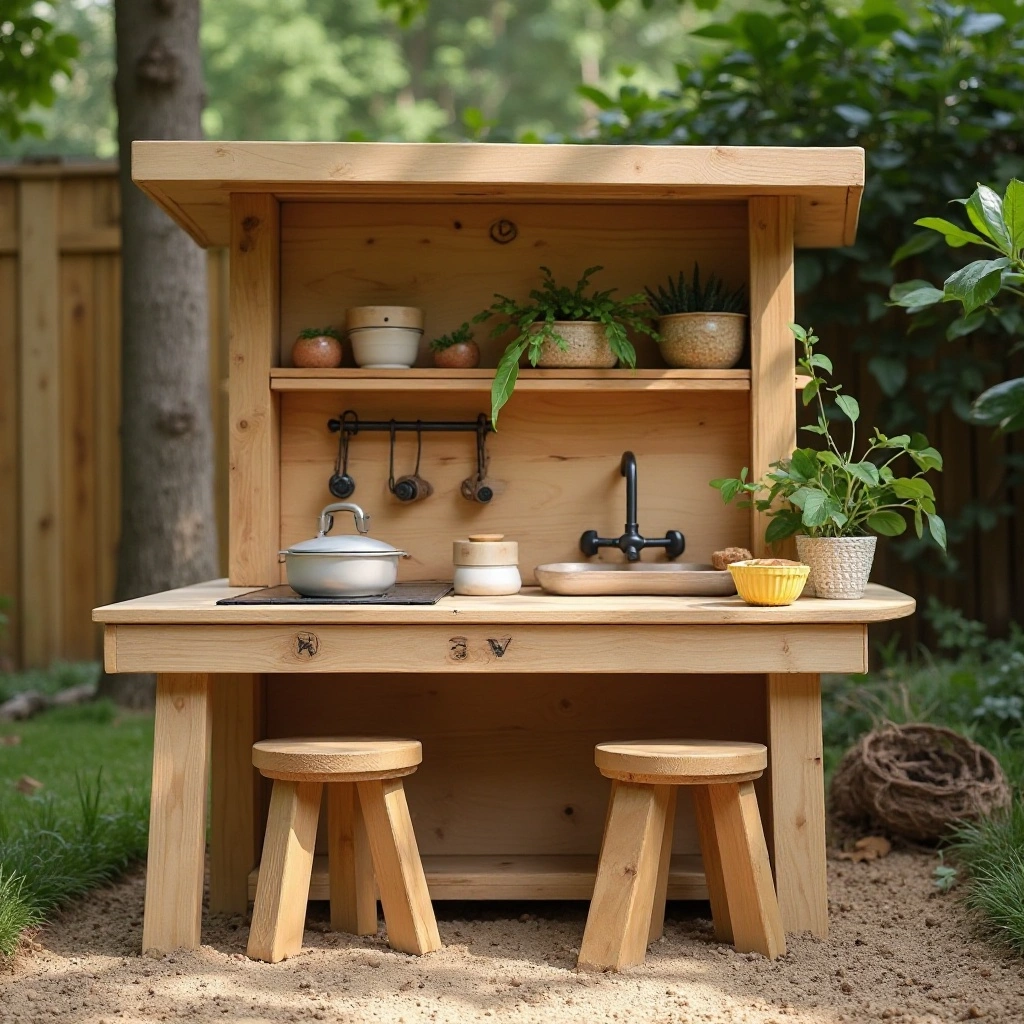
The Montessori-inspired mud kitchen strips back all unnecessary decoration and focuses entirely on child independence, accessibility, and purposeful design. Every element is child-sized and perfectly reachable without adult help. Materials are clearly organised in labelled containers.
Real functional tools — a small working tap, real metal measuring cups, proper pouring jugs — replace toy versions. The environment communicates: “You are capable of doing this yourself.” Children working here develop fine motor skills, concentration, and a powerful sense of self-efficacy that transfers across all areas of learning. Shop on Amazon
How to Style It
- Natural unfinished wood, no paint
- Labelled glass or wooden ingredient containers
- Real functional tools throughout
- Child-height working tap where possible
- Consistent, minimal, purposeful styling
- A dedicated place for every single item
Where to Use It
Thrives in calm, well-designed outdoor spaces with clear pathways and organised play zones. Position away from loud, high-energy areas so children can engage in focused, contemplative sensory play without distraction.
Pro Tip
Introduce a “control of error” element: provide measuring jugs with volume markings and recipe cards specifying exact amounts. Children naturally self-correct when their mixture doesn’t match the card — teaching problem-solving and mathematical thinking through completely intrinsic motivation.
15. Toddler Mini Mud Kitchen
Standard mud kitchens suit children aged 3 and above, but toddlers from 12 months have an instinctive drive to explore mud, water, and sensory materials. The toddler mini mud kitchen is sized at 50–55cm high, built with rounded edges, non-toxic materials, oversized chunky tools little hands can grip, and shallow trays that keep water and mud depth at safe levels.
Everything is designed for confident, independent exploration by the youngest garden adventurers. Watching a one-year-old deeply absorbed in scooping and pouring is one of early parenthood’s most joyful moments. Shop on Amazon
How to Style It
- Counter height 50–55cm (toddler ergonomic)
- Oversized chunky wooden tools and spoons
- Non-toxic, child-safe paint throughout
- Rounded and sanded edges on all surfaces
- Shallow trays maximum 5cm deep
- Suction cup bowl attachment for stability
Where to Use It
Position within clear sightlines from the house for easy supervision. Soft grass or rubber matting underneath protects little knees from falls. Ensure the area is fully enclosed — curious toddlers wander at remarkable speed.
Pro Tip
For very young toddlers under 18 months, fill trays with cooled cooked oat porridge, yoghurt, or cornflour gloop. These are completely safe if mouthed, create identical sensory experiences to mud, and are far easier to clean from hair, ears, and clothing after enthusiastic play sessions.
17. Window Pass-Through Kitchen
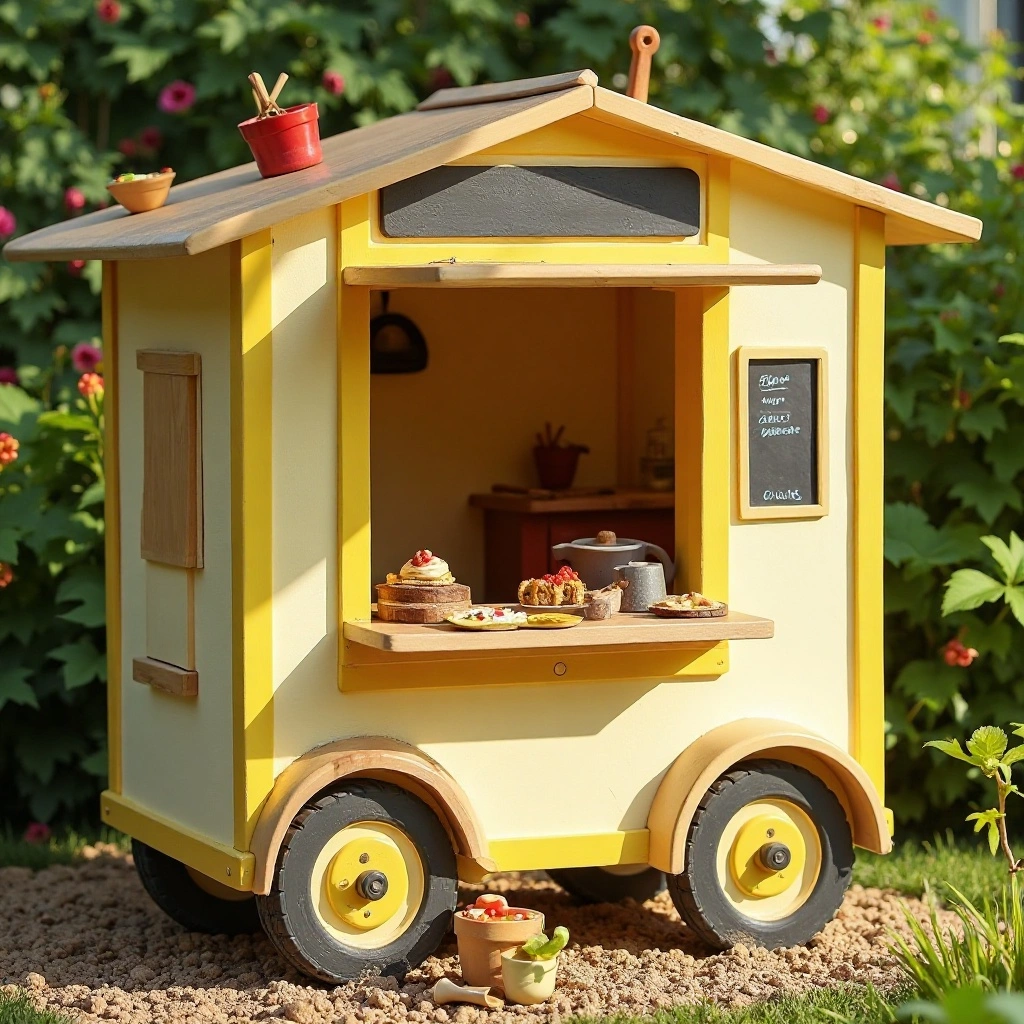
The window pass-through kitchen adds a social and dramatic play dimension that no other mud kitchen design can match. A hinged serving hatch or cut-out window in the back panel separates the “kitchen side” from the “customer side,” allowing children to take orders, prepare dishes, and serve them through the window — just like a food truck.
This design is remarkable for developing social language, turn-taking, negotiation, and cooperative play skills. When two or more children play together here, the social and language learning is extraordinary. Shop on Amazon
How to Style It
- Hinged opening window hatch with safety stop
- Small serving ledge on the customer side
- Menu chalkboard panel above the window
- Till or cash box prop inside
- Food truck or café theme signage
- Order tickets and pencil on a string
Where to Use It
Works best as a freestanding unit in a social area of the garden — near a seating area, sandpit, or lawn where other children naturally gather. The two-sided nature requires open access on both faces, so avoid positioning against a wall.
Pro Tip
Create a laminated “order pad” and hang a short pencil on a string by the customer window. Children filling in written orders — even as scribbles in younger children — is early mark-making and pre-writing development happening completely naturally through play, with zero adult direction required.
18. Stone & Brick Built-In Kitchen
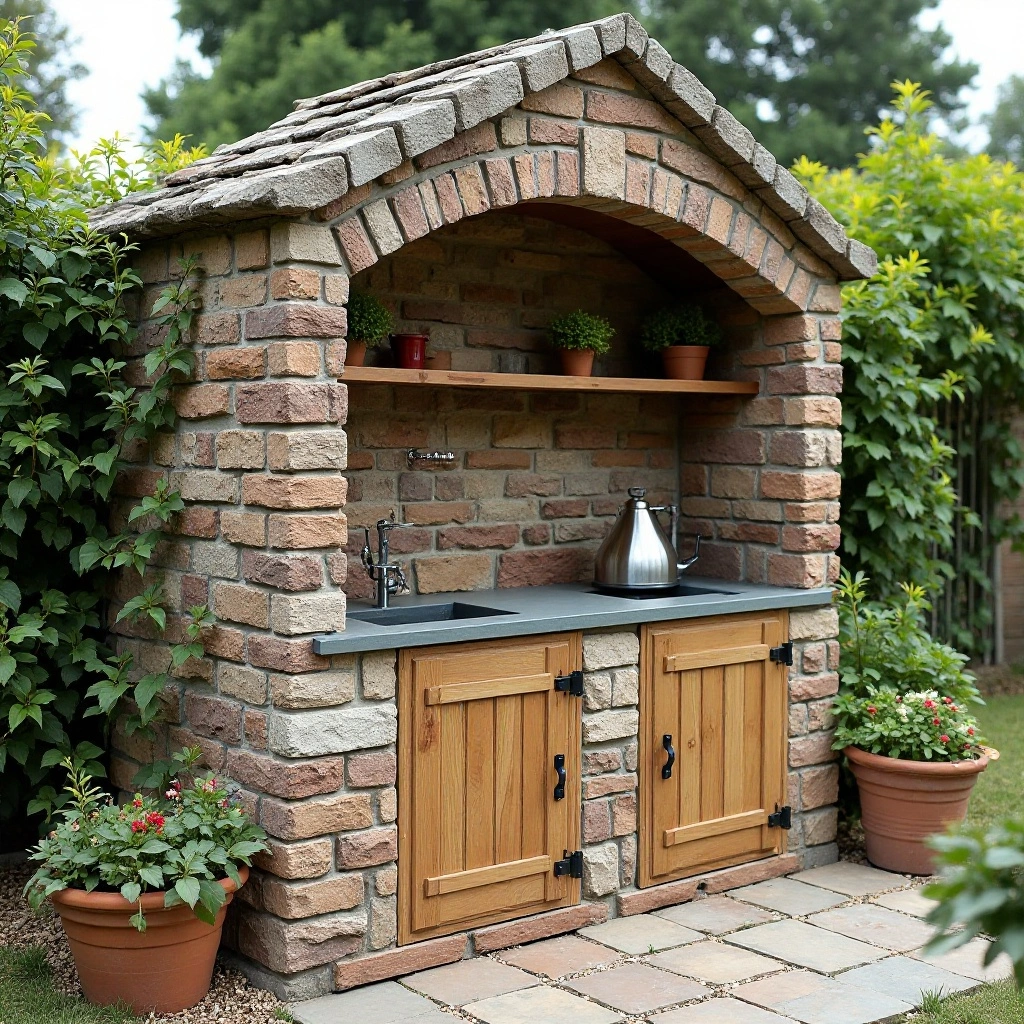
For those who view their mud kitchen as a permanent landscape feature, the stone and brick built-in kitchen is the ultimate investment. Constructed using real brick, reclaimed stone, or rendered breeze block with a slate or stone worktop, this kitchen becomes part of the garden architecture itself.
It weathers beautifully, gains character over time, and never needs replacing. It can be plumbed directly into a garden tap for a real working water supply. The mud kitchen as genuine garden feature — something children outgrow but the garden never will. Shop on Amazon
How to Style It
- Brick or reclaimed stone construction
- Slate or natural stone worktop
- Plumbed-in garden tap for real water
- Climbing plants integrated into the surround
- Weathered metal accessories and hooks
- Integrated storage alcoves built into the structure
Where to Use It
Built against an existing garden wall for structural support, or as a freestanding island in a larger garden. Ensure adequate drainage from the sink and work surface. Position to allow easy adult supervision from the main seating area or house windows.
Pro Tip
Design the worktop at two heights — 55cm for younger children and 75cm for older children and adults. This “grow with you” design remains ergonomically correct as your child grows and can eventually transition into a genuine outdoor kitchen prep area for summer entertaining.
19. Portable Tray & Box Kitchen

Not everyone has a sprawling garden — but every child deserves mud kitchen play. The portable tray kitchen solves the space challenge brilliantly: a set of shallow wooden trays each containing a different material, arranged on step stools or folding shelving, creates a fully functional mud kitchen that sets up and packs away in under three minutes.
Perfect for balconies, patios, rented properties, and smaller outdoor spaces, this approach proves that mud kitchen magic is available to every family regardless of garden size or budget. Shop on Amazon
How to Style It
- Three shallow wooden trays (one texture each)
- Folding step stool or small shelf unit
- Large waterproof play mat as the base
- Drawstring storage bag for all tools
- Clearly labelled ingredient containers
- Wipe-clean tray liners for easy cleaning
Where to Use It
Ideal for balconies, patios, or any compact outdoor space. A large silicone or waterproof fabric splash mat underneath contains mess beautifully and rolls up for easy storage. Works year-round under a canopy or awning for weather protection.
Pro Tip
Keep a dedicated “mud kitchen box” — a sealed plastic tub containing all tools, materials, and accessories. The ritual of “opening the kitchen” by lifting the lid and setting up trays is itself meaningful play. Storage as transition creates anticipation and teaches children responsibility for their own play environment.
20. Luxury Outdoor Play Kitchen
For those investing in a truly exceptional piece of outdoor furniture that will serve their children across an entire childhood, the luxury outdoor play kitchen is in a category of its own. Built from FSC-certified solid hardwood — oak, cedar, or iroko — with real stainless steel sinks, plumbed working taps, integrated chalkboards, and a Scandinavian minimalist aesthetic, these kitchens are as much a statement piece as a play structure.
They command a significant investment but deliver unparalleled longevity, beauty, and play value — often lasting 10–15 years and passing between siblings and generations. Shop on Amazon
How to Style It
- Solid oak or cedar FSC-certified construction
- Real stainless steel sink inset into worktop
- Plumbed-in working tap connection
- Integrated chalkboard panel on one side
- Clean Scandi minimal aesthetic throughout
- Premium wooden or metal branded accessories
Where to Use It
Treat it as garden furniture — position thoughtfully within the overall garden design. Works equally in contemporary minimalist gardens and traditional cottage settings. Natural hardwood complements virtually any planting scheme and genuinely improves the garden’s overall aesthetic appeal.
Pro Tip
Annual maintenance with hardwood oil (teak oil or Danish oil) takes under 20 minutes and dramatically extends the kitchen’s life. Cover with a breathable outdoor furniture cover in winter — never plastic, which traps moisture and causes mould. With proper care, a quality hardwood kitchen easily outlasts multiple childhood stages.
Which Mud Kitchen Is Right for Your Child’s Age?
| Age | Stage | Best Ideas |
|---|---|---|
| 12–24 months | First Explorers | Toddler Mini (#15), Portable Tray (#19) |
| 2–4 years | Young Chefs | Classic Pallet (#1), Farmhouse (#8), Sensory Station (#4) |
| 4–7 years | Story Builders | Fairy Tale (#2), Chef’s Corner (#5), Window Kitchen (#17), Pizza Oven (#11) |
| 7–11 years | Investigators | Potion Station (#16), Jungle Kitchen (#6), Natural Wood (#12) |
| All Ages | Timeless | Luxury Kitchen (#20), Stone & Brick (#18), Upcycled Cabinet (#3) |
Common Mistakes to Avoid
1. Using MDF or Chipboard Outdoors
MDF and chipboard absorb water and swell irreversibly when exposed to rain. Always use exterior-grade plywood (minimum 18mm), solid timber, or marine plywood. The cost difference is minimal; the durability difference is enormous.
2. Building at Adult Height
Standard kitchen counter height is 90cm — far too tall for most children. Build at 65–70cm for children aged 3–7, and 55cm for toddlers. Children’s posture, comfort, and play duration all improve dramatically when the work surface is the right height.
3. Using Interior Paint Outdoors
Interior emulsion flakes, peels, and fades within a single season outdoors. Always use exterior chalk paint, exterior gloss, or exterior primer followed by two coats of outdoor-rated paint. Add UV-protective varnish as a final coat.
4. Neglecting Drainage
Without drainage, water play areas become stagnant puddles. Drill drainage holes in all sink bowls and water trays, and position the kitchen on a surface that drains naturally — gravel, permeable membrane, or slightly angled hardstanding.
5. Over-Tidying Between Play Sessions
Resist the urge to deep-clean the kitchen after every session. Children benefit enormously from returning to work they left the previous day — it builds continuity, ownership, and deeper narrative play. A light rinse is sufficient.
6. Failing to Secure the Structure
A mud kitchen that wobbles is both dangerous and discouraging. Secure pallet kitchens to fence posts or ground stakes. Add rubber feet or L-brackets to prevent sliding. Test stability by pushing firmly from all directions before allowing children to play.
Frequently Asked Questions
What age is a mud kitchen suitable for? Mud kitchens are suitable from approximately 12 months old when adapted with safe, mouthable materials and shallow supervised trays. Standard mud kitchens for independent play typically suit children aged 2–3 and above. The upper age limit is essentially limitless — many children aged 8, 9, and 10 remain deeply engaged with elaborately themed mud kitchen play, particularly when the setup includes potion-making, scientific experiments, or complex role play scenarios.
Is mud play actually safe? Yes — extensive research supports mud play as genuinely beneficial and safe. Soil contact exposes children to beneficial microbiota that research suggests boosts mood, immune function, and stress resilience. Basic hygiene practices — hand washing before eating, avoiding mud near roads or animal waste, and checking for broken glass — make mud kitchen play entirely safe for healthy children.
How do I keep a mud kitchen clean between uses? A light rinse with a garden hose after use is sufficient for daily maintenance. Empty and dry metal bowls in summer to prevent rust; tip out standing water to avoid mosquito breeding. Monthly scrubbing with a brush and mild outdoor cleaner keeps surfaces fresh. Annual repainting of worn sections maintains appearance and protects the wood. Avoid high-pressure washing, which damages paintwork and forces water into wood grain.
What accessories do I need for a mud kitchen? The essentials: old metal pots and pans, mixing spoons and ladles, a mixing bowl or sink, and a water source. Beyond these, muffin tins, cake tins, sieves, funnels, measuring cups, small jugs, and chopping boards extend play enormously. Natural loose parts — pebbles, sticks, leaves, cones, seed pods — are free and among the most valuable additions available. Metal and wood are preferable to plastic for durability and sensory quality.
Can a mud kitchen stay outside all year? Properly built and finished mud kitchens from exterior-grade timber can stay outdoors year-round in most climates. Key protections: exterior paint or sealant, annual re-oiling or repainting, draining water in hard frosts to prevent cracking, and a breathable cover in sustained very wet periods. Metal accessories should be brought inside in winter or replaced with stainless steel. A well-maintained mud kitchen can last 5–10+ years outdoors.
How much does a mud kitchen cost to build? Costs range widely. A pallet-based DIY kitchen can be built for under £30 using reclaimed pallets, basic paint, and charity shop pots. A mid-range DIY build from new timber costs £80–£150. Quality ready-made kitchens from specialist brands range from £100–£400. Premium hardwood or custom-built kitchens reach £500–£1,200+. The most important factor is build quality and material suitability — a £30 pallet kitchen built correctly will outlast a £100 kit built with unsuitable materials.
What can I use instead of mud? Many materials offer similar sensory benefits: play sand, kinetic sand, oobleck (cornstarch and water), cloud dough (flour and baby oil), wet compost, shredded paper, bird seed, or peat-free potting compost. In winter, fake snow from baking soda and white conditioner is wildly popular. Rotating materials keeps the kitchen fresh and engaging across seasons and age groups.
How do I involve my child in building their mud kitchen? Children from age 2 can help apply paint with a brush (supervised). From age 4 they can choose colours, apply stickers, arrange accessories, and use sandpaper on smooth surfaces. From age 6 they can assist with measuring and planning the layout. Building together creates shared ownership that makes subsequent mud play richer, longer, and more meaningful for both child and adult.
Ready to build your mud kitchen? Save this guide, share it with a friend, and get outside. The garden is waiting — and so is one very muddy, very happy child.