10 Creative Painting Flower Pots Ideas
There is something deeply satisfying about turning a plain, ordinary pot into a piece of art. It does not require a studio, a degree, or an expensive set of supplies. All it takes is a little paint, a brush, and the willingness to try.
Painting Flower Pots Ideas are proof that the smallest creative acts can make the biggest difference — a single pot on a windowsill can change the entire feeling of a room.
Whether you are decorating your home, refreshing your garden, or looking for a meaningful handmade gift, you are in the right place.
Why Painting Flower Pots Are Worth Your Time
Most home decor upgrades cost money, time, and effort with no guarantee of a result you will love. Painted flower pots are different. Here is why this craft consistently delivers:
They are affordable. A plain terracotta pot costs almost nothing, and a basic set of acrylic paints goes a long way. You can create a stunning, one-of-a-kind piece for a fraction of what a designer pot would cost in a store.
They are forgiving. Unlike wallpaper or furniture, if you do not love what you painted, you can simply sand it down and start over. There is no permanent commitment — just creative freedom.
They make spaces feel personal. Mass-produced decor fills homes with things that look like everyone else’s. A hand-painted pot carries your taste, your choices, and your energy. Visitors notice. It matters.
They are a genuine creative outlet. Painting is meditative. The focus it requires quiets the noise of daily life. Even beginners report that the process itself is as rewarding as the finished result.
They make exceptional gifts. A painted pot filled with a plant or herbs is thoughtful, personal, and useful — the combination that makes a gift truly memorable.
Idea #1 — Boho Geometric Terracotta Pot
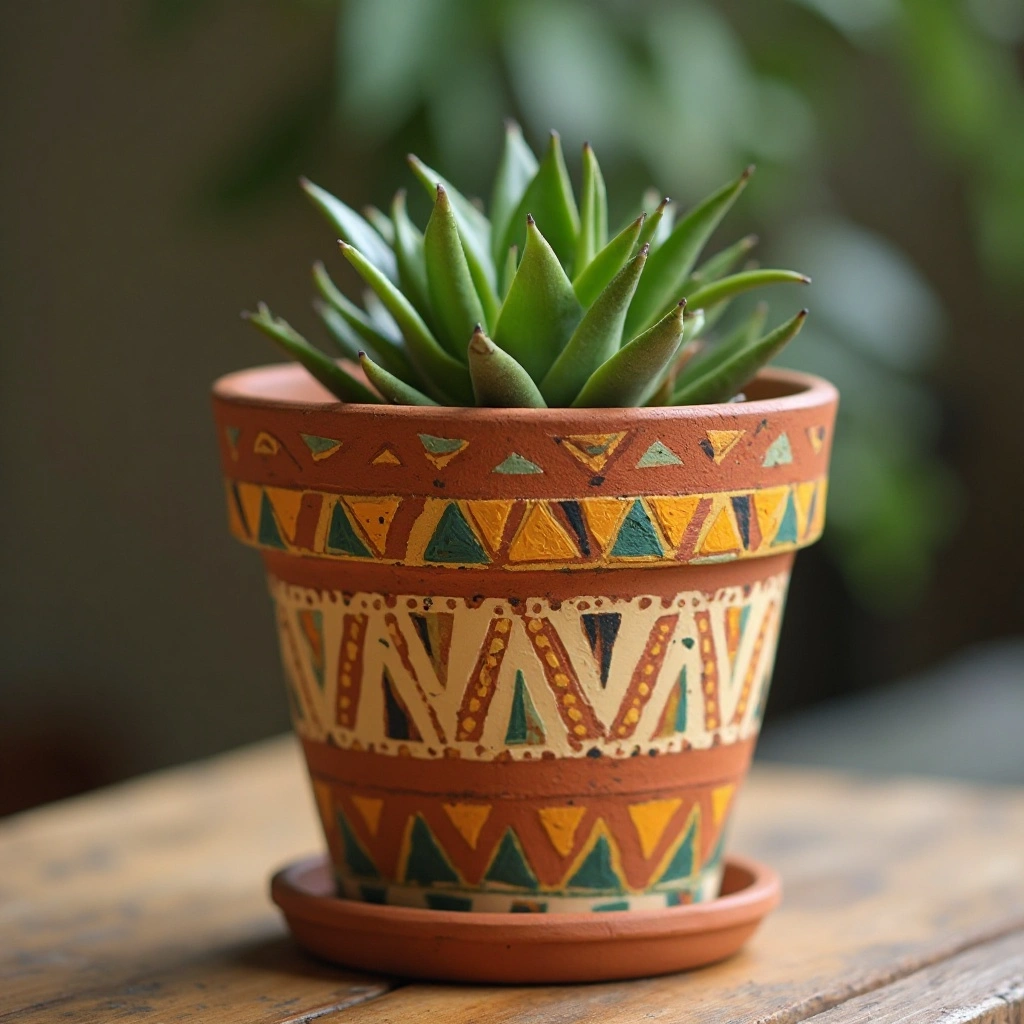
A warm terracotta pot hand-painted with bold geometric shapes — triangles, diamonds, and zigzag lines — in earthy tones of burnt orange, cream, mustard yellow, and forest green. The design wraps around the entire pot, giving it a tribal, bohemian feel that belongs in a desert-inspired sanctuary. Shop on Amazon
How to Style It
- Paint the base pot with a cream or white undercoat first
- Use painter’s tape to create sharp geometric lines
- Fill each section with a different earthy tone
- Add fine black outlines with a liner brush for definition
- Seal with matte varnish to protect the design
Where to Use It
Bohemian living rooms, reading corners, desert-inspired patios, or boho bedroom windowsills. Pairs beautifully with succulents, cacti, or trailing string-of-pearls plants.
Pro Tip
Mix a tiny amount of raw umber into your colors to keep all shades in the same warm family — this prevents any color from looking out of place and gives the whole pot a cohesive, sun-baked feel.
Idea #2 — Minimalist Black & White Stripe Pot
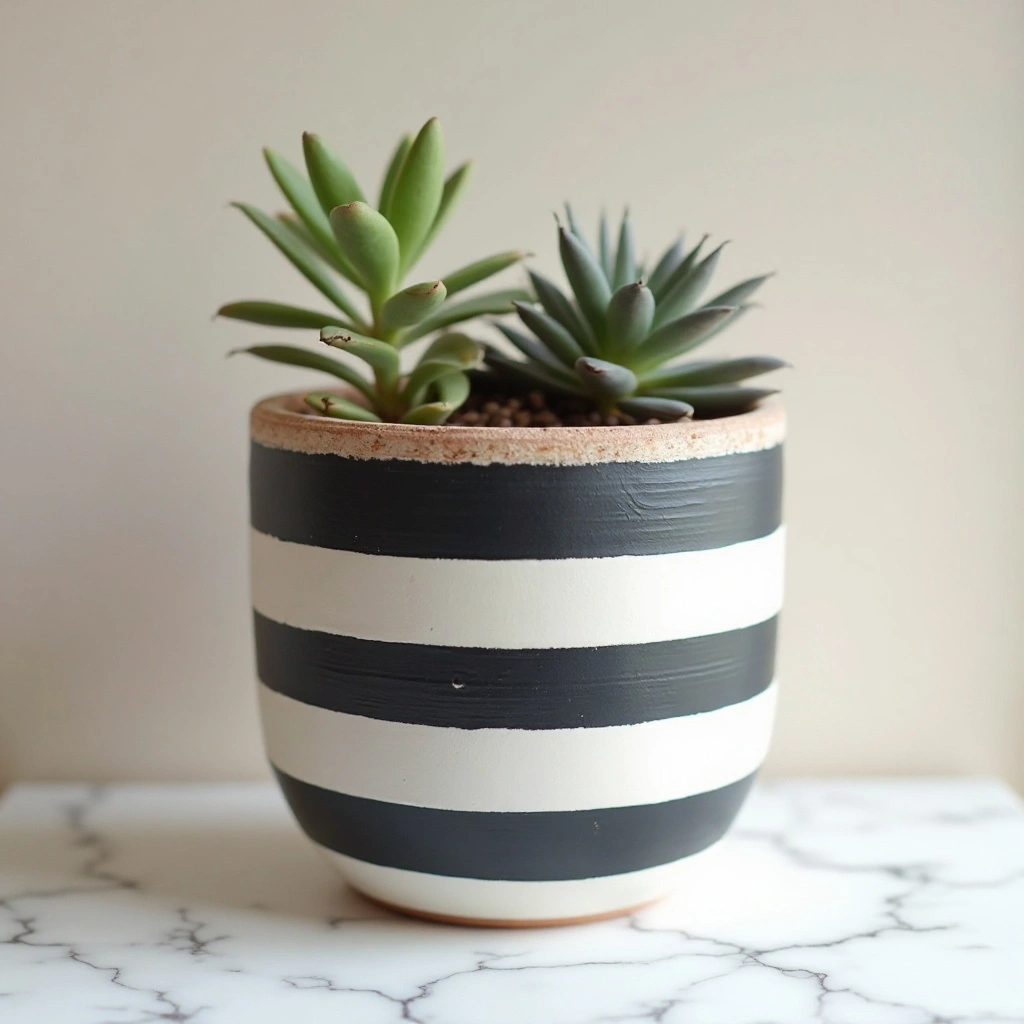
A sleek, modern flower pot painted in crisp alternating black and white horizontal stripes of varying widths. The clean lines give it an architectural quality — simple yet striking. The mouth of the pot is left in natural terracotta or painted solid black for contrast. Shop on Amazon
How to Style It
- Apply a white base coat and let dry completely
- Use painter’s tape to mark out horizontal stripes of different widths
- Paint alternating stripes black with a flat brush
- Remove tape while paint is still slightly wet for cleanest lines
- Finish with a glossy or satin sealant
Where to Use It
Modern kitchens, Scandinavian-style offices, bathroom counters, or entryway console tables. Looks especially sharp with a fiddle leaf fig, snake plant, or peace lily.
Pro Tip
Vary the stripe widths intentionally — alternate a wide stripe (4 cm) with a thin stripe (1 cm) rather than making them all equal. This creates visual rhythm and feels more deliberately designed.
Idea #3 — Watercolor Floral Ombre Pot
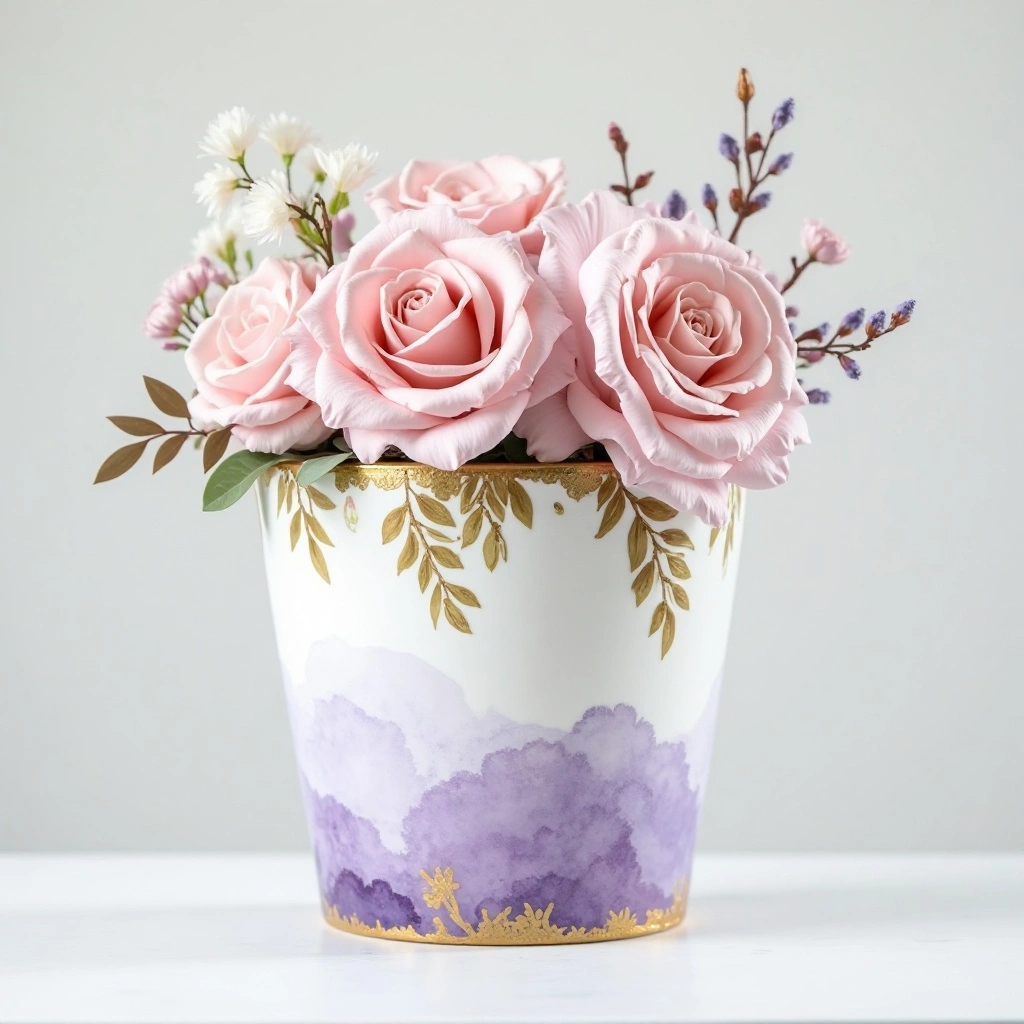
A soft, dreamy pot with a watercolor-style floral design blending from blush pink at the top to lilac and soft lavender at the base. Delicate painted roses, daisies, and leaves float across the surface as if brushed with real watercolor paints, giving the pot an ethereal, romantic quality. Shop on Amazon
How to Style It
- Start with a white base coat
- Use heavily diluted acrylic paint to mimic watercolor transparency
- Work wet-on-wet for soft color blending
- Add fine gold metallic accents around the rim with a detail brush
- Seal with a soft-sheen varnish to preserve the delicate look
Where to Use It
Bedroom vanities, wedding centerpieces, feminine home offices, or bathroom shelving. Pair with peonies, roses, or lavender for a cohesive floral theme.
Pro Tip
Add a few drops of water to your acrylic paint and test on paper first until it looks transparent enough to mimic real watercolor. The more water, the more the base color beneath shows through naturally.
Idea #4 — Galaxy / Night Sky Pot
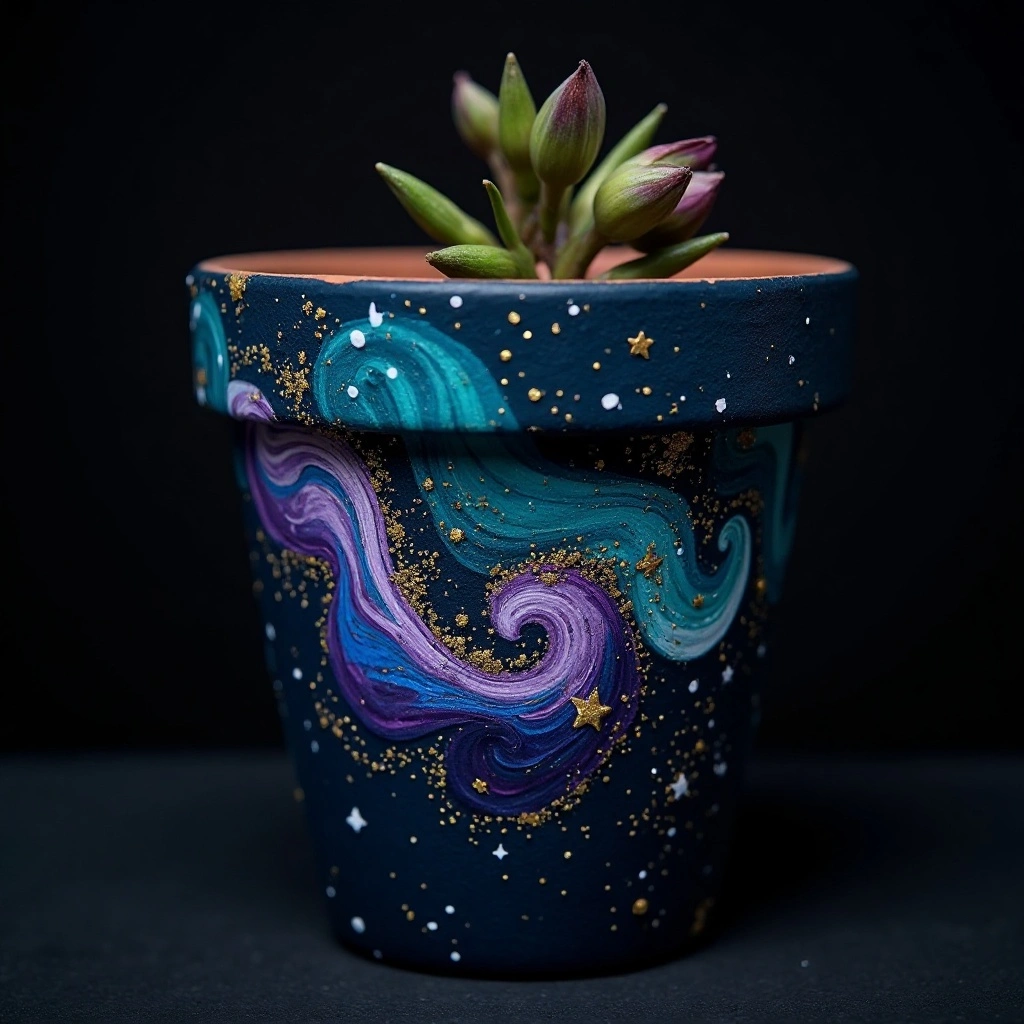
A dramatic, deep-space inspired pot painted in midnight navy and black, with swirling nebula clouds of purple and teal, scattered white star dots, and subtle gold specks that catch light like a real starfield. A mesmerizing, cosmic piece that glows under warm lighting. Shop on Amazon
How to Style It
- Base coat the pot in matte black
- Dab dark navy and deep purple with a sea sponge for the nebula effect
- Add teal and blue highlights by blotting lightly
- Flick white paint with a stiff brush for star dots
- Dab gold acrylic sparingly for metallic stardust
- Seal with gloss varnish to enhance depth
Where to Use It
Kids’ rooms, teen bedrooms, gaming setups, dark-academia living rooms, or creative studio spaces. Pairs perfectly with air plants, ferns, or a dramatic black orchid.
Pro Tip
Use a sea sponge rather than a paintbrush for the nebula clouds — the irregular sponge texture creates a natural, organic swirl that is nearly impossible to replicate with a brush.
Idea #5 — Mediterranean Blue Mosaic Tile Pot
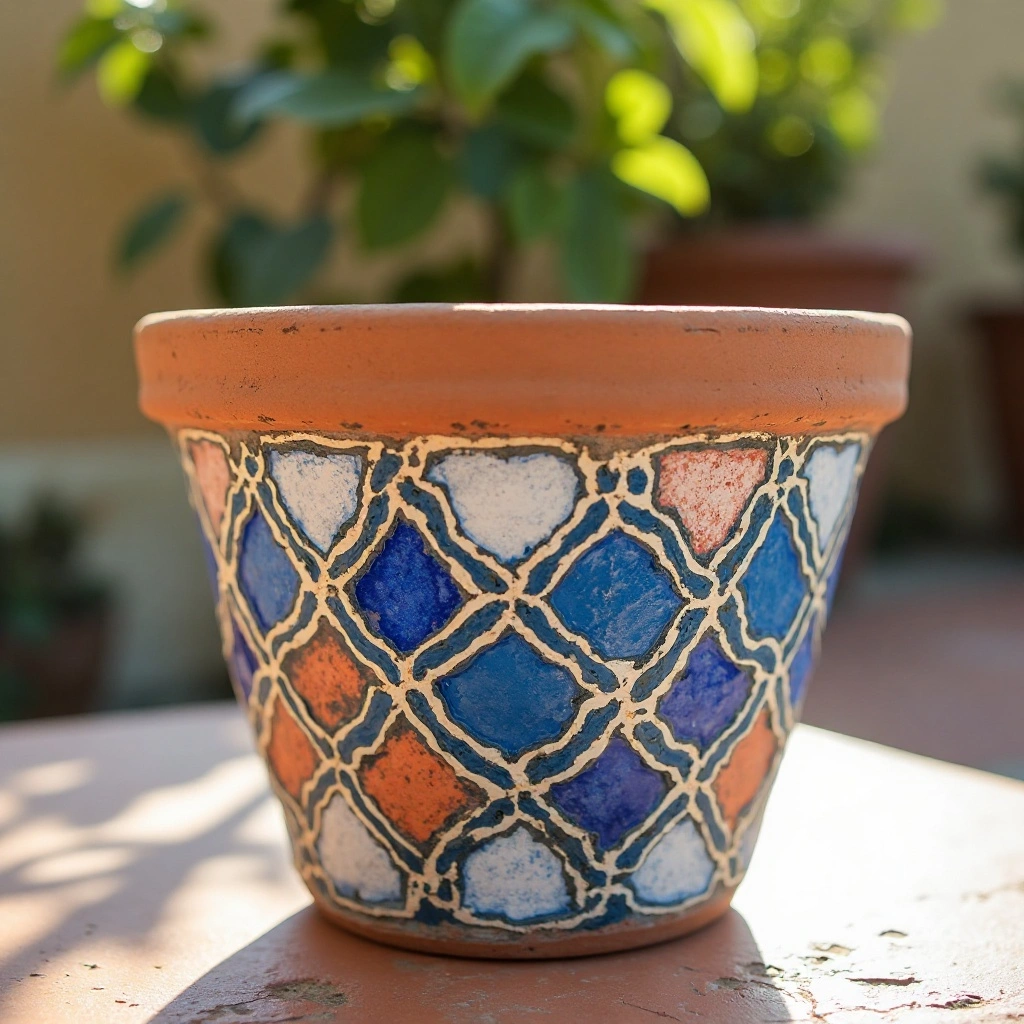
Inspired by the sun-drenched coasts of Morocco and Greece, this pot is painted to imitate a mosaic tile pattern in cobalt blue, white, and touches of terracotta. Each painted “tile” is separated by thin white grout lines, creating a stunning illusion of real ceramic mosaic work. Shop on Amazon
How to Style It
- Sketch a tile grid onto the pot with pencil first
- Paint the base white, then fill each tile section in alternating cobalt and terracotta
- Use a fine liner brush to paint white grout lines over everything
- Add small geometric accents inside each tile for extra detail
- Seal with outdoor-grade sealant if placing outside
Where to Use It
Outdoor patios, Mediterranean garden corners, kitchen windowsills, or entryways. Plant with rosemary, thyme, or lavender for an authentic coastal kitchen vibe.
Pro Tip
Do not try to make the “tiles” perfectly even — slight irregularities actually make the mosaic look more authentic and handmade, just like real tilework.
Idea #6 — Pastel Polka Dot Spring Pot

A cheerful, playful pot in a soft pastel base color — think mint green or baby yellow — covered in hand-painted polka dots of various sizes in coordinating spring pastels: coral, lilac, sky blue, and peach. Light, fun, and full of joy. Shop on Amazon
How to Style It
- Apply a solid pastel base coat (mint, butter yellow, or sky blue)
- Use the eraser end of a pencil dipped in paint for perfect round dots
- Use different pencil or brush sizes for varied dot sizes
- Space dots randomly rather than in a grid for a more organic look
- Seal with satin varnish for a subtle sheen
Where to Use It
Children’s bedrooms, nurseries, spring porches, or colorful kitchen shelves. Plant with colorful pansies, petunias, or marigolds for maximum seasonal cheer.
Pro Tip
Use a pencil eraser for small dots and a cork from a wine bottle for large dots — both create consistently round shapes far better than any brush.
Idea #7 — Organic Abstract Brush Stroke Pot
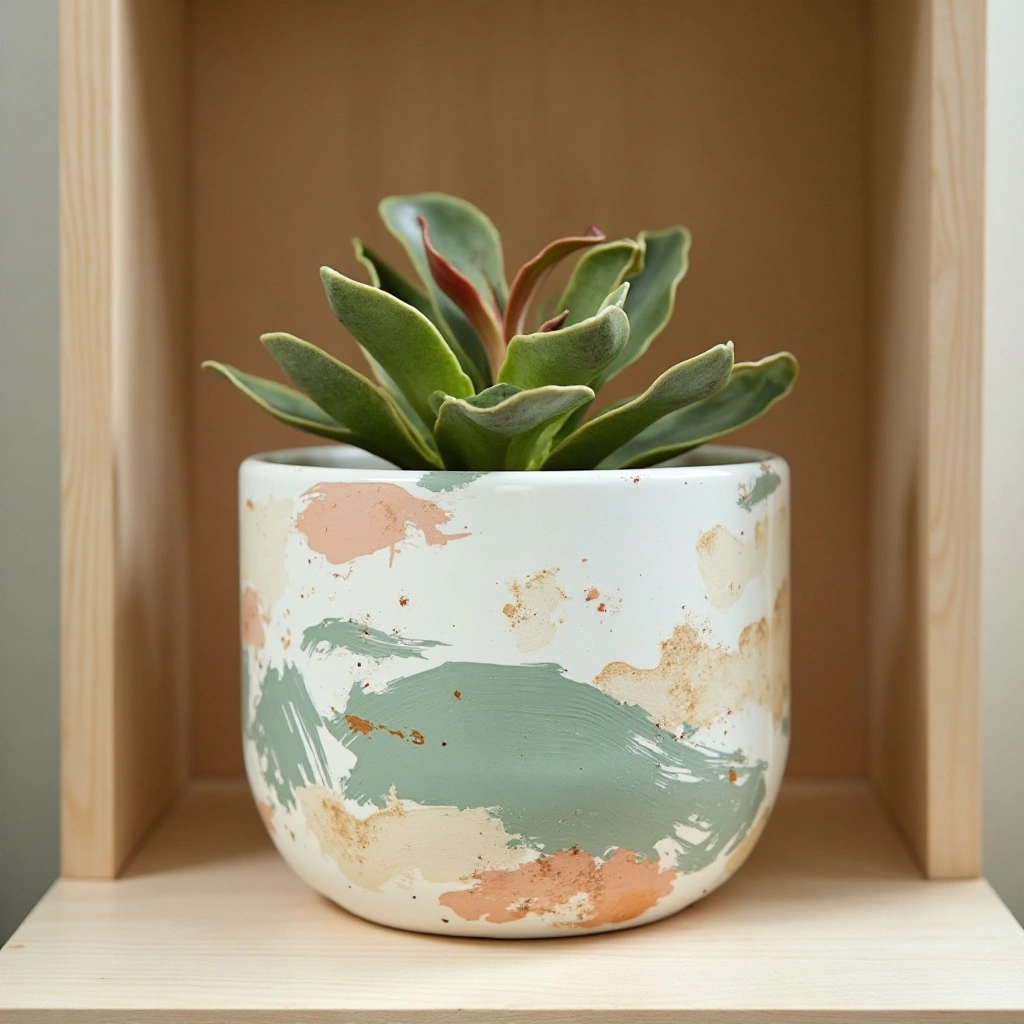
An artsy, expressive pot featuring loose, sweeping brushstrokes in contrasting colors — ivory and sage green, or charcoal and warm terracotta. The strokes are intentionally imperfect and gestural, giving the pot an abstract expressionist quality that looks straight out of a gallery. Shop on Amazon
How to Style It
- Paint the pot white or cream as the base
- Load a wide flat brush with paint and sweep bold strokes across the surface
- Layer a second color in a contrasting but complementary tone
- Leave some base coat showing — negative space is key to this style
- Seal with matte varnish for a gallery-quality finish
Where to Use It
Modern living rooms, art studios, open-plan Scandinavian homes, or gallery walls. Pairs beautifully with architectural plants like monstera, bird of paradise, or olive trees.
Pro Tip
Work quickly and do not overthink it — abstract brushstroke art looks best when painted fast and confidently. If you pause and fiddle, the spontaneity disappears.
Idea #8 — Vintage Botanical Illustration Pot
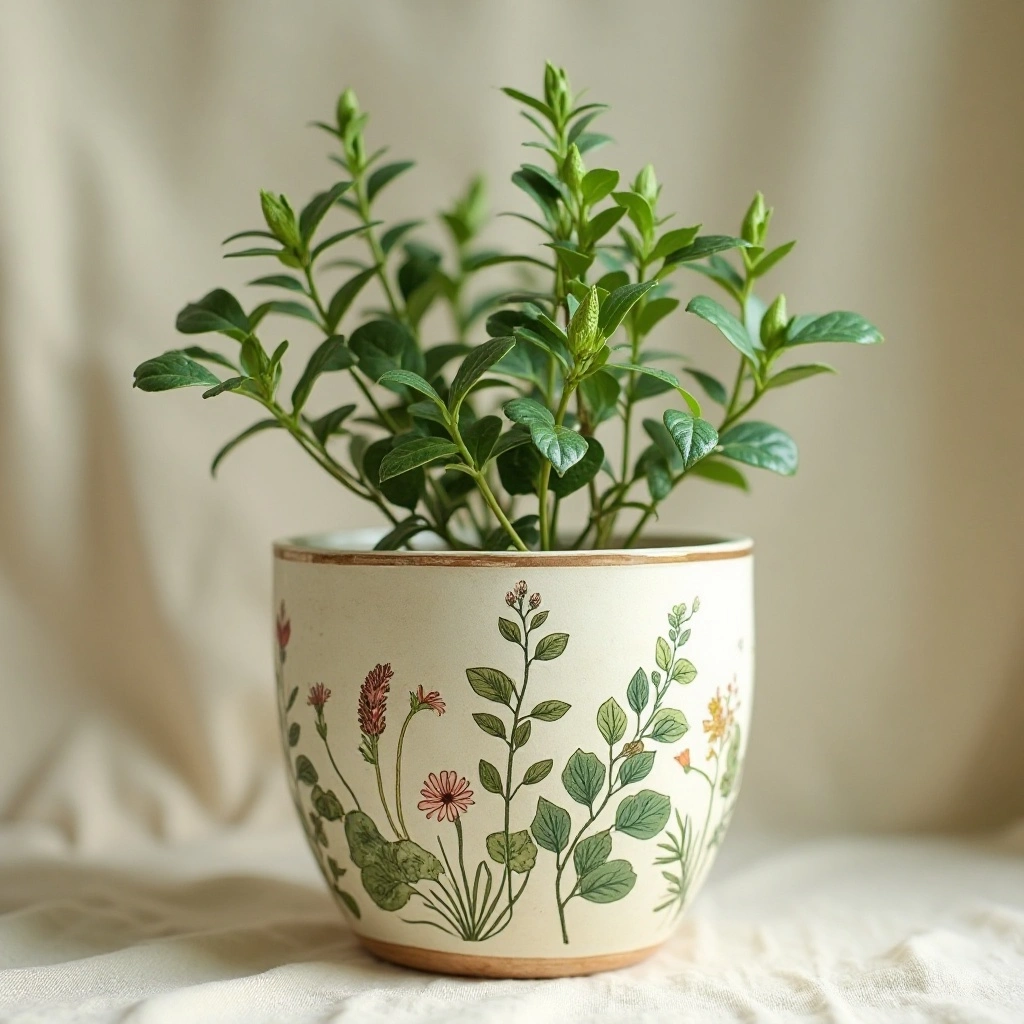
A refined, sophisticated pot painted in a cream or antique white base, adorned with hand-painted vintage botanical illustrations of herbs, leaves, and botanicals in muted greens, dusty rose, and sepia tones. The style echoes 19th-century scientific illustration journals. Shop on Amazon
How to Style It
- Base coat in antique cream or aged white
- Sketch botanical outlines lightly in pencil
- Paint with thin, detail-focused brushstrokes in muted tones
- Add fine vein details on leaves with a liner brush
- Use a dry brush of sepia over the whole pot for an aged effect
- Seal with matte varnish
Where to Use It
Cottage-style kitchens, Victorian-inspired studies, farmhouse porches, or herbal gardens. Plant with actual herbs like basil, mint, or rosemary to match the illustrated design.
Pro Tip
Print out a real vintage botanical illustration as reference before you start — not to copy exactly, but to study how the lines, proportions, and shading work at a glance.
Idea #9 — Ombre Sunset Gradient Pot
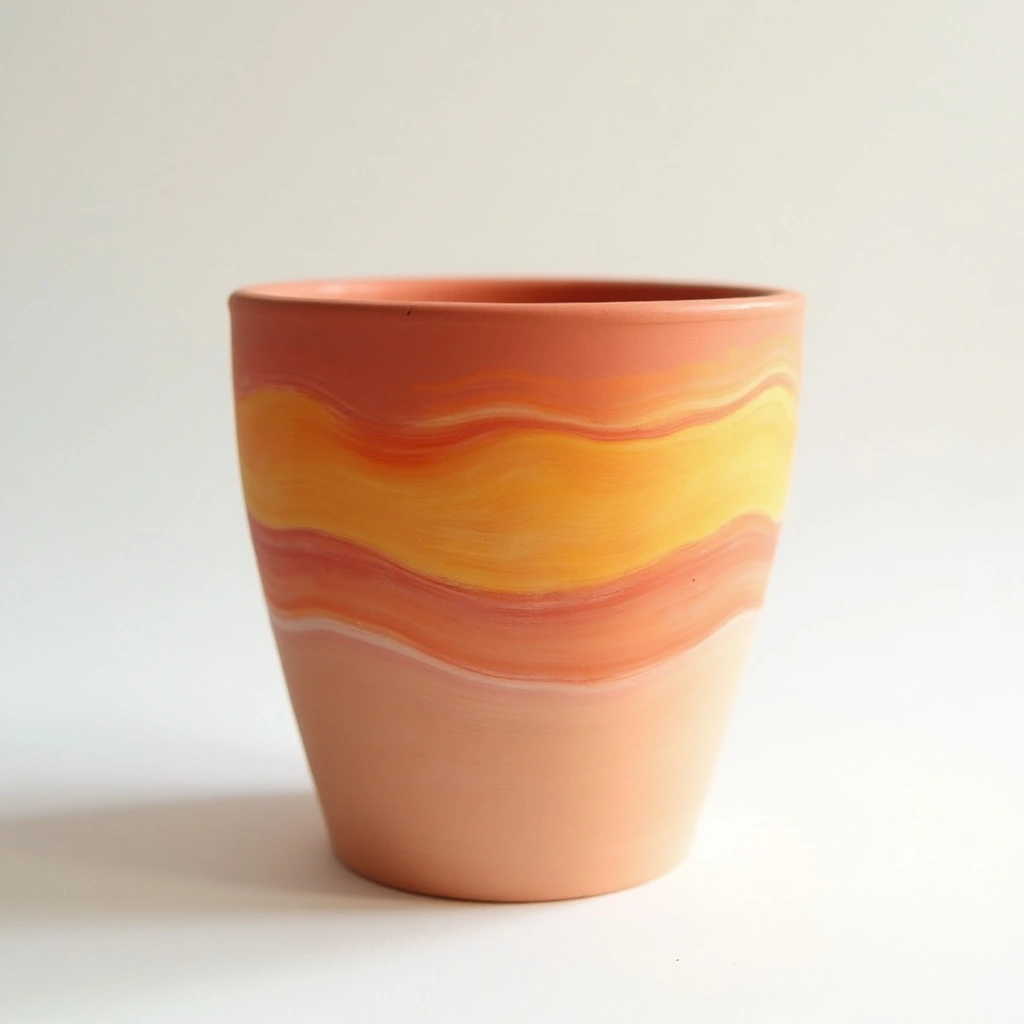
A breathtaking gradient pot that transitions from deep coral and tangerine orange at the top, melting into golden yellow at the mid-section, and fading to soft peach or blush at the base — capturing the colors of a perfect golden-hour sunset in a single pot. Shop on Amazon
How to Style It
- Apply the darkest color (coral) at the top third
- While still wet, blend the middle color (golden yellow) downward
- Apply the lightest color (blush) at the base and blend upward
- Use a soft dry brush in circular strokes at each transition point
- Repeat layering until transitions are smooth
- Seal with glossy varnish to enhance color intensity
Where to Use It
Outdoor terraces, summer patios, tropical-style living rooms, or bright kitchen windowsills. Matches best with golden pothos, marigolds, or flamingo flowers.
Pro Tip
Work while all layers are still slightly wet — if you let each color fully dry before blending the next, you will get harsh lines instead of a smooth gradient.
Idea #10 — Gold Leaf Luxury Marble Pot
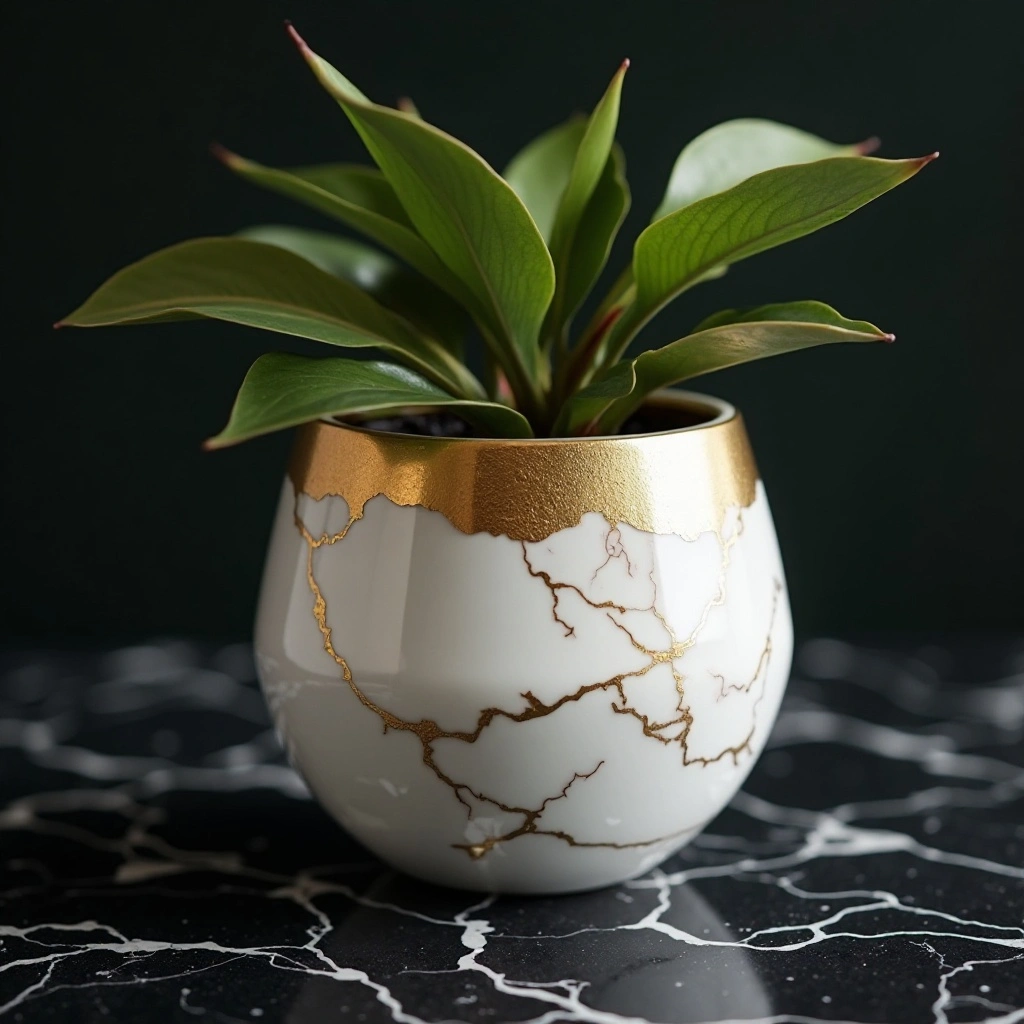
The ultimate statement piece: a pot painted in sophisticated pearl white or charcoal grey, with hand-painted marble veining in silver or gold, and real (or faux) gold leaf accents applied to the rim and base. The result is a pot that looks like it belongs in a luxury interior design showroom. Shop on Amazon
How to Style It
- Paint the pot in smooth pearl white or deep charcoal as the base
- Use a fine liner brush and thin gold or silver paint to paint irregular marble veins — let them branch and fork naturally
- Apply gold leaf adhesive to the rim and press faux gold leaf sheets on top
- Gently brush off excess gold leaf with a soft brush
- Seal carefully with a non-yellowing varnish (avoid brushing over gold leaf too firmly)
Where to Use It
Luxury living rooms, master bedrooms, glamorous vanity corners, or as a gift for special occasions. Plant with a white orchid, marble queen pothos, or dramatic philodendron for a five-star effect.
Pro Tip
When painting marble veins, hold the liner brush very loosely near the end of the handle and let your hand tremble slightly as you drag — this natural tremor creates the organic, irregular vein pattern that makes marble look authentic.
Common Mistakes to Avoid
1. Skipping the primer or base coat Painting directly on raw terracotta means the paint absorbs unevenly and the final color looks patchy. Always seal the pot first with a primer or at least two solid base coats.
2. Using indoor paint for outdoor pots Standard acrylic paint will crack, peel, and fade in rain and sunlight. Always use outdoor-grade or weather-resistant acrylic paint for any pot that will live outside.
3. Not sealing the finished design Paint alone will chip and scratch over time — especially with regular watering. A proper sealant or outdoor varnish is non-negotiable if you want your design to last.
4. Rushing between coats Painting the next layer before the previous one is fully dry causes smudging, streaking, and color bleed. Allow 20–30 minutes drying time per coat for acrylic paint.
5. Using too much water to thin paint A little water helps flow, but too much makes paint streaky and watery. Use an acrylic medium instead of water when thinning is needed.
6. Ignoring the inside rim and drainage hole The inside rim and base of the pot are often forgotten. Paint visible interior sections with at least a base color so the finished pot looks complete from every angle.
7. Choosing colors without testing first Colors often look different on pots than on the palette. Always test your color combination on a scrap surface or paper before committing to the pot.
Frequently Asked Questions
Q: What type of paint is best for flower pots? Acrylic paint is the most popular choice — versatile, fast-drying, and available in matte, satin, and gloss finishes. For outdoor pots, choose outdoor acrylic or patio paint specifically formulated for weather resistance.
Q: Do I need to seal painted flower pots? Yes, always. Sealing is essential to protect your design from moisture, sun, and scratching. Use a clear acrylic sealant, outdoor Mod Podge, or a dedicated outdoor varnish. Apply 2–3 coats for best protection.
Q: Can I paint plastic pots? Yes, but you will need a plastic-bonding primer first, otherwise the paint may peel off. After priming, acrylic paints adhere well to plastic. Seal the finished pot well, especially for outdoor use.
Q: How do I make painted pots waterproof? Use outdoor-grade acrylic paint and seal with a waterproof outdoor varnish. For extra protection, apply sealant to the inside of the pot as well.
Q: Will the paint affect my plants? Once the paint is fully cured (usually 24–72 hours after the final sealant coat), it is safe for plants. Avoid letting fresh paint contact soil or roots.
Q: How long does a painted pot last outdoors? With outdoor-grade paint and a proper sealant, a well-painted pot can last 2–5 years outdoors. Bringing pots indoors during harsh winters significantly extends their life.
Q: Can I repaint a pot that is already painted? Yes — lightly sand the surface to help new paint adhere, wipe clean, and apply a fresh base coat before adding your new design.
Q: What is the best brush for detail work? A fine round liner brush (size 0 or 00) is ideal for intricate details, veining, outlines, and fine lines. For broad coverage, use a flat wash brush in sizes 12–20.
Final Thoughts
Painted flower pots are one of the most accessible and high-impact forms of home creativity. They require minimal tools, minimal budget, and can completely transform any corner of your home or garden. Whether you go bold with a galaxy design, elegant with gold marble, or playful with polka dots, the key ingredients are always the same: good prep, quality paint, proper sealing, and the confidence to experiment.