23+ Spring Centerpiece Ideas – Transform Your Table
Spring is the season of renewal, and your table deserves to reflect that fresh energy. Whether you’re hosting an Easter brunch, a garden party, or simply want to brighten your everyday meals, the right centerpiece can transform your dining experience from ordinary to unforgettable.
These spring centerpiece ideas combine natural beauty with creative styling to help you capture the season’s vibrant spirit without breaking the bank.
Affiliate links are used in this article. If you make a purchase through them, I may earn a small commission without any added cost to you.
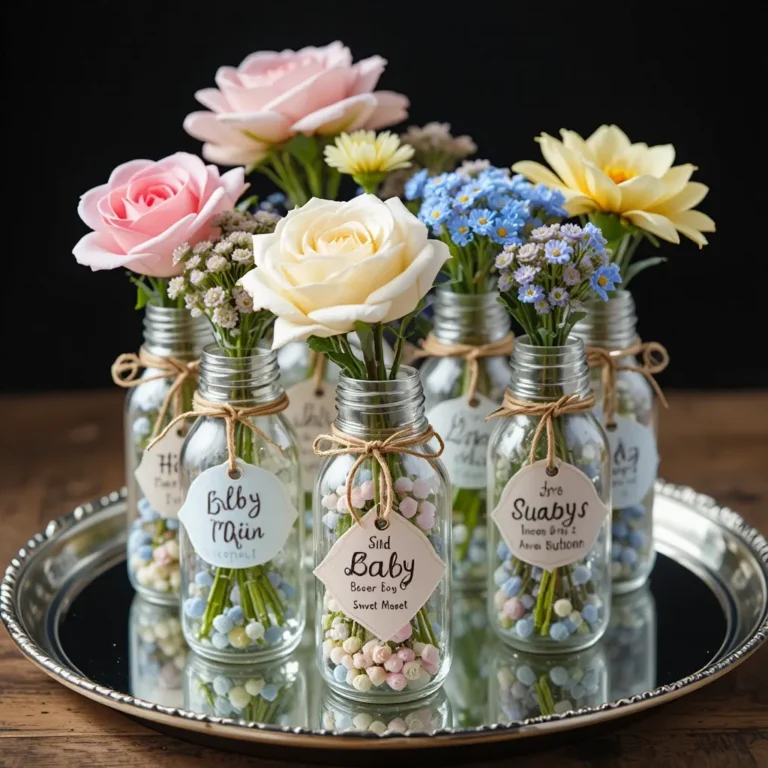
1. Tulip Tower in Clear Glass Vases
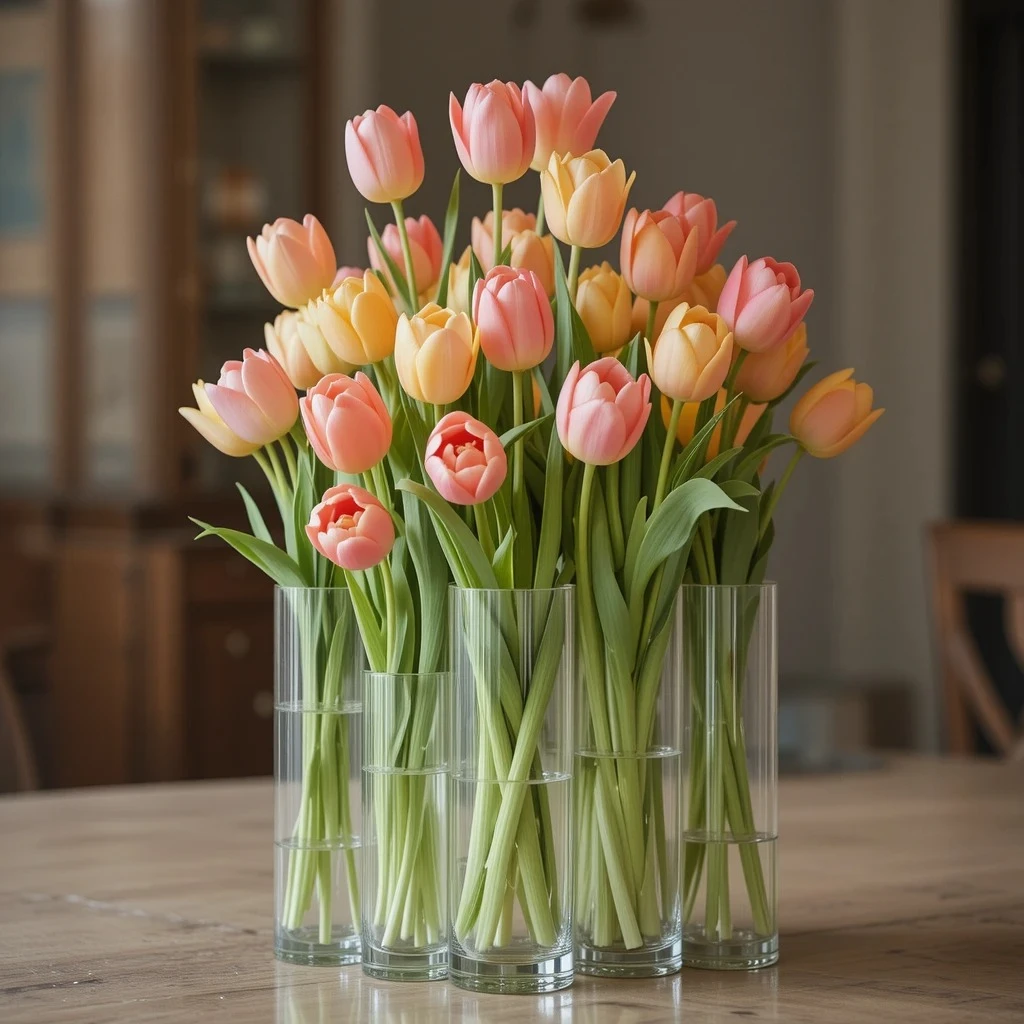
A collection of varying-height clear glass cylinder vases filled with colorful tulips in shades of pink, coral, yellow, and white, arranged in a cluster down the center of a dining table. The stems are visible through the glass, creating a clean, modern aesthetic with the tulips at different heights creating visual interest and dimension. Shop on Amazon
Why It Works: This arrangement celebrates tulips’ architectural beauty while their varying heights create natural conversation breaks across the table. The transparent vases showcase the elegant stems, doubling the visual impact, while the monochromatic grouping of each vase keeps the look sophisticated rather than chaotic. It’s fresh, modern, and unmistakably spring.
How to Style It:
- Cut tulips to heights of 8″, 12″, and 16″ and group same heights together for maximum impact
- Use odd numbers of vases (3, 5, or 7) and arrange them in a slightly staggered line rather than perfectly straight
- Keep water crystal clear by changing it daily and adding a drop of bleach to prevent cloudiness
- Place vases on a linen table runner to anchor the arrangement and add texture contrast
Where to Use It: Formal dining rooms, Easter brunch tables, wedding reception tables, console tables in entryways
Pro Tip: Tulips continue growing after they’re cut, so purchase them a day before your event when they’re still tightly closed, and they’ll open to perfection right on schedule.
2. Lemon and Herb Garden Centerpiece
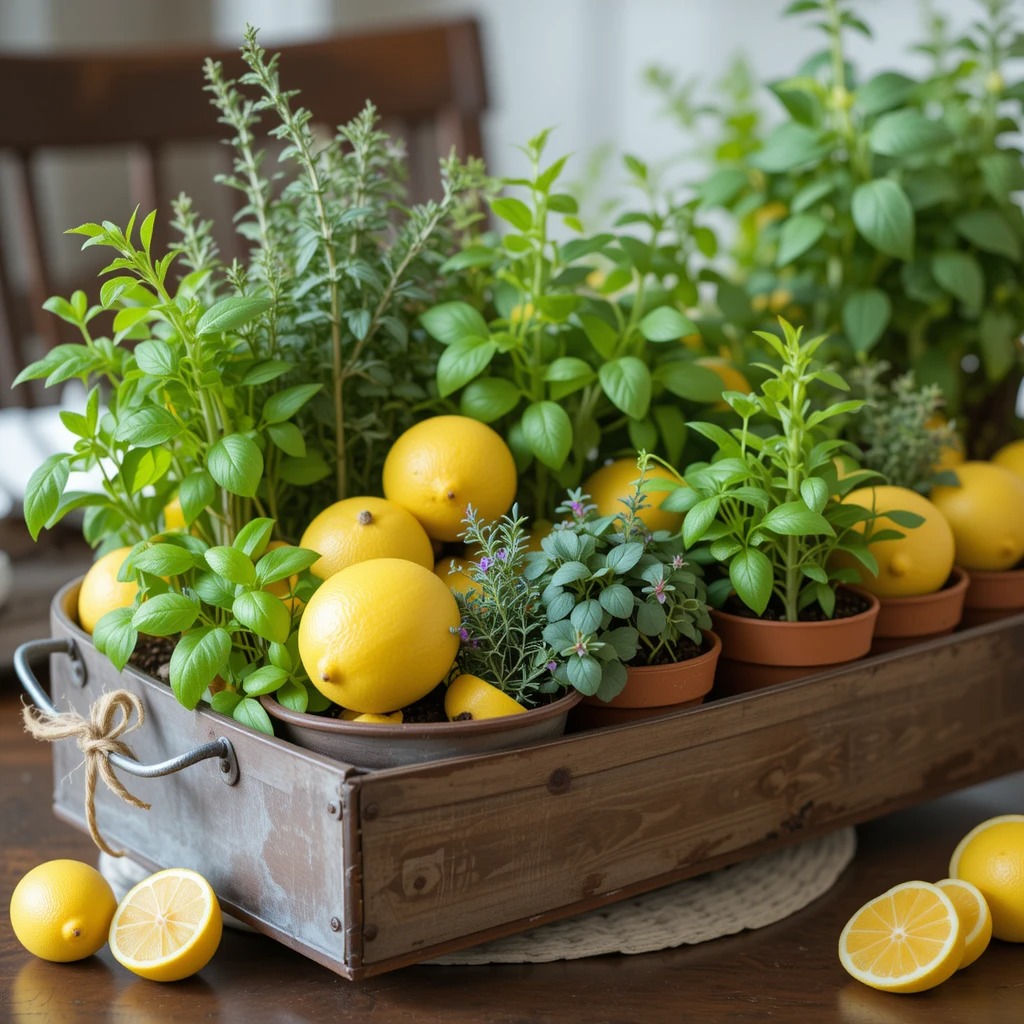
A rustic wooden tray or galvanized metal container filled with potted herbs like rosemary, thyme, and basil, interspersed with fresh lemons—some whole, some sliced—creating a fragrant, functional centerpiece. Small terracotta pots and natural twine add farmhouse charm, while the green herbs and bright yellow lemons create a fresh color palette. Shop on Amazon
Why It Works: This centerpiece engages multiple senses with its visual appeal, fresh fragrance, and practical functionality. Guests can actually snip herbs for their meal, making it interactive and memorable. The combination of citrus and herbs evokes Mediterranean spring gardens while remaining budget-friendly since you can transplant the herbs to your garden afterward.
How to Style It:
- Choose a weathered wooden tray at least 24″ long to create substantial presence on your table
- Place 3-5 small herb pots (4″ diameter) and nestle whole lemons between them, adding lemon slices propped vertically for height
- Wrap some pots with burlap or linen tied with twine for varied texture
- Add small chalkboard plant markers with handwritten herb names for a personalized touch
Where to Use It: Kitchen tables, outdoor dining spaces, covered porches, brunch buffets
Pro Tip: Mist the herbs lightly before guests arrive—the water droplets will catch the light beautifully and intensify the aromatic oils for a more fragrant experience.
3. Floating Flower Garden in Shallow Bowl
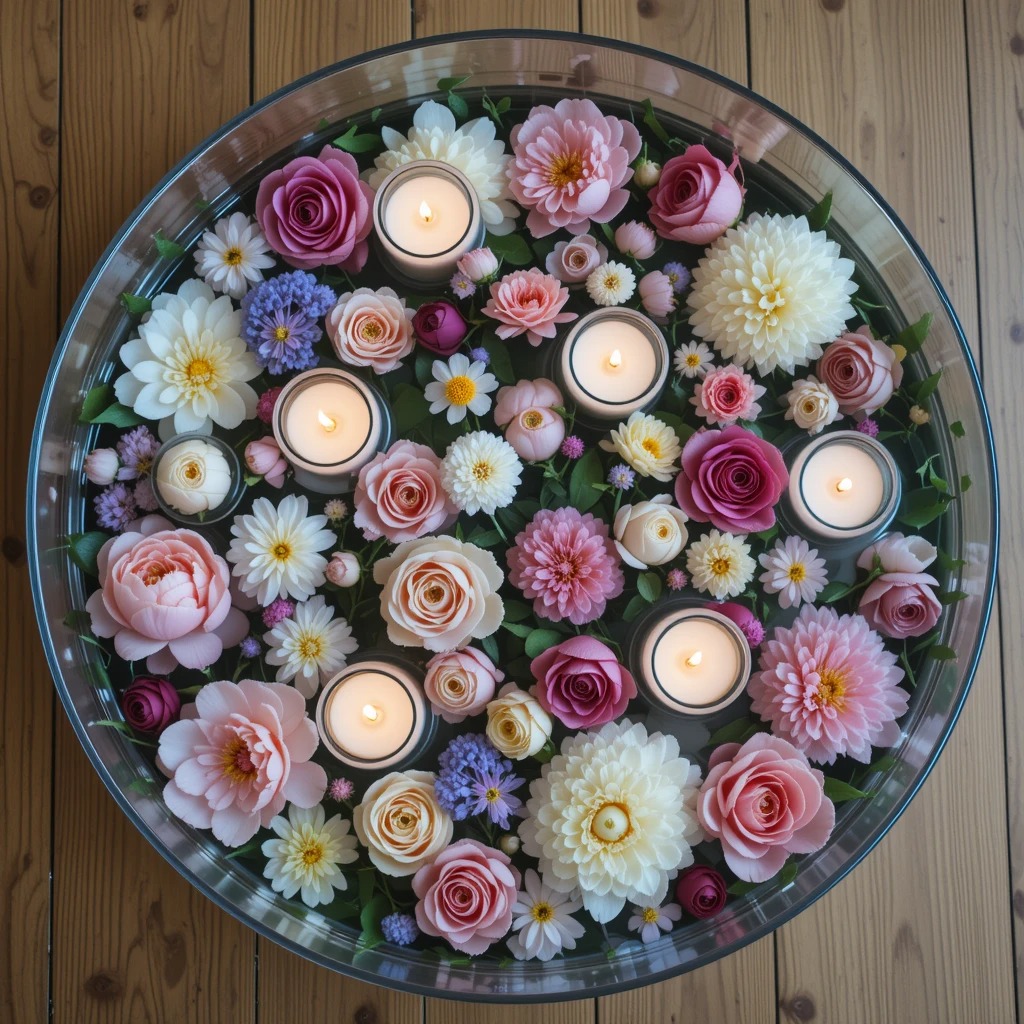
A wide, shallow bowl (14-18″ diameter) filled with water and floating blooms like peonies, ranunculus, garden roses, and cherry blossoms, creating the illusion of a flower garden viewed from above. Small votive candles in clear glass holders float among the blooms, adding soft illumination for evening gatherings. Shop on Amazon
Why It Works: This low-profile design ensures conversation flows freely across the table while maximizing visual impact when guests look down. The floating technique extends the life of blooms that might be too short-stemmed for traditional arrangements, making it budget-friendly. The water creates a reflective surface that doubles the beauty and adds a serene, spa-like atmosphere.
How to Style It:
- Fill the bowl 3/4 full with room-temperature water and add flower food to prevent bacterial growth
- Cut flower stems to 1-2″ and let them float naturally—avoid overcrowding by leaving 40% of the water surface visible
- Add floating candles in clear glass holders for stability, spacing them evenly among the blooms
- Surround the base of the bowl with scattered petals or moss for a finished look
Where to Use It: Round dining tables, coffee tables, outdoor garden party tables, powder room vanities
Pro Tip: Use distilled water instead of tap water to keep the arrangement crystal clear throughout your event—minerals in tap water can create cloudy residue within hours.
4. Cascading Wisteria and Candlelight
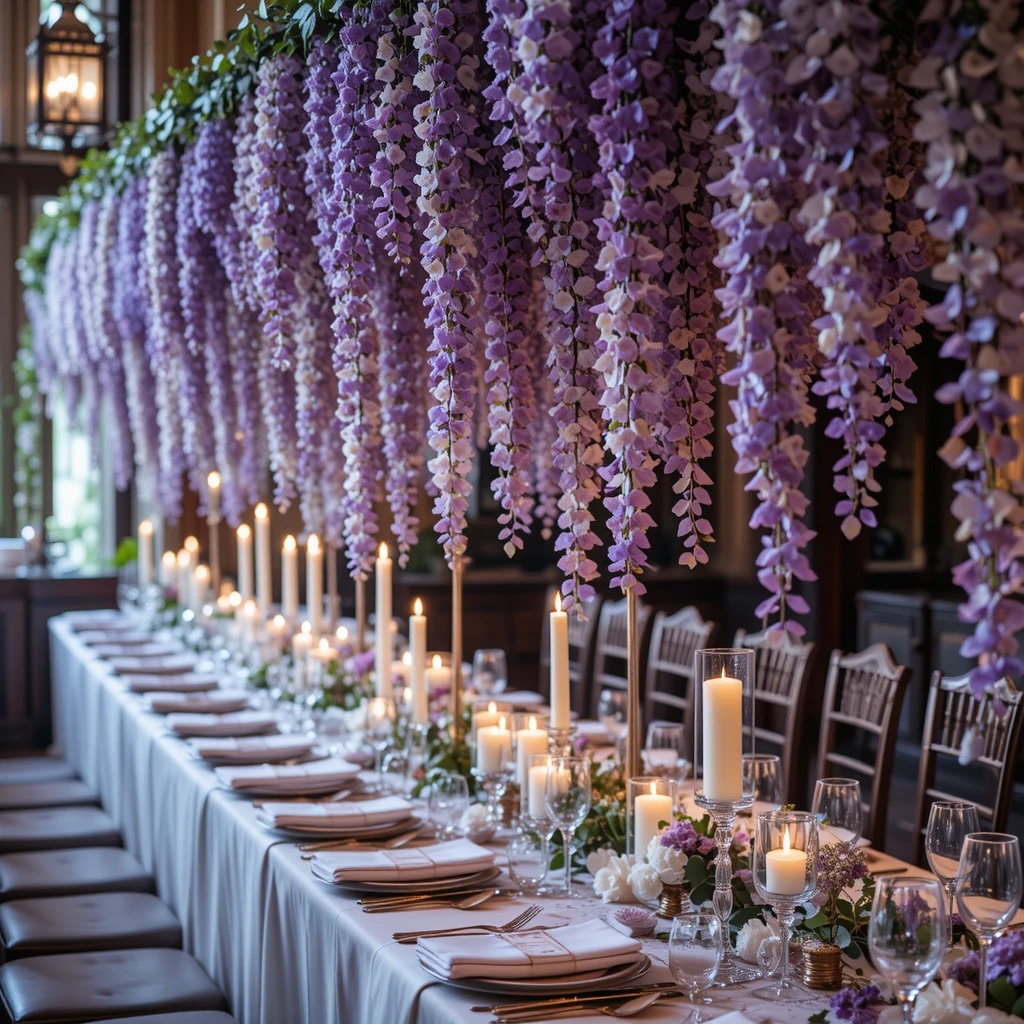
Long, trailing wisteria branches (real or high-quality silk) draped along the table’s length, interwoven with pillar candles in varying heights placed on candlesticks and holders. The purple and white wisteria blooms cascade gracefully between place settings while the candles add vertical dimension and romantic glow. Shop on Amazon
Why It Works: Wisteria’s natural draping habit creates movement and drama without feeling stiff or formal. The cascading design draws the eye along the entire table length, making even modest tables feel grand. The combination of the delicate flowers with substantial candles balances feminine and sophisticated elements perfectly.
How to Style It:
- Lay wisteria branches end-to-end down the table center, allowing some blooms to cascade over the edges
- Place candlesticks of 8″, 12″, and 16″ heights at intervals, ensuring no candle is directly in a sightline
- Weave the wisteria loosely around candlestick bases to integrate the elements
- Add mercury glass votives tucked into the garland for additional shimmer and light layers
Where to Use It: Wedding tables, anniversary dinners, romantic outdoor evening gatherings, formal dining rooms
Pro Tip: If using fresh wisteria, cut branches the morning of your event and immediately submerge stems in lukewarm water for 2 hours—this helps them stay supple and prevents premature wilting.
5. Terracotta Pot Progression
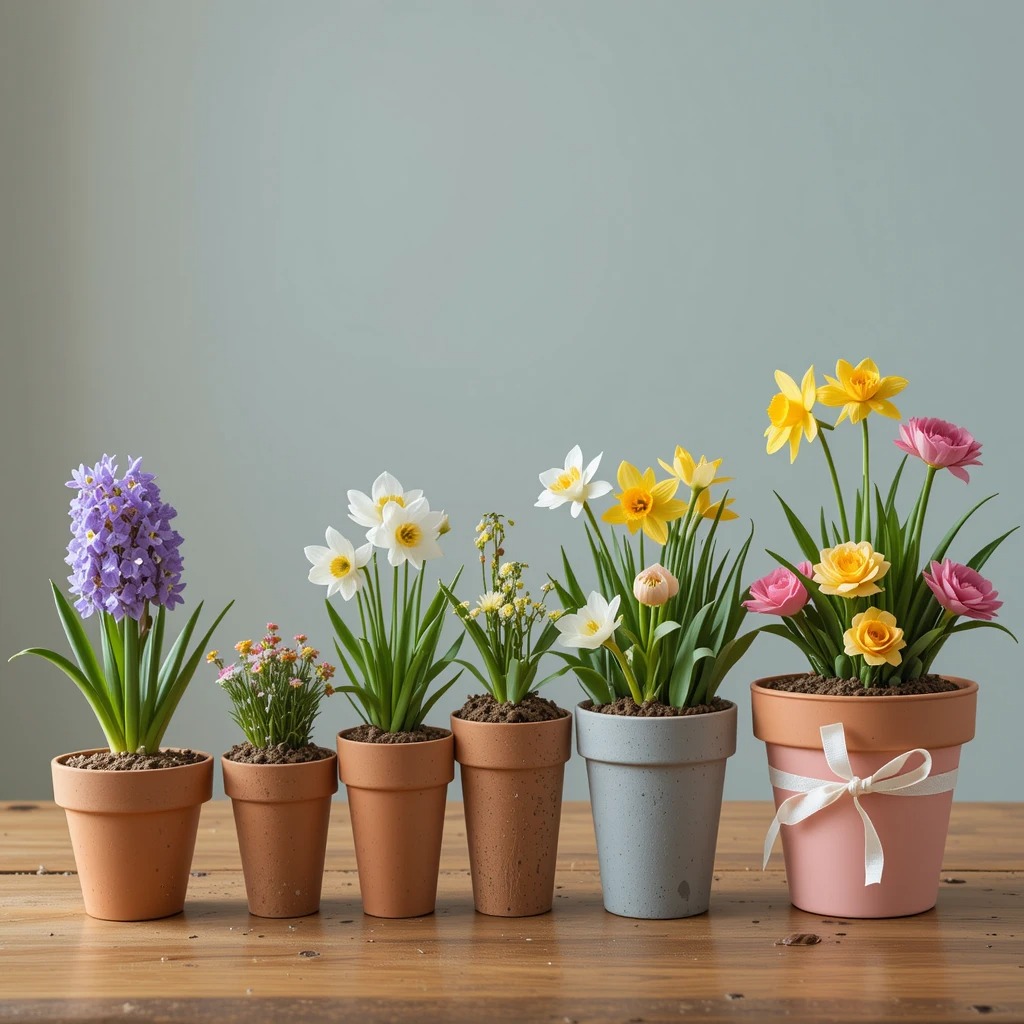
A series of terracotta pots in graduated sizes arranged in ascending order down the table, each planted with different spring blooms like hyacinths, daffodils, primrose, and ranunculus. Some pots remain natural terra cotta while others are painted in soft pastels or wrapped with ribbon, creating cohesive variety. Shop on Amazon
Why It Works: The graduated sizes create natural rhythm and visual flow while the terracotta brings warmth and authenticity to the table. This arrangement is wonderfully forgiving—if one plant wilts, the others still shine. Plus, guests can take pots home as favors, and you can later transplant them to your garden for lasting value.
How to Rise It: Potted plants are more forgiving than cut flowers, lasting weeks rather than days, making this ideal for extended spring celebrations or homes where you want lasting decor. The earthy terracotta grounds even the most elaborate table settings.
How to Style It:
- Use 5-7 pots ranging from 3″ to 6″ diameter, arranging them in a wave pattern rather than strict size order
- Paint every other pot in soft pastels (pale pink, mint, or butter yellow) using chalk paint for a matte finish
- Wrap unpainted pots with Belgian linen ribbon or jute tied in simple bows
- Place pots on a wooden or linen table runner and surround bases with sheet moss to conceal soil
Where to Use It: Casual family dinners, farmhouse-style tables, outdoor patio dining, spring birthday parties
Pro Tip: Water plants thoroughly 2 hours before guests arrive, then blot excess water from saucers—this ensures plants look their freshest without the risk of water rings on your table during the event.
6. Vintage Books and Botanical Stack
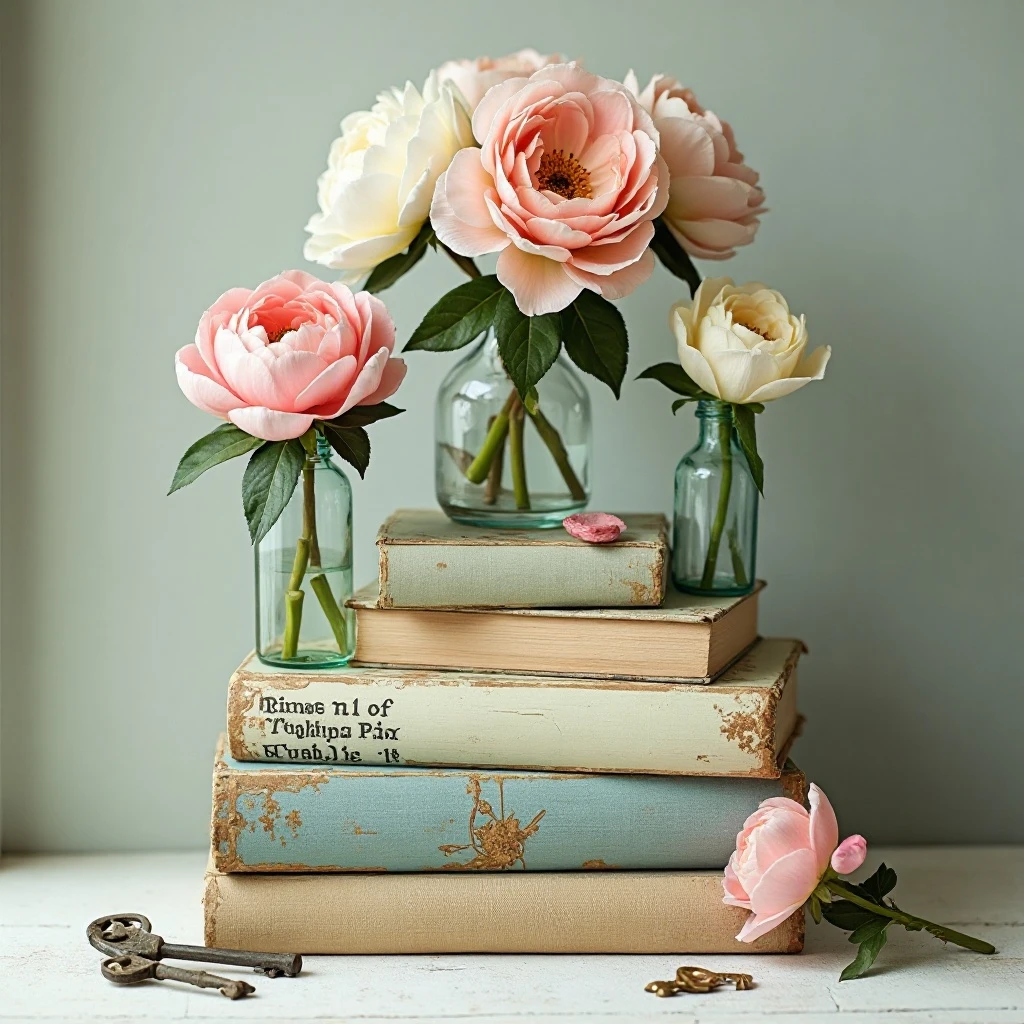
Stacks of vintage books in spring-appropriate colors (cream, sage, soft blue) used as risers for small bud vases, each holding a single spectacular bloom like a peony, parrot tulip, or garden rose. Antique botanical prints or seed packets are tucked between the books, and a few scattered vintage keys or small gardening tools add finishing details. Shop on Amazon
Why It Works: This literary-meets-garden aesthetic adds intellectual charm and conversation-starting details to your table. The books provide varying heights without traditional pedestals, making the arrangement feel collected and personal rather than purchased. It’s particularly perfect for booklovers and adds a European-inspired sophistication.
How to Style It:
- Stack 2-3 vintage books per station, varying stack heights from 4″ to 8″ along the table
- Place small bud vases (3-4″ tall) on top of each stack with a single statement bloom
- Tuck botanical seed packets or pressed flower prints between book pages, allowing them to peek out
- Scatter vintage brass keys, old garden tags, or antique spoons around the base for layered interest
Where to Use It: Library tables, book club gatherings, writer’s retreats, English garden-inspired settings
Pro Tip: Visit thrift stores for inexpensive vintage books with beautiful spines in your color palette—look for gardening books, poetry collections, or French literature for the most authentic aesthetic.
7. Pussy Willow and Forsythia Branch Forest
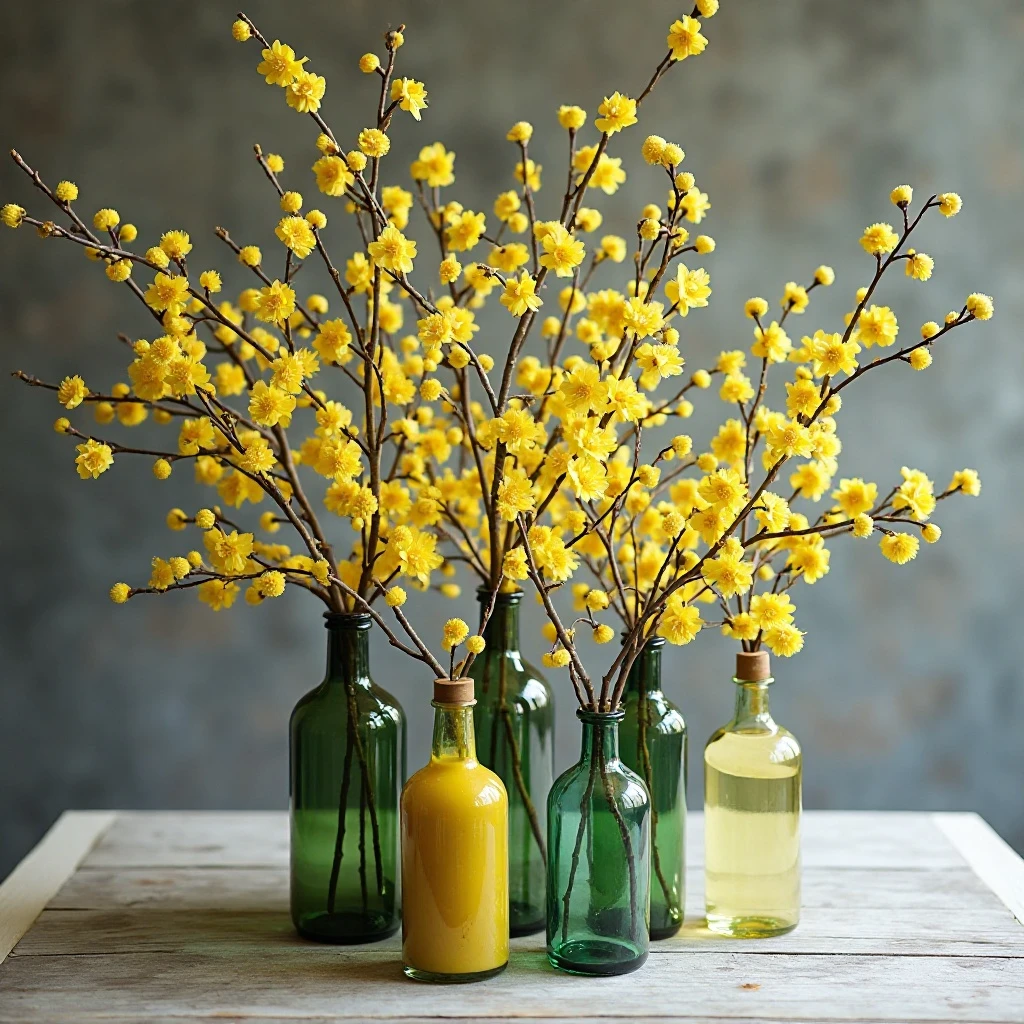
Tall branches of pussy willow and bright yellow forsythia arranged in a collection of bottles and vases clustered at the table’s center, creating a miniature spring forest. The varying heights and natural curves of the branches add organic movement while the mix of silver-gray pussy willows and golden forsythia provides subtle color contrast. Shop on Amazon
Why It Works: These early spring branches are incredibly budget-friendly (often free if you forage) and create substantial impact with minimal effort. Their vertical lines draw the eye upward, making rooms feel taller, while their natural irregularity keeps the look relaxed and approachable. The branches last for weeks and may even root in water.
How to Style It:
- Gather 9-15 branches of mixed lengths (18″ to 36″) and remove lower leaves that would sit below waterline
- Arrange in a cluster of bottles and vases (3, 5, or 7 containers) in varying heights and widths
- Cross some branches at the base to create natural-looking density while leaving upper portions airy
- Wrap some container necks with twine or ribbon to unify mismatched vessels
Where to Use It: Rustic dining rooms, farmhouse tables, breakfast nooks, entryway console tables
Pro Tip: Forsythia branches can be “forced” to bloom early by cutting them 2-3 weeks before your event and placing them in warm water indoors—you’ll have spectacular blooms when you need them.
8. Succulent Garden in Wooden Box
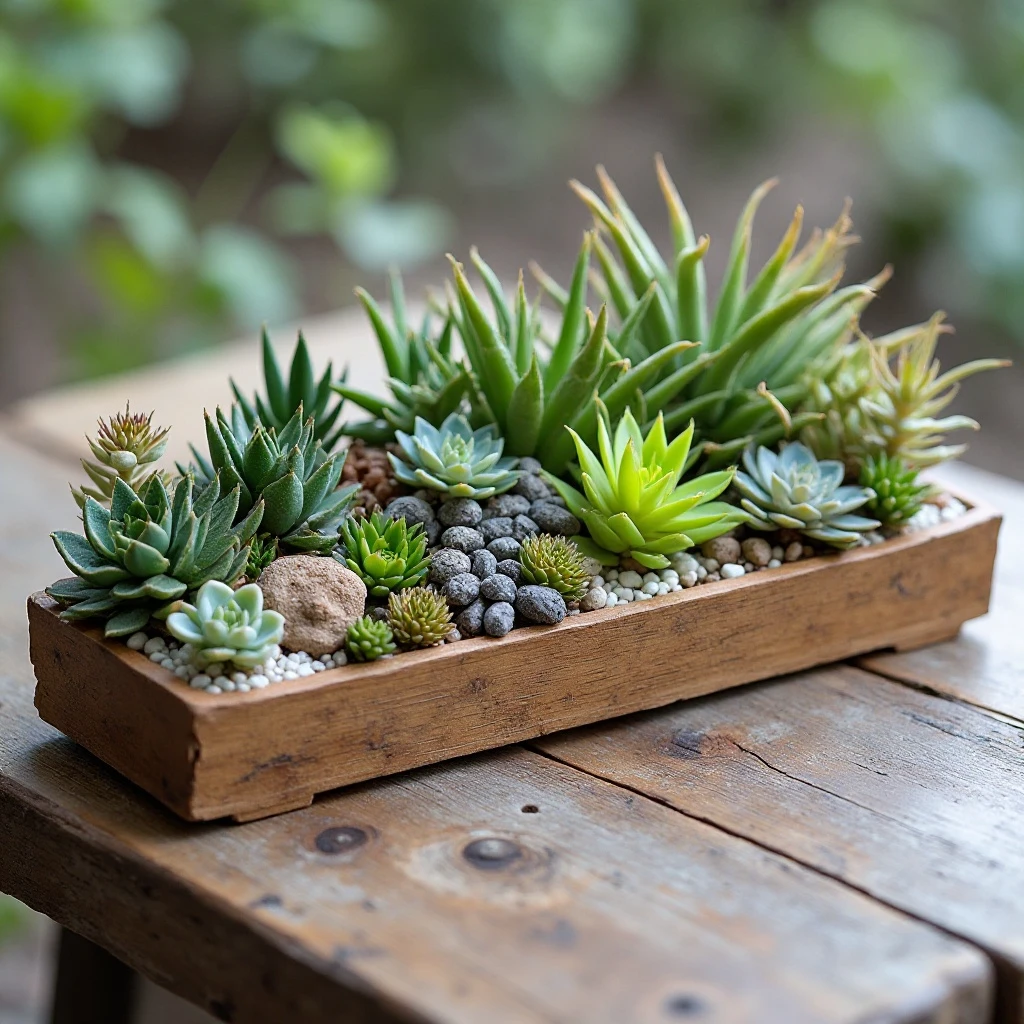
A long, shallow wooden box or tray (24-36″ length) filled with an assortment of succulents in varying textures, colors, and heights, interspersed with small decorative stones, driftwood pieces, and air plants. The low profile and year-round durability make this a practical yet beautiful option. Shop on Amazon
Why It Works: Succulents offer incredible textural variety while requiring virtually no maintenance during your event. Their sculptural forms provide visual interest from every angle, and their muted color palette complements any table setting without competing. This centerpiece can remain on your table for months, making it exceptional value.
How to Style It:
- Fill a wooden box (4-6″ deep) with cactus soil mix, leaving 1″ from the rim
- Plant 7-11 succulents of varying heights (2-8″) with the tallest in back if on a side table, centered if on a dining table
- Add decorative river rocks or white pebbles to cover soil and create clean definition
- Tuck in 2-3 air plants (tillandsia) for unexpected texture and easy removal for watering
Where to Use It: Modern dining rooms, covered outdoor tables, coffee tables, long console tables
Pro Tip: Spray succulents with a leaf shine product an hour before guests arrive—this removes dust and makes the plants look incredibly vibrant and healthy with professional polish.
9. Cherry Blossom Branch Cloud
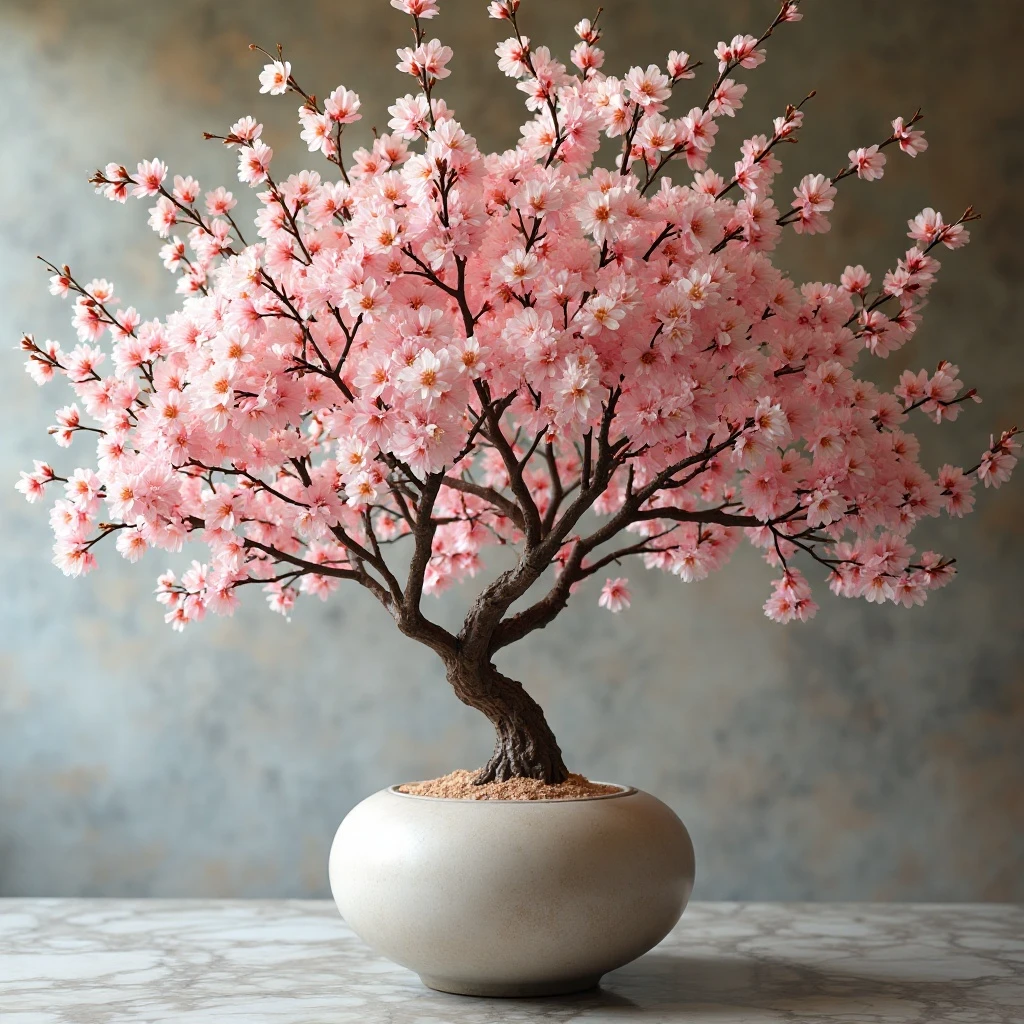
Delicate cherry blossom branches arranged in a large, low vessel creating a wide, airy canopy of pink and white blooms that seems to float above the table. The branches are carefully positioned to arch outward, creating an ethereal cloud-like effect that frames the dining space. Shop on Amazon
Why It Works: Cherry blossoms epitomize spring’s fleeting beauty and create an enchanting atmosphere that feels both celebratory and serene. The horizontal spread rather than vertical height keeps the arrangement from blocking conversation while making a dramatic statement. The soft colors and delicate petals add romance without feeling overly sweet.
How to Style It:
- Use a wide, heavy vase (10-12″ diameter) with a low profile to support the branches’ weight
- Select 5-7 branches with natural curves and arrange them to extend outward in all directions
- Fill the vase with marbles or decorative stones to keep branches secure and add visual interest through the glass
- Place the arrangement on a mirrored tray to double the visual impact and catch fallen petals beautifully
Where to Use It: Spring weddings, Japanese-inspired table settings, baby showers, anniversary celebrations
Pro Tip: Purchase cherry blossom branches while they’re still in tight bud form—they’ll gradually open over 3-5 days, allowing you to control exactly when they reach peak bloom for your event.
10. Wildflower Meadow Runner
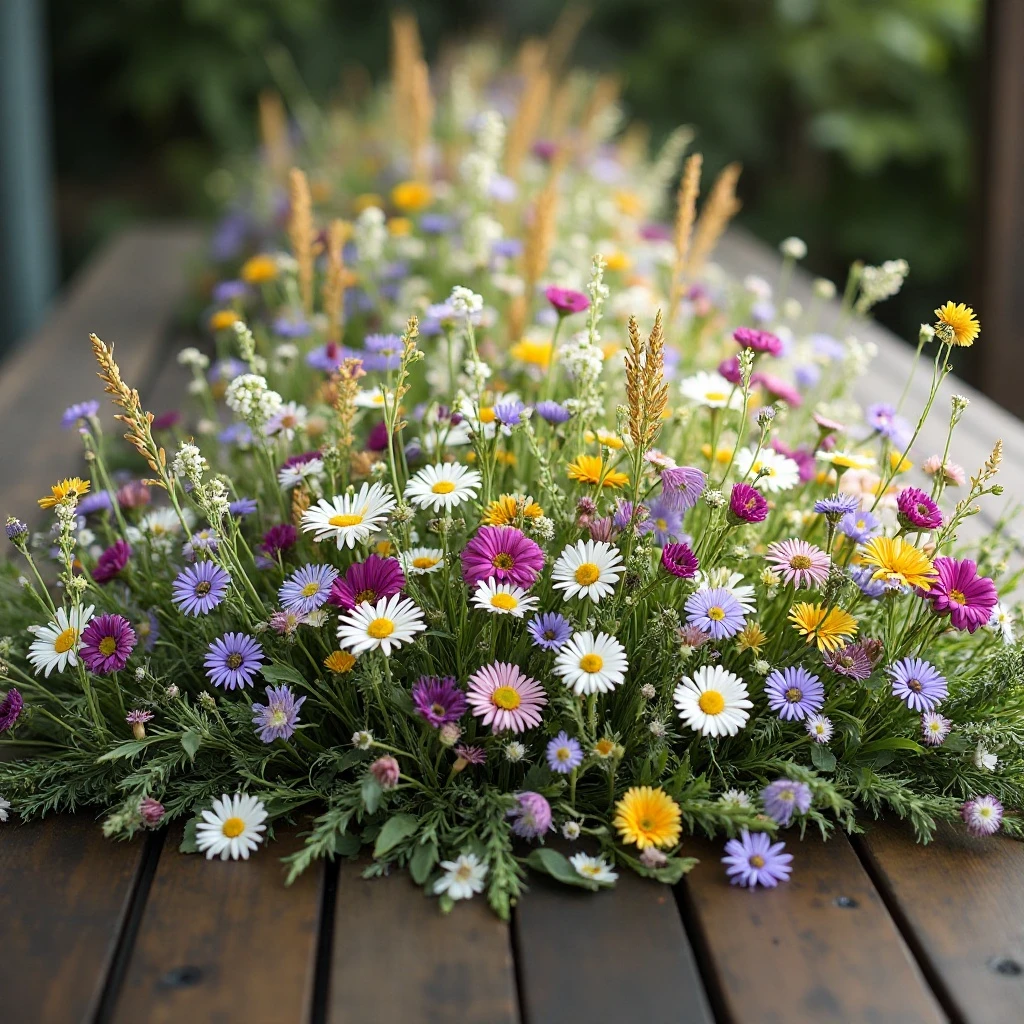
A long, organic arrangement of wildflowers and grasses laid directly on the table without vases, creating the appearance of a meadow harvested and brought indoors. Flowers like Queen Anne’s lace, bachelor buttons, cornflowers, and wild grasses overlap and intertwine naturally, with stems visible and flowers facing all directions. Shop on Amazon
Why It Works: This maximalist approach celebrates spring’s abundance and creates an immersive sensory experience. The informal arrangement feels effortless and romantic, and because stems are visible, there’s an honest beauty about the display. It works particularly well for long tables where you want continuous visual interest without repetitive vases.
How to Style It:
- Lay a protective plastic liner or parchment paper down the table center before arranging flowers
- Create small water tubes from florist’s foam or wrap stem ends in wet paper towels covered with plastic wrap
- Layer flowers and grasses in overlapping sections, working in 12-18″ segments along the table
- Vary height from 2″ to 10″ to create natural-looking dimension and movement
Where to Use It: Garden party tables, bohemian wedding receptions, farm-to-table dinners, outdoor spring celebrations
Pro Tip: Prepare this arrangement no more than 2 hours before guests arrive and mist lightly every 30 minutes—the flowers will stay fresh through a 3-4 hour event without formal water sources.
11. Citrus Wheel and Floral Wreath
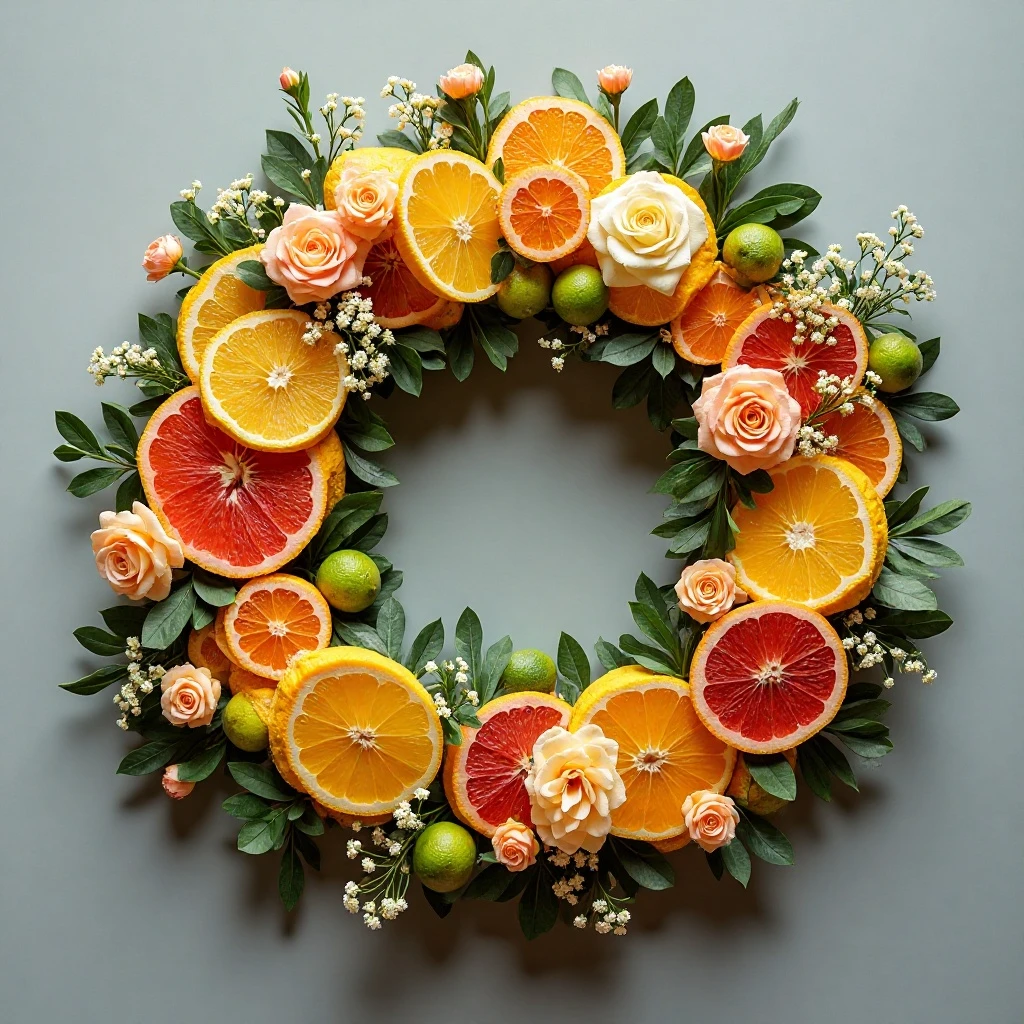
A flat wreath form laid horizontally on the table, decorated with overlapping citrus slices (lemons, limes, oranges, and grapefruits) alternated with fresh flowers like ranunculus, spray roses, and eucalyptus. The citrus wheels are secured to the wreath base and provide pops of vibrant color and unexpected texture. Shop on Amazon
Why It Works: The circular form naturally draws people together and works beautifully on round tables. The combination of fruit and flowers feels fresh and unexpected while remaining elegant. The citrus adds both visual interest and subtle fragrance, and the flat profile means it won’t interfere with serving dishes or conversation.
How to Style It:
- Start with a 14-16″ foam or grapevine wreath form as your base
- Slice citrus fruits 1/4″ thick and secure to the wreath with floral pins, slightly overlapping each slice
- Fill gaps between citrus wheels with short-stemmed flowers inserted into water tubes hidden in the wreath
- Place the completed wreath on a charger or cake stand to elevate it slightly above the table surface
Where to Use It: Summer-into-spring transition tables, Mediterranean-inspired settings, brunch tables, outdoor dining
Pro Tip: Make citrus wheels 24 hours in advance and let them dry slightly in the refrigerator—they’ll be firmer, easier to work with, and won’t weep moisture onto your table.
12. Moss and Mushroom Woodland Scene
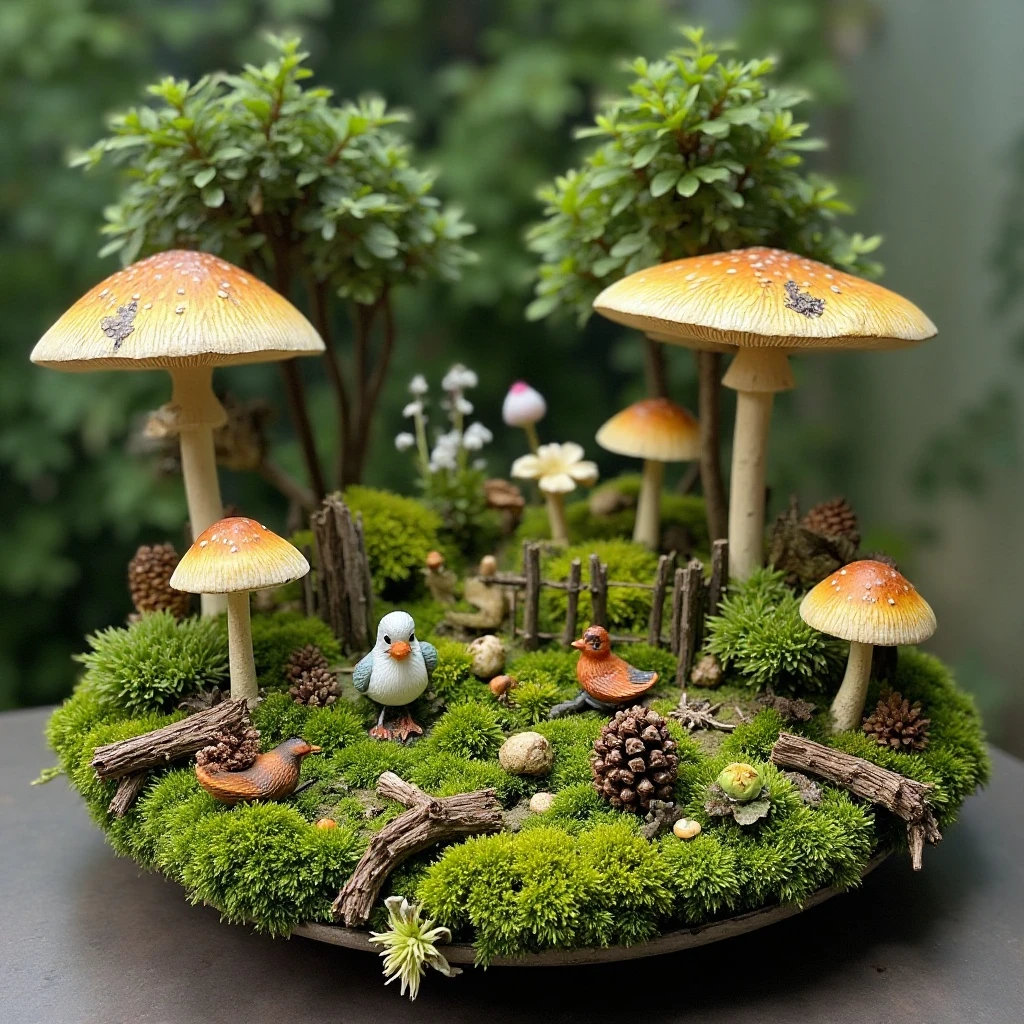
A naturalistic arrangement featuring varieties of preserved moss (sheet moss, reindeer moss, mood moss) as the foundation, decorated with foraged or faux mushrooms, small bird figurines, pinecones, and delicate woodland flowers like trillium or wood anemones. Small twig fences or miniature toadstools add whimsical touches. Shop on Amazon
Why It Works: This centerpiece brings the magic of a forest floor to your table with an enchanted, fairy-tale quality that appeals to all ages. The predominantly green palette with earthy browns creates a calming, grounded atmosphere while feeling distinctly spring-like. It’s wonderfully textural and can incorporate foraged elements for budget-friendly beauty.
How to Style It:
- Cover a wooden tray or board (18-24″ long) with sheet moss secured with floral pins
- Build up areas with different moss varieties to create hills and valleys for dimension
- Nestle mushrooms (fresh edible varieties like maitake or faux craft mushrooms) throughout the moss
- Add small water tubes hidden in the moss for delicate woodland flowers and ferns
Where to Use It: Cottagecore-themed events, children’s fairy parties, nature-inspired weddings, cabin dining rooms
Pro Tip: Preserved moss (available at craft stores) stays beautiful indefinitely and requires no water—just lightly mist it once before your event to revive its color and supple texture.
13. Ombré Flower Gradient
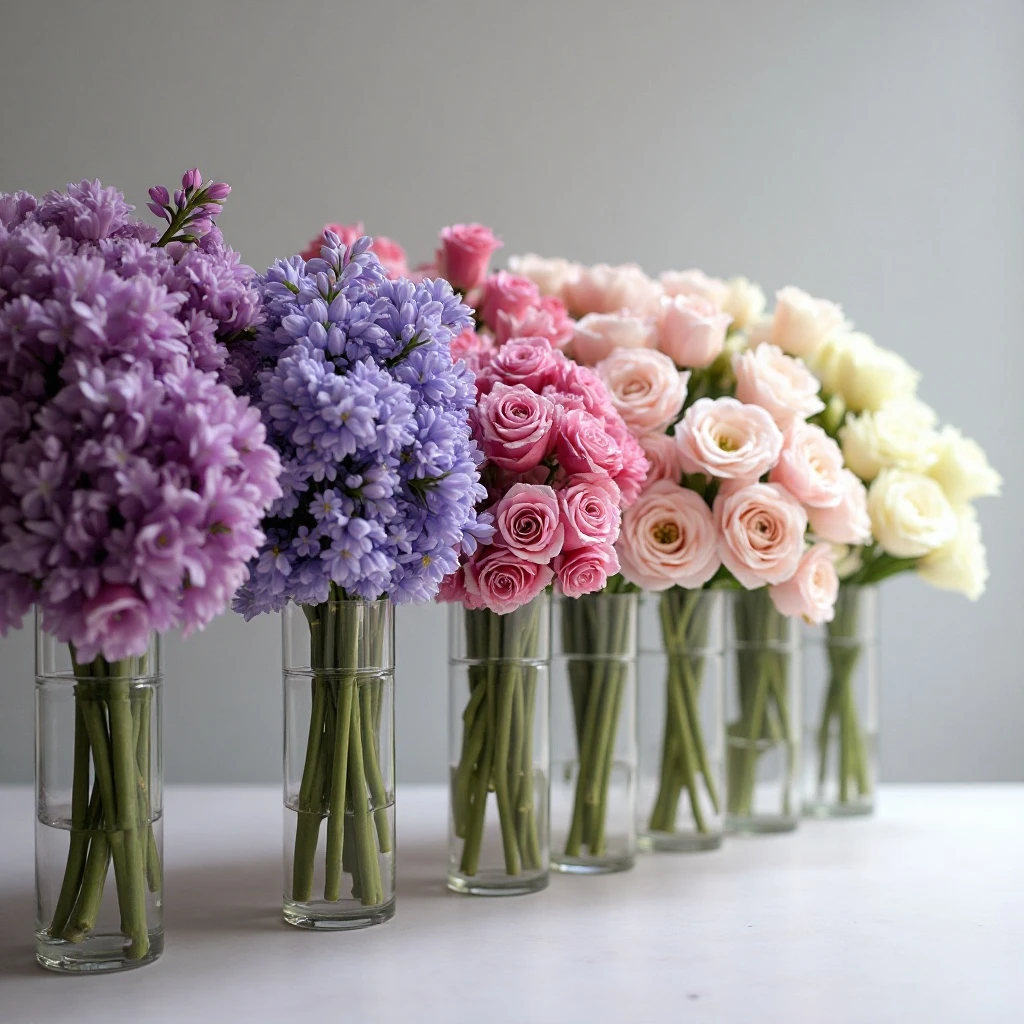
A series of vases arranged in a straight line, each filled with flowers in progressively lighter or darker shades, creating a beautiful color gradient from deep to pale. For spring, this might transition from deep purple hyacinths through lavender ranunculus to pale pink roses and finally white tulips. Shop on Amazon
Why It Works: The ombré effect creates sophisticated visual flow that guides the eye along the table with intentionality. This technique transforms an ordinary arrangement into an artistic statement while remaining surprisingly simple to execute. The color progression feels modern and curated, perfect for design-conscious hosts.
How to Style It:
- Choose 5-7 vases in identical shapes but varying heights (8-14″ tall) for cohesion
- Select flowers in the same variety or similar form but in graduated shades of one color family
- Arrange vases in a straight line with 4-6″ spacing, darkest to lightest from left to right
- Keep each vase monochromatic—don’t mix shades within individual vessels
Where to Use It: Modern dining spaces, gallery-style tables, contemporary wedding receptions, designer showcases
Pro Tip: Use paint chips from a hardware store to plan your color progression before shopping for flowers—this ensures perfect gradation and prevents purchasing flowers that don’t fit the sequence.
14. Repurposed Tea Tin Garden
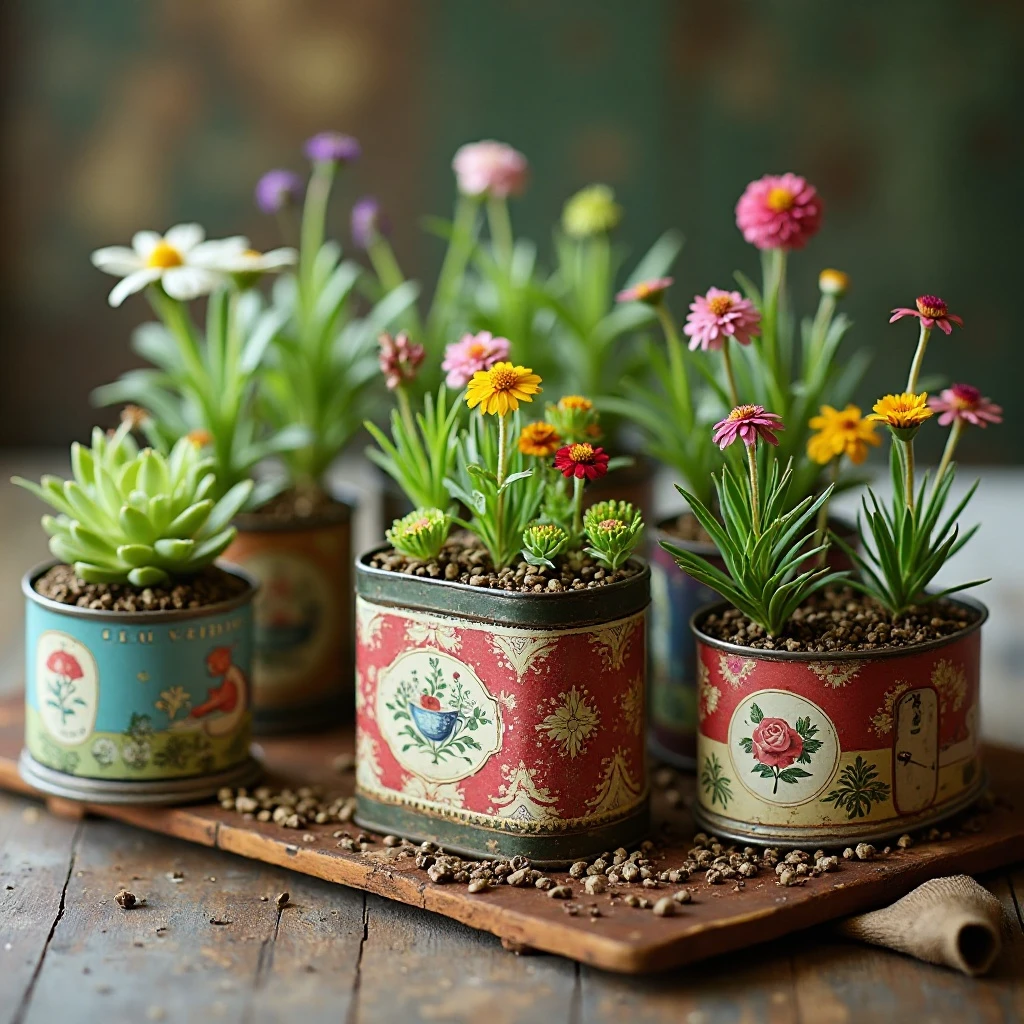
Vintage or antique tea tins in various sizes and designs arranged down the table’s center, each planted with small spring flowers, herbs, or succulents. The colorful graphics and varied shapes of the tins add nostalgic charm while the plants provide freshness and life. Shop on Amazon
Why It Works: This approach celebrates sustainable design by repurposing beautiful vintage containers that would otherwise be discarded. Each tin tells its own story, adding conversation-starting details and personal history to your table. The mix-and-match aesthetic feels collected over time rather than bought all at once, adding authenticity.
How to Style It:
- Collect 5-9 vintage tea tins in complementary colors or themes (florals work especially well for spring)
- Drill 2-3 small drainage holes in the bottom of each tin to prevent root rot
- Plant with small varieties like violas, primrose, or miniature daffodils, leaving 1/2″ below the rim
- Arrange tins in a scattered formation rather than a rigid line, varying spacing for organic appeal
Where to Use It: Vintage-inspired tables, English garden parties, afternoon tea gatherings, eclectic dining rooms
Pro Tip: Line the inside of vintage tins with plastic wrap before adding soil—this prevents rust and extends the life of your collectible containers while protecting plants from metal contact.
15. Hanging Flower Chandelier Above Table
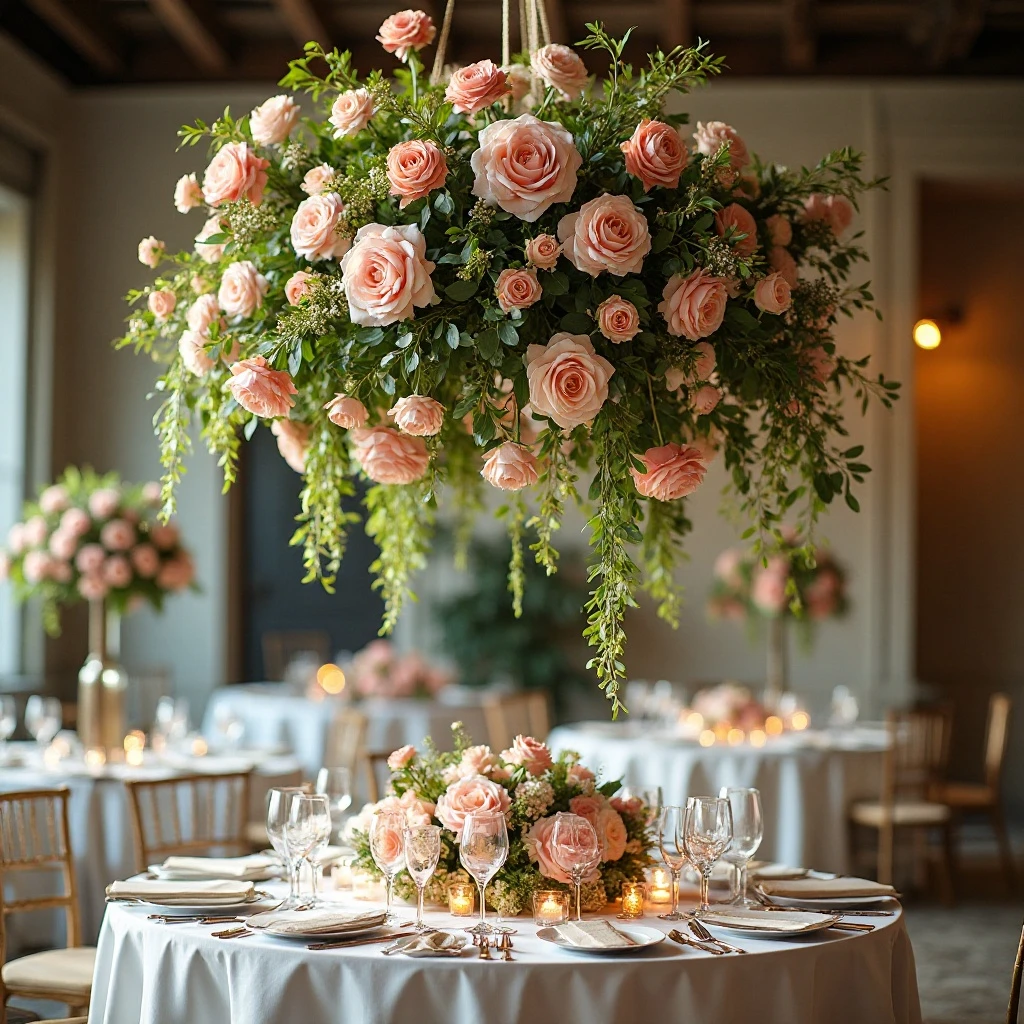
A hanging installation suspended above the table center featuring cascading flowers, greenery, and flowing ribbons that create a living chandelier effect. Spring blooms like wisteria, jasmine vine, garden roses, and ivy trail downward while staying high enough not to interfere with conversation or serving. Shop on Amazon
Why It Works: This dramatic approach transforms the entire dining space and creates an immersive floral environment without consuming valuable table real estate. The overhead installation makes even modest flower quantities look abundant and luxurious. It’s particularly impactful for special occasions and creates incredible photos.
How to Style It:
- Secure a floral foam ring or wire wreath form (18-24″ diameter) to an existing light fixture or ceiling hook
- Soak foam thoroughly and insert flowers and greenery, concentrating the fullest areas on the sides facing diners
- Allow trailing elements like ivy, jasmine, or amaranthus to cascade 12-18″ below the form
- Add flowing silk ribbons in complementary colors for movement and to hide mechanics
Where to Use It: Wedding receptions, engagement dinners, special anniversary celebrations, grand dining rooms
Pro Tip: Install this arrangement no more than 4 hours before guests arrive and hang it over a sheet or tarp during installation—this protects your table from water drips and allows you to work freely.
16. Seed Packet and Garden Tool Display
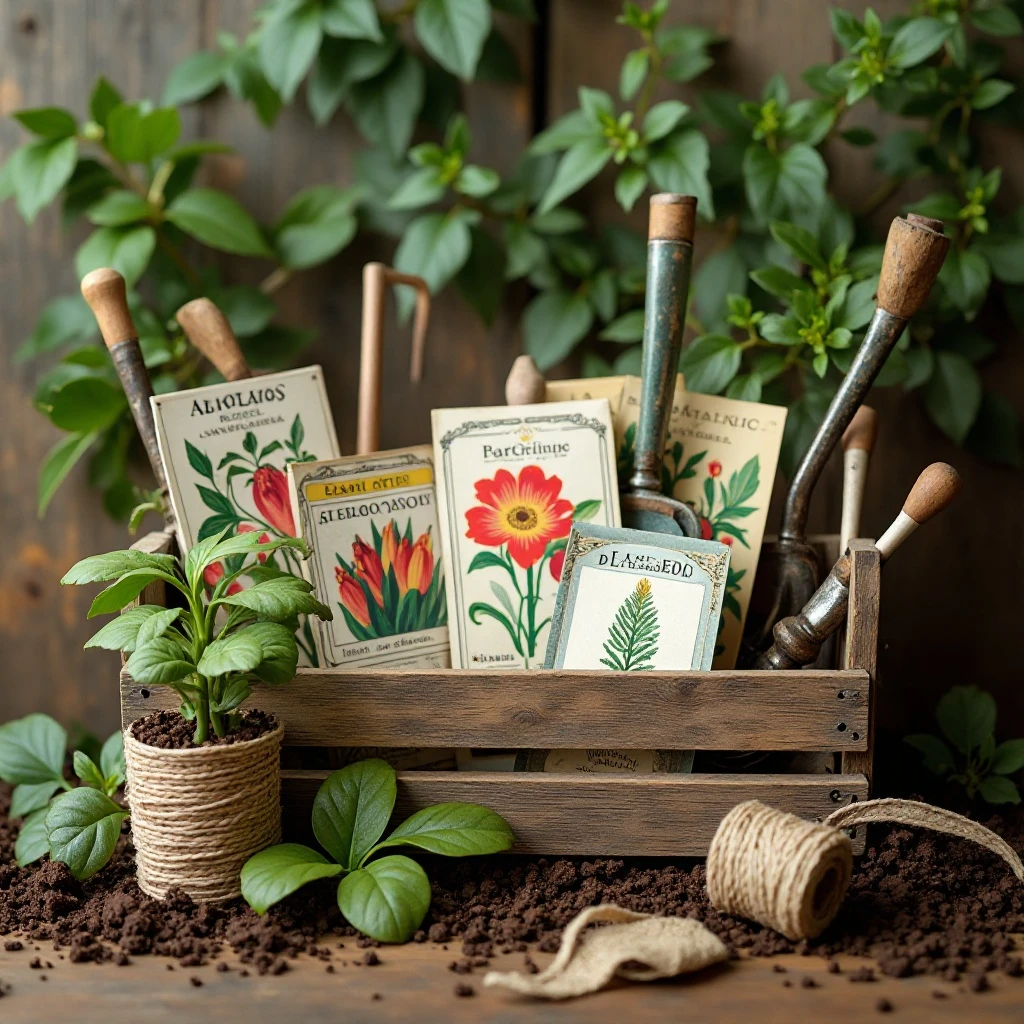
A collection of vintage seed packets arranged in small wooden crates or standing in a vintage tool caddy, surrounded by small garden tools (trowels, hand rakes, pruning shears), garden twine spools, and small potted seedlings just beginning to emerge. The combination celebrates the promise of spring planting. Shop on Amazon
Why It Works: This centerpiece speaks to spring’s forward-looking energy and the anticipation of growth and harvest. It’s particularly meaningful for gardeners and creates a narrative about the season ahead. The vintage elements add character while the fresh seedlings provide living proof of spring’s renewal.
How to Style It:
- Arrange seed packets in a vintage wooden crate or metal tool caddy, standing them upright with fronts visible
- Place small potted seedlings in biodegradable peat pots around the packet display
- Lay small garden tools nearby as if casually set down during planting work
- Coil natural jute garden twine loosely near the arrangement and add a pair of vintage gardening gloves
Where to Use It: Farmhouse tables, garden club meetings, spring planting party tables, covered outdoor spaces
Pro Tip: Use reproduction vintage seed packets (available online) rather than authentic antiques—they’re inexpensive, you can choose varieties relevant to your region, and you won’t risk damaging valuable collectibles.
17. Monochromatic White Garden
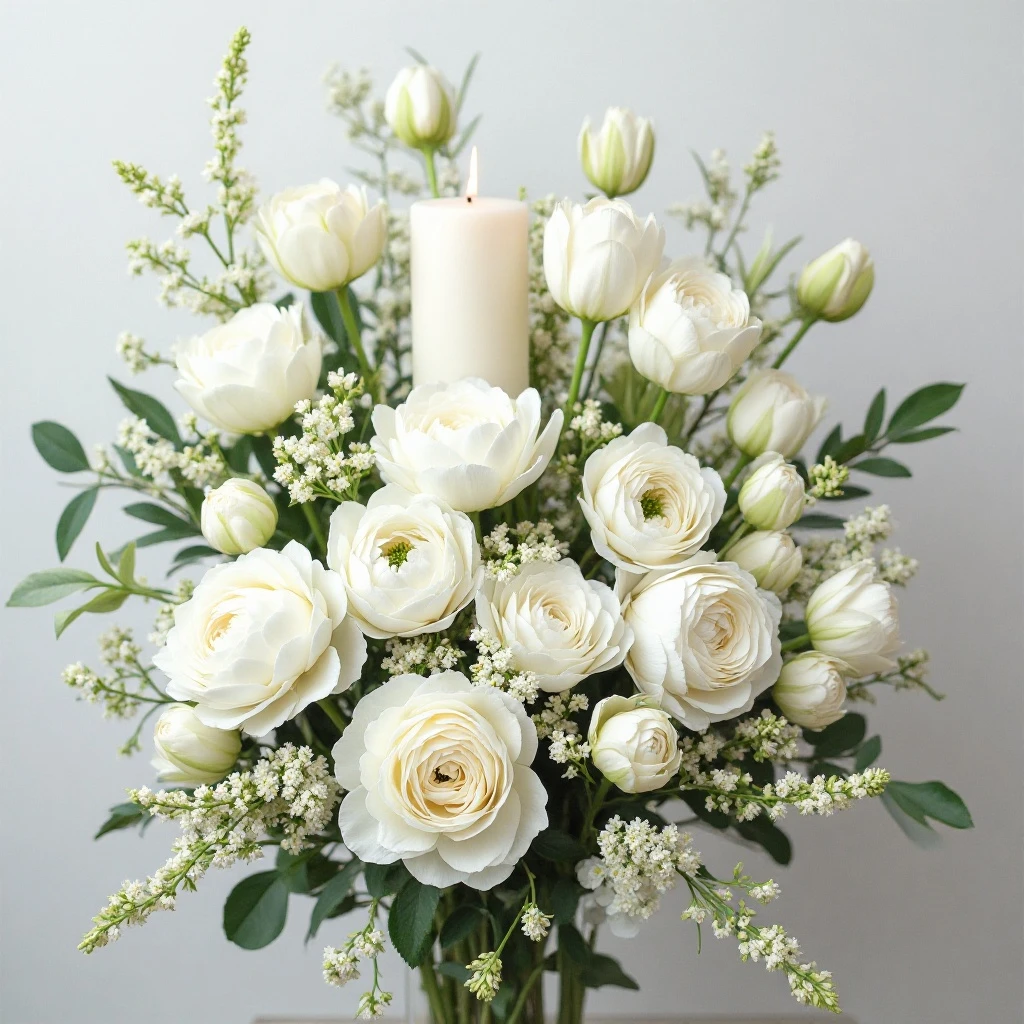
An all-white arrangement featuring varying textures and flower types including white peonies, tulips, ranunculus, Queen Anne’s lace, white lilac, and jasmine, combined with white-variegated foliage and white candles. The monochromatic palette creates serene elegance while the varied textures prevent monotony. Shop on Amazon
Why It Works: All-white arrangements have timeless sophistication and work with absolutely any table setting or decor style. The single color lets you focus entirely on texture, form, and scent, creating a more nuanced and refined aesthetic. White reflects candlelight beautifully, making evening gatherings particularly magical.
How to Style It:
- Combine 5-7 different white flower varieties with distinct forms: round (peonies), spiky (delphinium), clustered (lilac), delicate (baby’s breath)
- Arrange in a low, organic mound 10-12″ tall using a wide vessel or arranging flowers directly in foam
- Integrate white candles of varying heights (pillar candles and tapers) throughout the flowers
- Add textural foliage like dusty miller, lamb’s ear, or eucalyptus for silvery-white contrast
Where to Use It: Formal dinners, wedding tables, elegant brunch settings, minimalist modern spaces
Pro Tip: Include at least one fragrant white flower like jasmine, tuberose, or gardenia—the scent becomes more noticeable and luxurious when you aren’t distracted by competing colors.
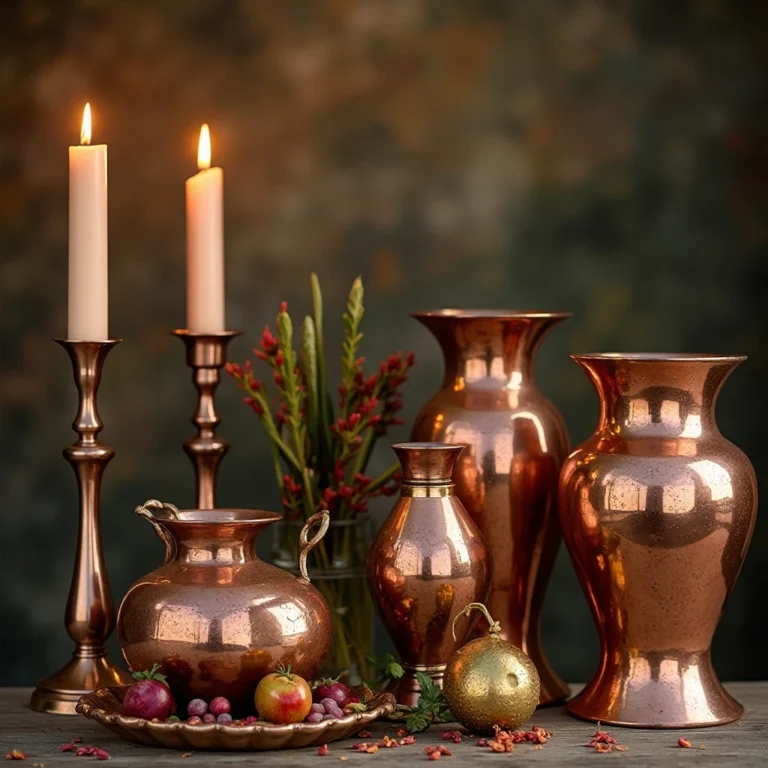
18. Copper Watering Can Arrangement
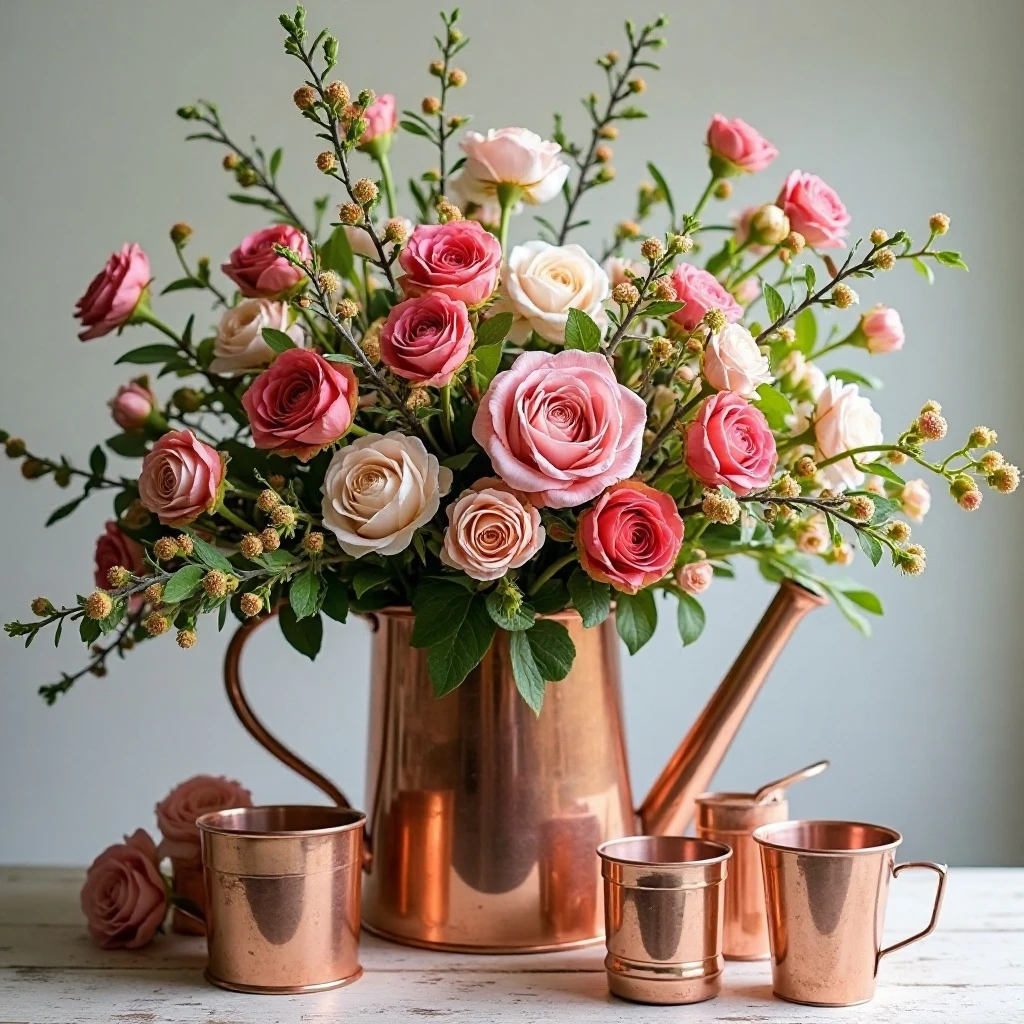
A vintage or new copper watering can used as the primary vessel for a loose, garden-fresh arrangement of spring flowers and flowering branches. Additional smaller copper vessels like measuring cups, small buckets, or mint julep cups scattered nearby create a cohesive metallic family of containers. Shop on Amazon
Why It Works: The copper’s warm metallic tone complements virtually all spring colors while adding a practical, garden-to-table narrative. Watering cans have built-in charm and their asymmetric form creates visual interest from every angle. The aged patina of vintage copper adds character, while new copper provides high shine.
How to Style It:
- Fill a watering can (10-14″ tall) with a chicken wire or floral foam insert to support stems
- Create a loose, overflowing arrangement that appears freshly gathered from a garden
- Position the spout toward one side of the table so the handle creates an asymmetric focal point
- Surround with smaller copper vessels holding individual blooms or small posies
Where to Use It: Farmhouse tables, garden room dining areas, outdoor covered porches, country-inspired settings
Pro Tip: If using a watering can with a rose (sprinkler head), remove it before arranging—it takes up valuable space and its holes can snag delicate stems during arrangement.
19. Magnolia Branch Statement
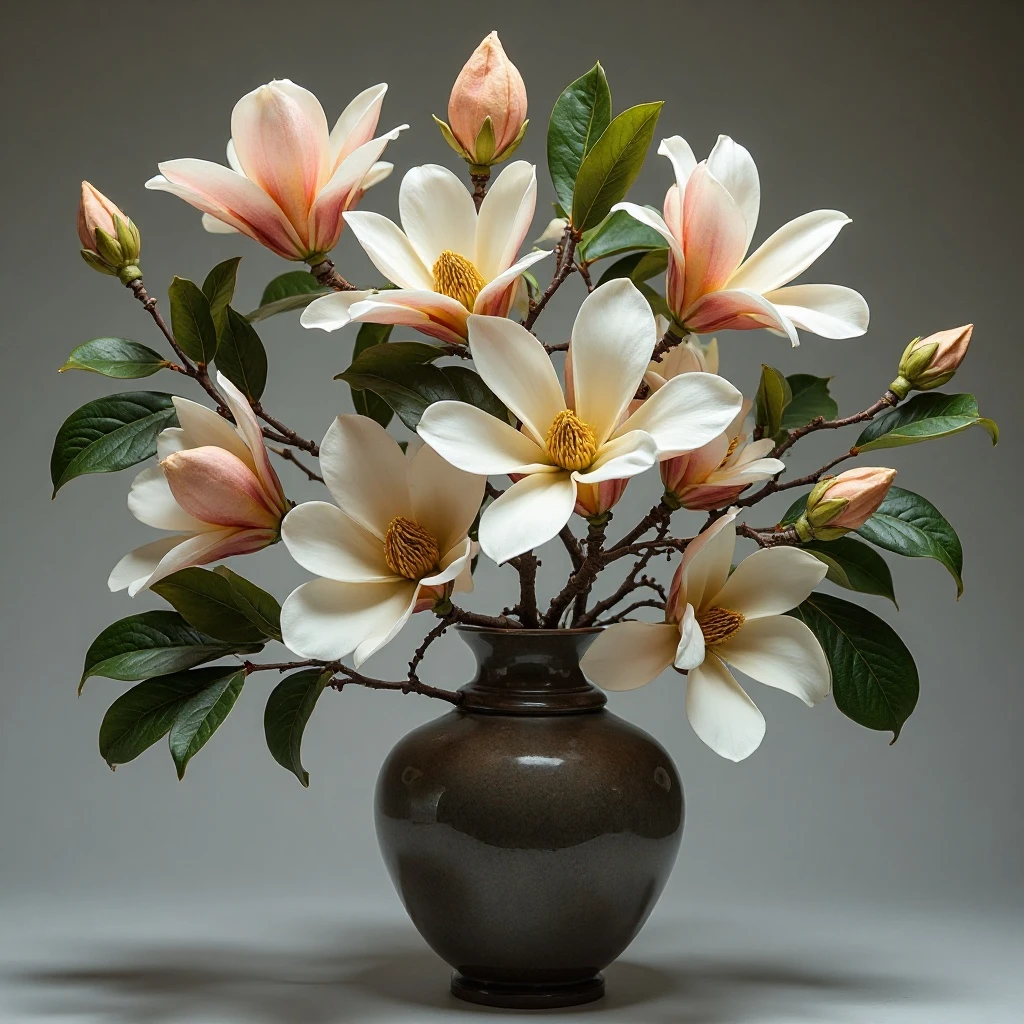
A few large, dramatic magnolia branches with their oversized blooms and glossy leaves arranged in a substantial vase, creating a bold, architectural centerpiece. The branches’ natural curves and the flowers’ impressive scale make even a simple arrangement feel grand and luxurious. Shop on Amazon
Why It Works: Magnolia’s substantial blooms mean you need very few stems to create major impact, making this surprisingly economical despite looking lavish. The flowers’ sculptural quality and Southern charm bring elegance without fussiness. Their light fragrance adds sensory appeal without being overwhelming.
How to Style It:
- Select 3-5 magnolia branches with blooms in various stages (some tight buds, some fully open) for extended beauty
- Use a heavy, substantial vase (12-16″ tall) to support the branches’ weight—fill with decorative stones for stability
- Position branches to create an asymmetric, reaching composition rather than a rigid, vertical arrangement
- Remove some lower leaves to showcase the blooms and prevent foliage from overcrowding the water
Where to Use It: Grand dining rooms, Southern-inspired tables, wedding reception head tables, entry console displays
Pro Tip: Make a fresh cut on branch ends and immediately place in warm (not hot) water—magnolias are thirsty and this helps them hydrate quickly for maximum vase life.
20. Fruit and Flower Hybrid
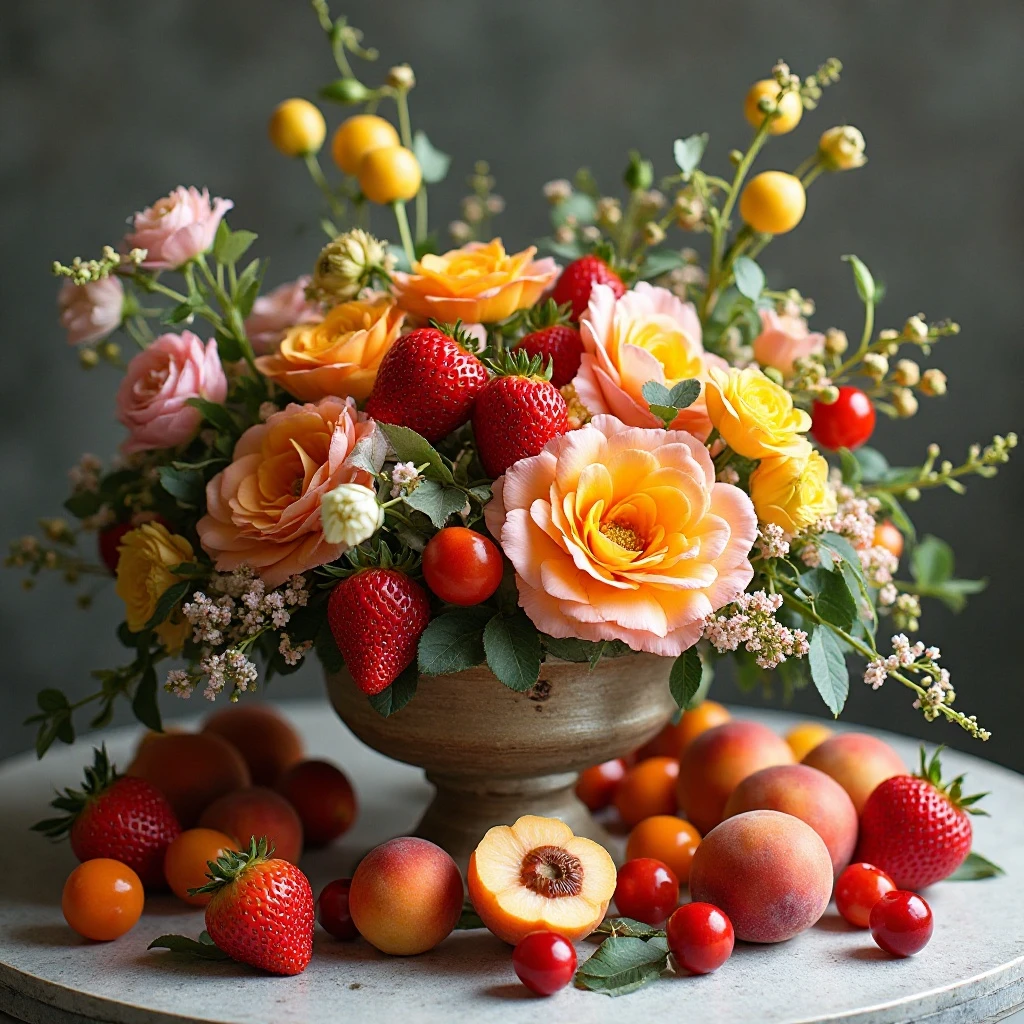
A combination of fresh spring fruits (strawberries, apricots, kumquats, cherries) arranged among flowers, creating an abundant, still-life-inspired centerpiece. The fruits are displayed both whole and sliced on small pedestals or nestled directly among blooms in low arrangements. Shop on Amazon
**Why It Works:** This approach engages multiple senses and creates Renaissance-style opulence while remaining approachable and functional—guests can actually eat the fruit. The combination feels abundant and celebratory, and the fruit’s vivid colors complement rather than compete with spring flowers. It’s particularly appropriate for brunch or tea.
How to Style It:
- Create a low floral base (6-8″ tall) using flowers in complementary colors to your chosen fruits
- Nestle whole fruits directly into the arrangement, using floral picks to secure if necessary
- Place some fruits on small pedestals or cake stands at varying heights for dimension
- Add a few sliced fruits (citrus wheels, halved strawberries) as visual accents throughout
Where to Use It: Brunch buffets, spring tea parties, Italian-inspired gatherings, celebratory luncheons
Pro Tip: Select slightly under-ripe fruit for centerpieces—it will look perfect and hold up better over several hours without releasing excess moisture or attracting insects.
21. Vintage Pitcher Collection
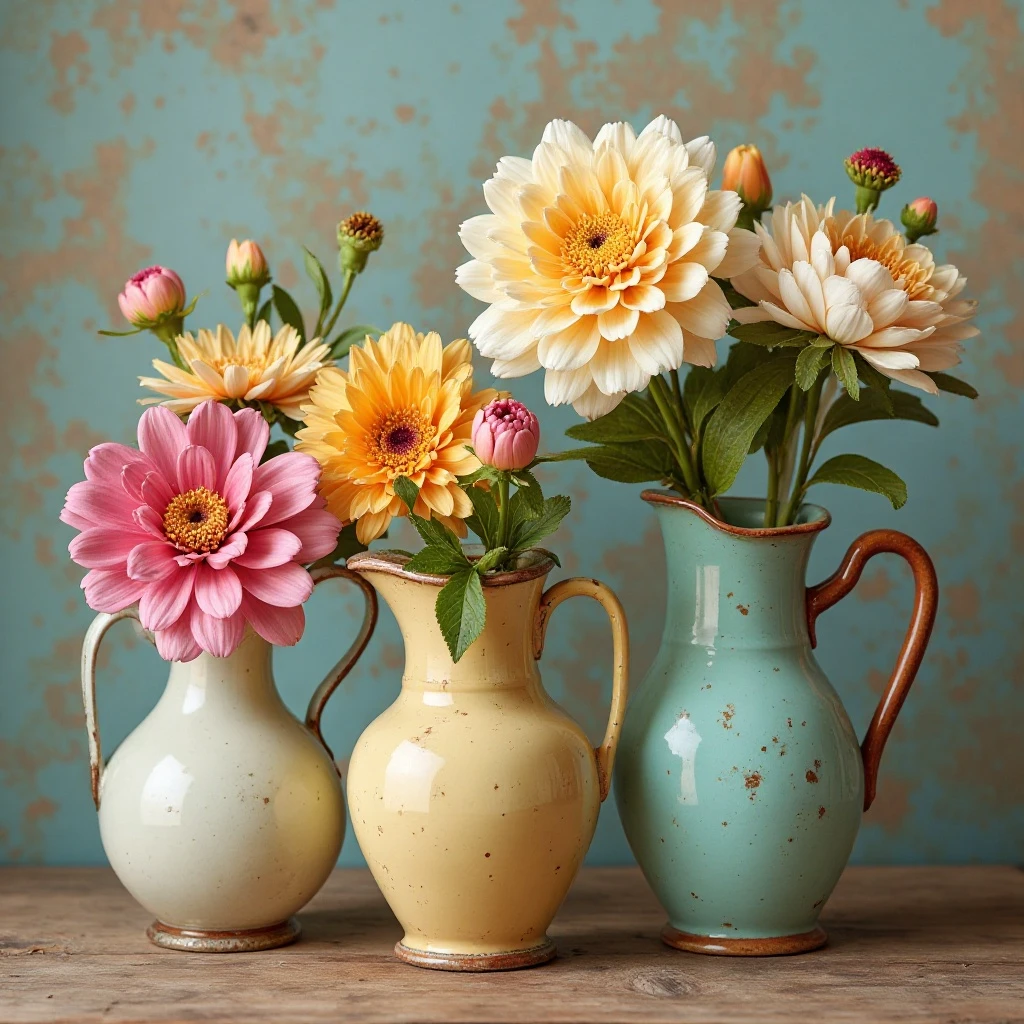
A family of mismatched vintage pitchers in complementary colors or patterns, each holding a different spring flower variety. The varying shapes, sizes, and styles of the pitchers create an eclectic, collected-over-time aesthetic that feels personal and warm. Shop on Amazon
Why It Works: Vintage pitchers have organic curves and character that new vessels often lack, and their variety prevents the arrangement from feeling too coordinated or stiff. This approach lets you mix flower types freely—each pitcher becomes its own moment while contributing to the collective display. It’s ideal for hosts who love vintage finds and want to showcase collections.
How to Style It:
- Collect 5-7 pitchers in varied sizes (6-12″ tall) with a unifying element like color palette, pattern style, or era
- Fill each pitcher with a single flower variety rather than mixed arrangements for cleaner visual impact
- Arrange pitchers in a slightly staggered line or loose cluster, varying heights from front to back
- Place the collection on a vintage tablecloth or linen runner that complements the pitchers’ era
Where to Use It: Cottage-style dining rooms, vintage-inspired tea parties, grandmother’s house aesthetic, country tables
Pro Tip: Check the bottom of vintage pitchers for any hairline cracks before filling with water—line cracked vessels with a small plastic bag or glass insert to prevent leaking while still displaying the beautiful exterior.
22. Herb Bundle and Twine Napkin Rings
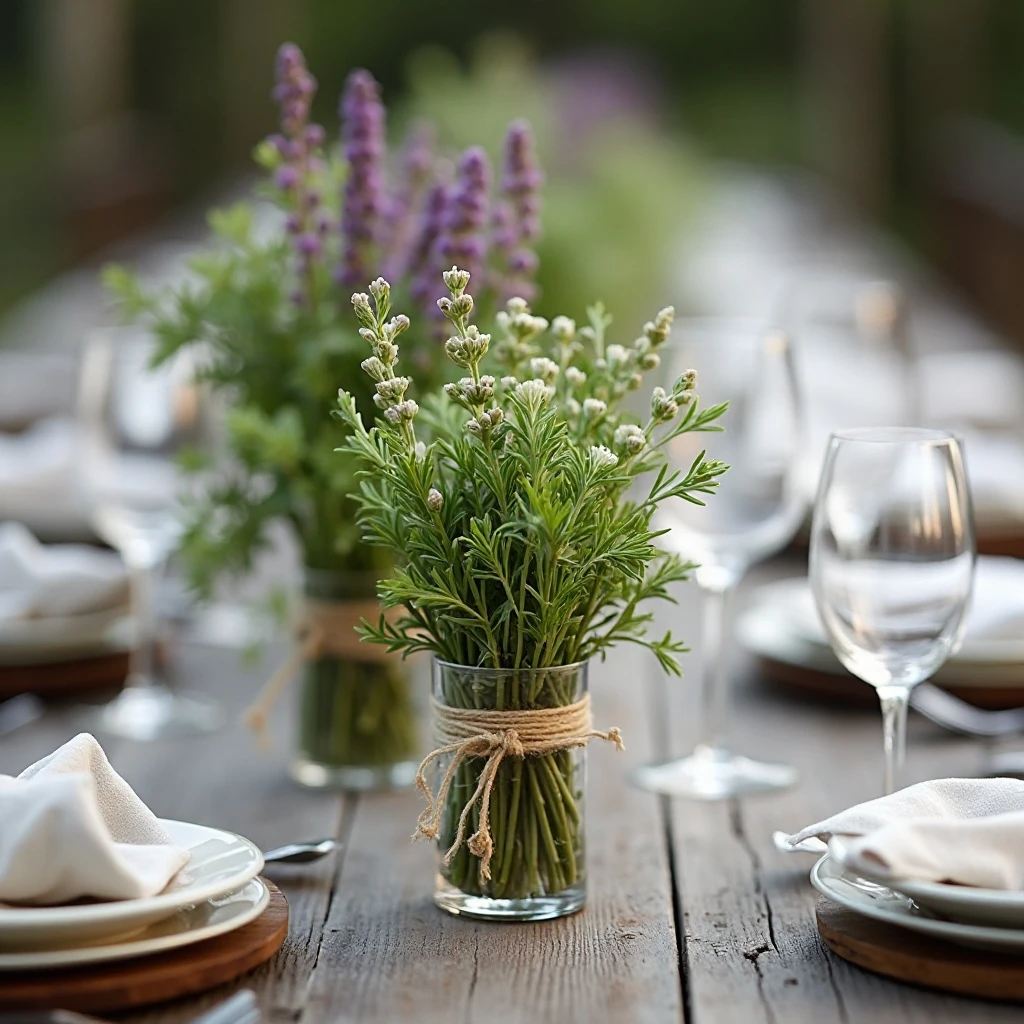
Individual fresh herb bundles (rosemary, lavender, thyme) tied with natural twine, used as napkin rings at each place setting. When combined, they create a distributed centerpiece effect that runs the length of the table while serving double duty as both decor and aromatic place markers. Shop on Amazon
Why It Works: This approach distributes visual interest evenly among all guests rather than centralizing it, making everyone feel equally important. The herbs provide wonderful fragrance that intensifies as guests interact with their napkins. It’s budget-friendly, and guests can take their bundles home to use in cooking or dry for lasting keepsakes.
How to Style It:
- Cut herb sprigs to 6-8″ lengths and gather 3-5 stems into small bundles, mixing varieties or keeping monochromatic
- Tie each bundle with natural jute twine, leaving 4-6″ tails that can be used to secure around napkins
- Thread rolled napkins through the twine and adjust bundles to sit at a slight angle rather than perfectly upright
- Add a small handwritten name tag or place card tucked into the twine for personalization
Where to Use It: Garden-to-table dinners, outdoor spring dining, Mediterranean-inspired meals, rustic celebrations
Pro Tip: Make herb bundles the morning of your event and store them wrapped in damp paper towels in the refrigerator—they’ll stay fresh and aromatic for 6-8 hours without wilting.
23. Butterfly Garden Centerpiece
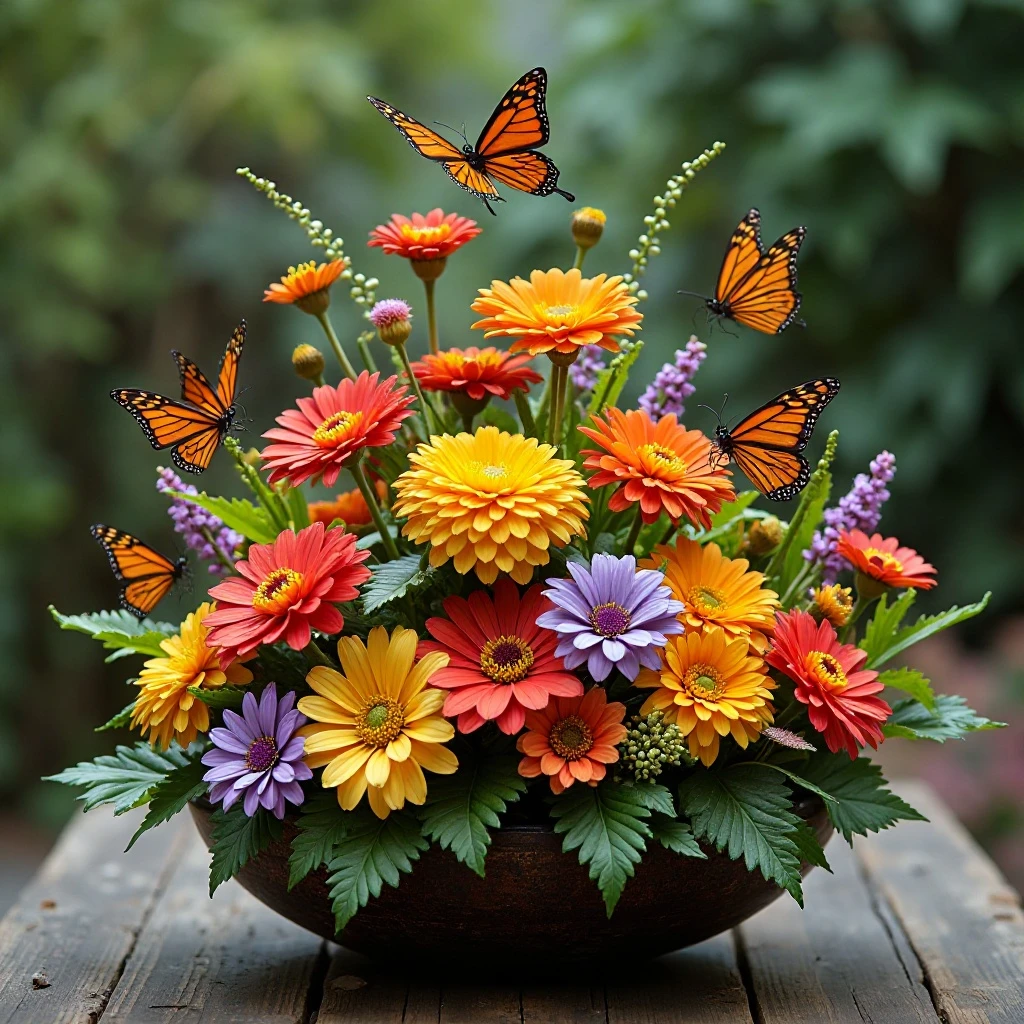
A naturalistic arrangement featuring butterfly-attracting flowers (butterfly bush, milkweed, zinnias, lantana) in vibrant colors, enhanced with decorative butterfly accents positioned throughout. Some butterflies appear to be landing on flowers while others are “flying” above on nearly-invisible fishing line. Shop on Amazon
Why It Works: This centerpiece celebrates spring’s association with transformation and renewal while adding whimsical movement to your table. The bright colors and sense of motion create energy and joy perfect for celebrations. Children are particularly delighted by the interactive element of discovering butterflies throughout the arrangement.
How to Style It:
- Create a base arrangement using butterfly-friendly flowers in purples, pinks, oranges, and yellows
- Insert decorative butterflies (craft store or floral supply) on wire stems throughout the flowers at various heights
- Suspend 2-3 butterflies above the arrangement using clear fishing line attached to a chandelier or ceiling
- Add actual butterfly host plants like milkweed or fennel if you’ll be displaying outdoors to attract real butterflies
Where to Use It: Garden parties, butterfly-themed celebrations, children’s events, spring fairy tale gatherings
Pro Tip: Position decorative butterflies at varying angles as if caught mid-flight rather than perfectly upright—this creates more realistic movement and visual interest from all viewing angles.
24. Forced Bulb Progression Display
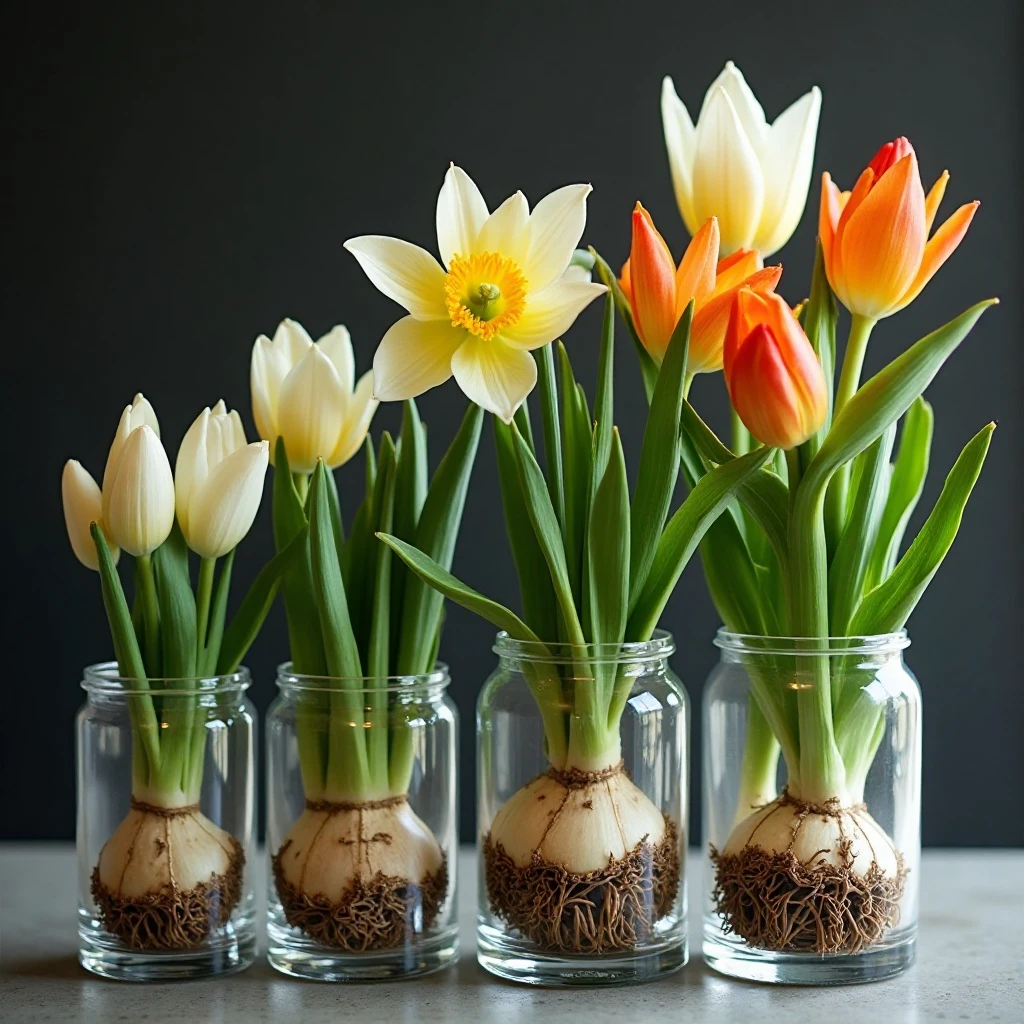
A collection of spring bulbs (paperwhites, hyacinths, tulips, daffodils) in various stages of growth displayed in forcing vases or glasses that show the entire bulb, roots, and flower. The transparent vessels showcase the complete journey from bulb to bloom, creating a botanical-specimen aesthetic. Shop on Amazon
Why It Works: Forcing vases turn the hidden mechanics of spring growth into visible art, creating educational interest alongside beauty. The progression from barely-rooted bulbs to full blooms tells a story about patience and spring’s unfolding. This display has a scientific elegance perfect for nature lovers and curious minds.
How to Style It:
- Arrange 5-9 forcing vases or glasses in graduated sizes (6-10″ tall) down the table center
- Place bulbs at different growth stages: some just beginning to root, others with emerging shoots, some in full bloom
- Use clear or colored glass to complement your color scheme while keeping roots visible
- Add water to each vessel to just below the bulb base—roots will grow down into the water
Where to Use It: Science-inspired tables, educational spring displays, botanical-themed gatherings, modern minimalist settings
Pro Tip: Start forcing bulbs 4-6 weeks before your event in a cool, dark place, then move them to light at staggered intervals (one week apart) to achieve the progression of growth stages for your display.
Common Mistakes to Avoid
1. Blocking Conversation Sightlines
Centerpieces taller than 12-14 inches create visual barriers that force guests to crane their necks or lean awkwardly to make eye contact across the table. This disrupts natural conversation flow and makes dining feel awkward rather than intimate. Keep arrangements low enough that seated guests can easily see over them, or go dramatically tall (24+ inches) so people can see beneath the blooms. The middle zone of 14-20 inches is the worst offender—it sits right at eye level and creates frustration.
2. Overpowering Fragrances
While fragrant flowers seem like a lovely addition, intensely scented blooms like stargazer lilies, tuberose, or heavy hyacinths can overwhelm the dining space and compete with food aromas. Some guests may have allergies or sensitivities, and strong floral scents during meals can suppress appetite. Choose lightly scented or unscented flowers for dining table centerpieces, or position fragrant arrangements in adjacent areas rather than directly on the dining surface where they’ll interfere with the meal.
3. Neglecting Scale and Proportion
A tiny arrangement on a large table looks lost and insignificant, while an oversized centerpiece on a small table overwhelms the space and leaves no room for serving dishes. Your centerpiece should occupy approximately one-third of the table’s width and no more than 50% of the table’s length on rectangular tables. For round tables, a centerpiece should be no more than one-third the table’s diameter. When in doubt, scale up—a slightly-too-large centerpiece reads as generous, while a too-small one just looks like you ran out of flowers.
4. Using Dirty or Cloudy Water
Nothing diminishes the beauty of fresh flowers faster than murky, discolored water with visible debris, fallen leaves, or bacterial film. Cloudy water in clear vases is particularly distracting and makes even expensive flowers look neglected. Change water completely every 1-2 days, remove any foliage below the waterline before arranging, add flower food to prevent bacterial growth, and use distilled water for important events to prevent mineral cloudiness. Give vessels a quick wipe-down on the outside as well to remove any water spots or fingerprints.
5. Forgetting Practical Table Function
Beautiful centerpieces fail if they don’t account for how the table will actually be used. Arrangements that take up so much space there’s nowhere for serving dishes, pitchers, or wine bottles create logistical nightmares. Delicate arrangements that can’t withstand minor bumps from passing dishes will be stressed throughout the meal.
Design centerpieces that can be easily lifted and temporarily relocated if needed, avoid arrangements that shed petals or leaves onto the table, and ensure there’s adequate space between the centerpiece and each place setting (at least 6 inches) for comfortable dining.
6. Mixing Too Many Competing Elements
While variety can be beautiful, combining too many flower types, colors, textures, and decorative elements creates visual chaos rather than cohesive design. A successful centerpiece typically includes 3-5 flower varieties maximum, a limited color palette of 2-3 hues plus neutrals, and one or two additional elements (like candles or fruit) rather than a jumbled collection of everything spring-related.
More restraint often creates more impact—let each element shine rather than competing for attention. If you’re drawn to many different ideas, create several simple centerpieces for different occasions rather than combining everything into one overwhelming display.
Frequently Asked Questions
How tall should a dining table centerpiece be?
For optimal conversation flow, dining table centerpieces should be either under 12 inches tall or dramatically tall at 24+ inches so guests can see beneath the flowers. The sweet spot for most tables is 8-10 inches, which keeps the arrangement visible and impactful while staying below eye level for seated diners. If you want height, use tall, narrow elements like branches or candlesticks rather than dense, full arrangements that block sightlines. For formal dinners where presentation matters most, you can go slightly taller (12-14 inches), but test by sitting at the table to ensure guests can comfortably make eye contact across the arrangement.
How far in advance can I create a fresh flower centerpiece?
Most fresh flower centerpieces can be created 2-4 hours before guests arrive, with some varieties lasting longer and others requiring last-minute assembly. Hardy flowers like roses, carnations, and alstroemeria can be arranged up to 24 hours in advance if kept cool and properly hydrated.
Delicate blooms like hydrangeas, poppies, and sweet peas should be arranged the day of your event, preferably no more than 4 hours before. Ensure flowers are pre-conditioned by cutting stems at an angle under water, removing lower foliage, and allowing them to drink in deep water for at least 2 hours before arranging. Store completed arrangements in a cool space away from direct sunlight until you’re ready to display them.
What’s the best way to make a centerpiece look fuller without spending more on flowers?
Strategic use of greenery, filler flowers, and design techniques can create the illusion of abundance without doubling your flower budget. Use affordable greenery like eucalyptus, ruscus, or salal as the foundation and backbone of your arrangement—this takes up substantial visual space at a fraction of the cost of flowers. Add inexpensive filler flowers like baby’s breath, waxflower, or statice to create volume between your focal flowers.
Position flowers at varying depths within the arrangement rather than all at the same level to create dimensional fullness. Use the grid method by crisscrossing tape across your vase opening to help flowers stand more upright and spread out naturally rather than drooping inward, maximizing the visual impact of each stem.
Can I reuse centerpiece flowers for multiple events or rooms?
Absolutely—fresh flower centerpieces can be repurposed and enjoyed in multiple locations throughout their vase life, which for most spring flowers is 5-10 days with proper care. After an event, immediately re-cut stems at an angle, change the water completely, remove any wilted blooms or damaged foliage, and add fresh flower food.
Move the arrangement to a cool location away from direct sunlight, heating vents, and ripening fruit (which releases ethylene gas that ages flowers). You can also dismantle a large centerpiece and create several smaller arrangements for bedrooms, bathrooms, or your workspace, extending enjoyment and value.
For flowers like tulips and daffodils that continue growing after cutting, the shape will evolve—embrace this natural movement rather than fighting it.
What are the most budget-friendly spring flowers for centerpieces?
Carnations, alstroemeria, and chrysanthemums consistently offer the best value, providing large blooms and impressive vase life at lower price points than premium flowers. Seasonal spring flowers like daffodils and tulips are significantly cheaper during peak season (March-April) than off-season.
Consider purchasing flowers from grocery stores, wholesale markets like Costco, or directly from local farms rather than florists to save 50-70% on the same varieties. Foraging is free—branches like forsythia, pussy willow, and flowering fruit trees cost nothing if you have access to them, and many wildflowers can be legally gathered from your own property or public spaces (check local regulations). Single-variety arrangements look intentionally sophisticated rather than budget-conscious, allowing you to buy one type in bulk at a lower per-stem price.
How do I keep flowers fresh throughout a long event?
Proper hydration and environmental control are essential for maintaining flower freshness during extended events lasting 4+ hours. Use flower food in all arrangements—it provides nutrients and antibacterial agents that dramatically extend freshness. Keep arrangements in air-conditioned spaces and away from direct sunlight, heating vents, or kitchen heat until the last possible moment before guests arrive.
For outdoor events, place arrangements in shaded areas and consider using water tubes or floral foam that’s been thoroughly soaked to keep stems hydrated. Mist delicate flowers lightly every 1-2 hours during setup but not once guests arrive. For very long events (6+ hours), have backup flowers in water nearby that you can quickly swap in if focal blooms begin to wilt. Choose resilient varieties like roses, carnations, and orchids rather than delicate options like hydrangeas or sweet peas for lengthy events.
Final Thoughts: Bringing Spring’s Beauty to Your Table
Creating a memorable spring centerpiece isn’t about following rigid rules or achieving perfection—it’s about capturing the season’s spirit of renewal and bringing that fresh energy into your home. Start with what you have: a favorite vase, flowers from your garden, or even interesting branches from your yard, and build from there with confidence rather than comparison.
These centerpieces do more than simply look beautiful; they create atmosphere, spark conversation, and mark the moments that become cherished memories. Whether it’s a casual family dinner or a celebration with friends, the care you invest in creating a thoughtful table display communicates warmth and welcome to everyone who gathers around it.
Trust your instincts and embrace experimentation—the best centerpieces often happen when you let go of perfection and allow spring’s natural beauty to guide you. Mix the ideas that resonate with you, adapt them to your space and style, and remember that even professional designers started with simple arrangements and grew their skills through practice and play.
Your Next Step: Choose one idea from this list that genuinely excites you and gather the basic materials this week. Don’t wait for a special occasion—your everyday meals deserve beauty too, and practicing now means you’ll be confident and skilled when that important celebration arrives.
Remember: Spring’s beauty is fleeting, which makes it precious. Your centerpiece doesn’t need to last forever; it just needs to capture this moment, this season, this gathering of people you care about. That’s more than enough.